Posts
My thoughts and ideas
Welcome to the blog
My thoughts and ideas
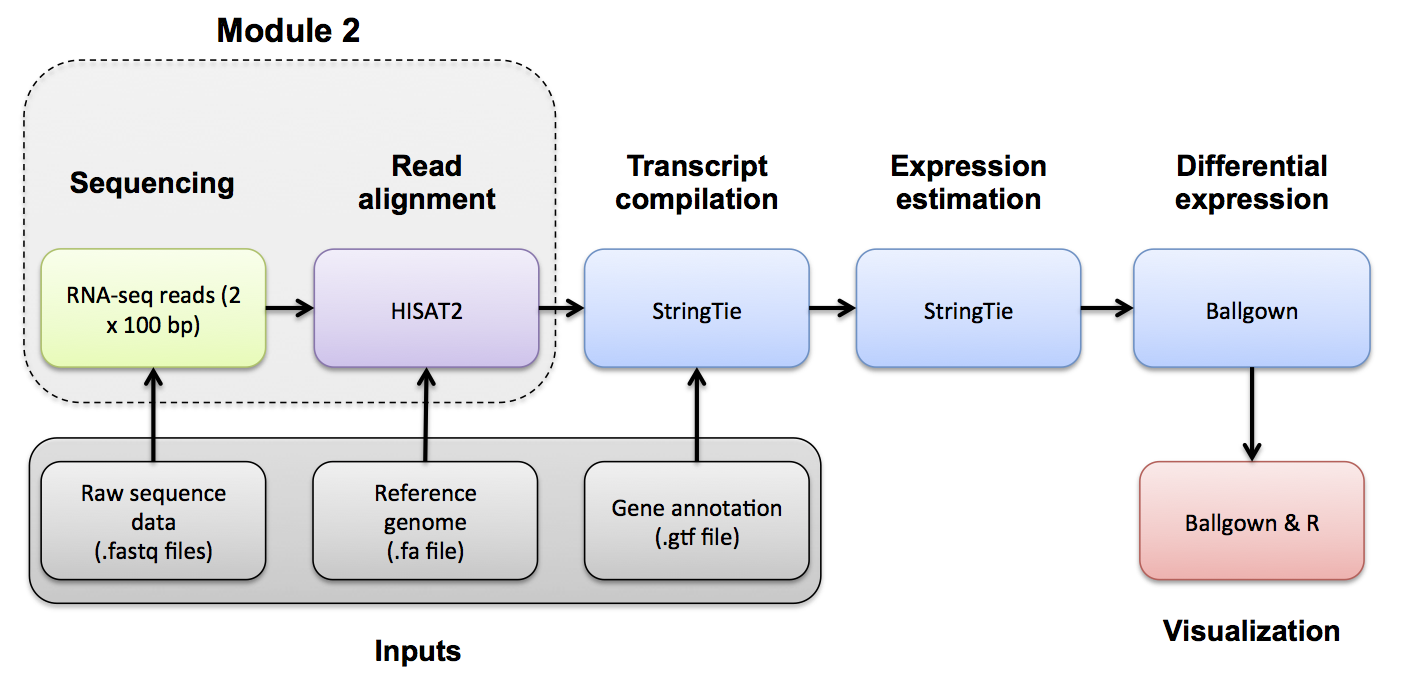
Introduction to bioinformatics for RNA sequence analysis
In this section we will demonstrate how to assess expression of specific variant alleles in the RNA-seq BAM using tools designed to interrogate read alignments and sequence base identities at particular positions.
Using one of the variant positions identified above, count the number of supporting reference and variant reads. First, use samtools mpileup to visualize a region of alignment with a variant.
cd $RNA_HOME
mkdir bam_readcount
cd bam_readcount
Create faidx indexed reference sequence file for use with mpileup
echo $RNA_REF_FASTA
samtools faidx $RNA_REF_FASTA
Run samtools mpileup on a region of interest
samtools mpileup -f $RNA_REF_FASTA -r 22:18918457-18918467 $RNA_ALIGN_DIR/UHR.bam $RNA_ALIGN_DIR/HBR.bam
Each line consists of chromosome, 1-based coordinate, reference base, the number of reads covering the site, read bases and base qualities. At the read base column, a dot stands for a match to the reference base on the forward strand, a comma for a match on the reverse strand, ACGTN for a mismatch on the forward strand and acgtn for a mismatch on the reverse strand. A pattern \+[0-9]+[ACGTNacgtn]+ indicates there is an insertion between this reference position and the next reference position. The length of the insertion is given by the integer in the pattern, followed by the inserted sequence. See samtools pileup/mpileup documentation for more explanation of the output:
Now, use bam-readcount to count reference and variant bases at a specific position. First, create a bed file with some positions of interest (we will create a file called snvs.bed using the echo command).
It will contain a single line specifying a variant position on chr22 e.g.:
22:38483683-38483683
Create the bed file
echo "22 38483683 38483683"
echo "22 38483683 38483683" > snvs.bed
Run bam-readcount on this list for the tumor and normal merged bam files
bam-readcount -l snvs.bed -f $RNA_REF_FASTA $RNA_ALIGN_DIR/UHR.bam 2>/dev/null
bam-readcount -l snvs.bed -f $RNA_REF_FASTA $RNA_ALIGN_DIR/HBR.bam 2>/dev/null
Now, run it again, but ignore stderr and redirect stdout to a file:
bam-readcount -l snvs.bed -f $RNA_REF_FASTA $RNA_ALIGN_DIR/UHR.bam 2>/dev/null 1>UHR_bam-readcounts.txt
bam-readcount -l snvs.bed -f $RNA_REF_FASTA $RNA_ALIGN_DIR/HBR.bam 2>/dev/null 1>HBR_bam-readcounts.txt
From this output you could parse the read counts for each base
cat UHR_bam-readcounts.txt | perl -ne '@data=split("\t", $_); @Adata=split(":", $data[5]); @Cdata=split(":", $data[6]); @Gdata=split(":", $data[7]); @Tdata=split(":", $data[8]); print "UHR Counts\t$data[0]\t$data[1]\tA: $Adata[1]\tC: $Cdata[1]\tT: $Tdata[1]\tG: $Gdata[1]\n";'
cat HBR_bam-readcounts.txt | perl -ne '@data=split("\t", $_); @Adata=split(":", $data[5]); @Cdata=split(":", $data[6]); @Gdata=split(":", $data[7]); @Tdata=split(":", $data[8]); print "HBR Counts\t$data[0]\t$data[1]\tA: $Adata[1]\tC: $Cdata[1]\tT: $Tdata[1]\tG: $Gdata[1]\n";'
If reading perl code isn’t your favorite thing to do, here’s a bam-readcount tutorial that uses python to parse output from bam-readcount to identify a Omicron SARS-CoV-2 variant of concern from raw sequence data.
Assignment: Index your bam files from Practical Exercise 6 and visualize in IGV.
Questions
Solution: When you are ready you can check your approach against the Solutions.