Introduction to AWS
Preamble
Cloud computing allows users to quickly access an arbitrary amount of compute resources from a distance without the need to buy or maintain hardware themselves. There are many cloud computing services. This tutorial describes the use of the Amazon Web Services (AWS) elastic compute (EC2) resource. However, the fundamental concepts covered here will generally apply to other cloud computing services such as Google Cloud, Digital Ocean, Microsoft Azure, etc., though with substantial differences in jargon used by each provider.
Table of Contents
- Acknowledgements
- Glossary and abbreviations
- What do I need to perform this tutorial
- What is a Region?
- How much does it cost to use AWS EC2 resources?
- Necessary steps for launching an instance
- Step 1. Choosing an AMI
- Step 2. Choosing an instance type
- Step 3. Configuring instance details
- Step 4. Adding storage
- Step 5. Tagging the instance
- Step 6. Configuring a security group
- Step 7. Reviewing the instance before launch
- Step 8. Assigning a key pair
- Step 9. Reviewing launch status
- Step 10. Examining a new instance in the ec2 console
- Step 11. Logging into an instance
- Trouble-shooting and advanced topics
- Can not login to EC2 instance - what might have gone wrong?
- How do storage volumes appear within a linux instance on amazon EC2?
- Taking stock of compute resources within an ubuntu linux instance
- Basic setup and administration of an ubuntu linux instance
- Setting up an Apache web server
- What is difference between the start, stop, reboot and terminate instance states?
- How do I create my own AMI, publish as a Community AMI, and what is a snapshot?
- Tidying up and shutting down AWS resources
- Further reading and preparing for more advanced AWS cloud computing concepts
Acknowledgements
Creation of this tutorial on Amazon AWS EC2 was generously supported by Amazon AWS Education grants.
Glossary and abbreviations
- AWS - Amazon Web Services. A collection of cloud computing services provided by Amazon.
- EC2 - Elastic Compute Cloud. An AWS service that provides ‘resizable cloud hosting services’. This service allows you to configure and rent computers on an as-needed basis.
- EBS - Elastic Block Storage. A data storage solution offered through the EC2 service. This service allows you to rent disk storage and associate that storage with your compute resources. EBS volumes are generally backed by SSD devices. EBS volumes can only be directly attached to a single EC2 instance at a time.
- AMI - Amazon Machine Image. A supported and maintained image provided by AWS that provides the information required to launch an EC2 instance. Each AMI typically includes an EBS-backed snapshot with an operating system pre-configured, launch permissions, and a mapping to specify which volumes (storage) to attach when launched.
- S3 - Simple storage service. A storage service that is cheaper than EBS and allows for storage of larger amounts of data with some drawbacks compared to EBS. S3 volumes store data as objects that are accessed by an API or command line interface or other application designed to work with S3. EBS volumes on the other hand can be mounted as if they were a local disk drive associated with the Instance..
- SSD - Solid state drive. A particular type of storage hardware that is generally faster and more expensive than traditional hard drives.
- HDD - Hard disk drive. A particular type of storage hardware that is generally cheaper and larger but slower than SSD. HDD drives are traditional hard drives that access data on a spinning magnetic disk.
- Ephemeral storage - Also known as Instance Store storage. Data storage associated with an EC2 instance that is local to the host computer. This storage does not persist when the instance is stopped or terminated. In other words, anything you store in this way will be lost if the system is stopped or terminated. Instance store volumes may be backed by SSD or HDD devices.
What do I need to perform this tutorial?
To complete this tutorial, you will need a computer with access to the internet, a Web Browser, and a command line terminal application (e.g. Terminal on a Mac, putty on Windows, etc.). We are going to access the Amazon EC2 console in your web browser and use it to configure and rent a remote computer from Amazon. We are then going to log into that computer from the command line using a terminal application. The computer you are working on can be almost anything and could be running Windows, Mac OSX, or Linux. The computer that we configure and rent from Amazon will be a Linux machine (though there are many other possibilities). You will use the terminal application on your computer to remotely log into this computer. The Amazon AWS computer you rent will be physically located somewhere that is likely far away from you. Depending on the Region you select in Amazon AWS it could be physically located in one of several large compute warehouses in the North America, South America, Europe or Asia.
Amazon AWS Data Center, Ashburn, Virginia (source):

By Vahurzpu - Own work, CC BY-SA 4.0
There are two types of knowledge you will be exposed to in this tutorial. First, use of the Amazon AWS EC2 web console. AWS documentation has a lot of jargon and technical concepts. Becoming proficient in AWS EC2 usage is akin to becoming a very particular type of system administrator. Everything we will do below in a web browser using the EC2 console can also be accomplished at the command line using the Amazon EC2 API tools. That is a subject for a more advanced tutorial.
Second, since we are going to create an Amazon instance that is running a Linux operating system you will need to learn the basics of working at a Linux command line. You will also need to become familiar with basic fundamentals of Linux system administration. Refer to the Resources section for a list of reference materials to help you learn the basics of Linux/Unix
Creating an account
In order to use AWS for the first time, you will need to create an account. In order to create and run instances as described in this tutorial, you will need to associate a credit card with that account for billing purposes. Refer to the sections below on how billing works, how to estimate costs, and how to ensure that you have properly shut down everything that you could be billed for. To run this tutorial as it is described should cost at most a few dollars.
Logging into the AWS console
To log into AWS, go to aws.amazon.com and hit the Sign In to the Console button as shown below. If needed, create an account and activate it by associating a credit card. Once you are logged in, select EC2 from the list of Amazon Web Services. This tutorial is entirely focused on EC2 (with some mention of S3) so the EC2 console will be the starting point for many of the activities described below.
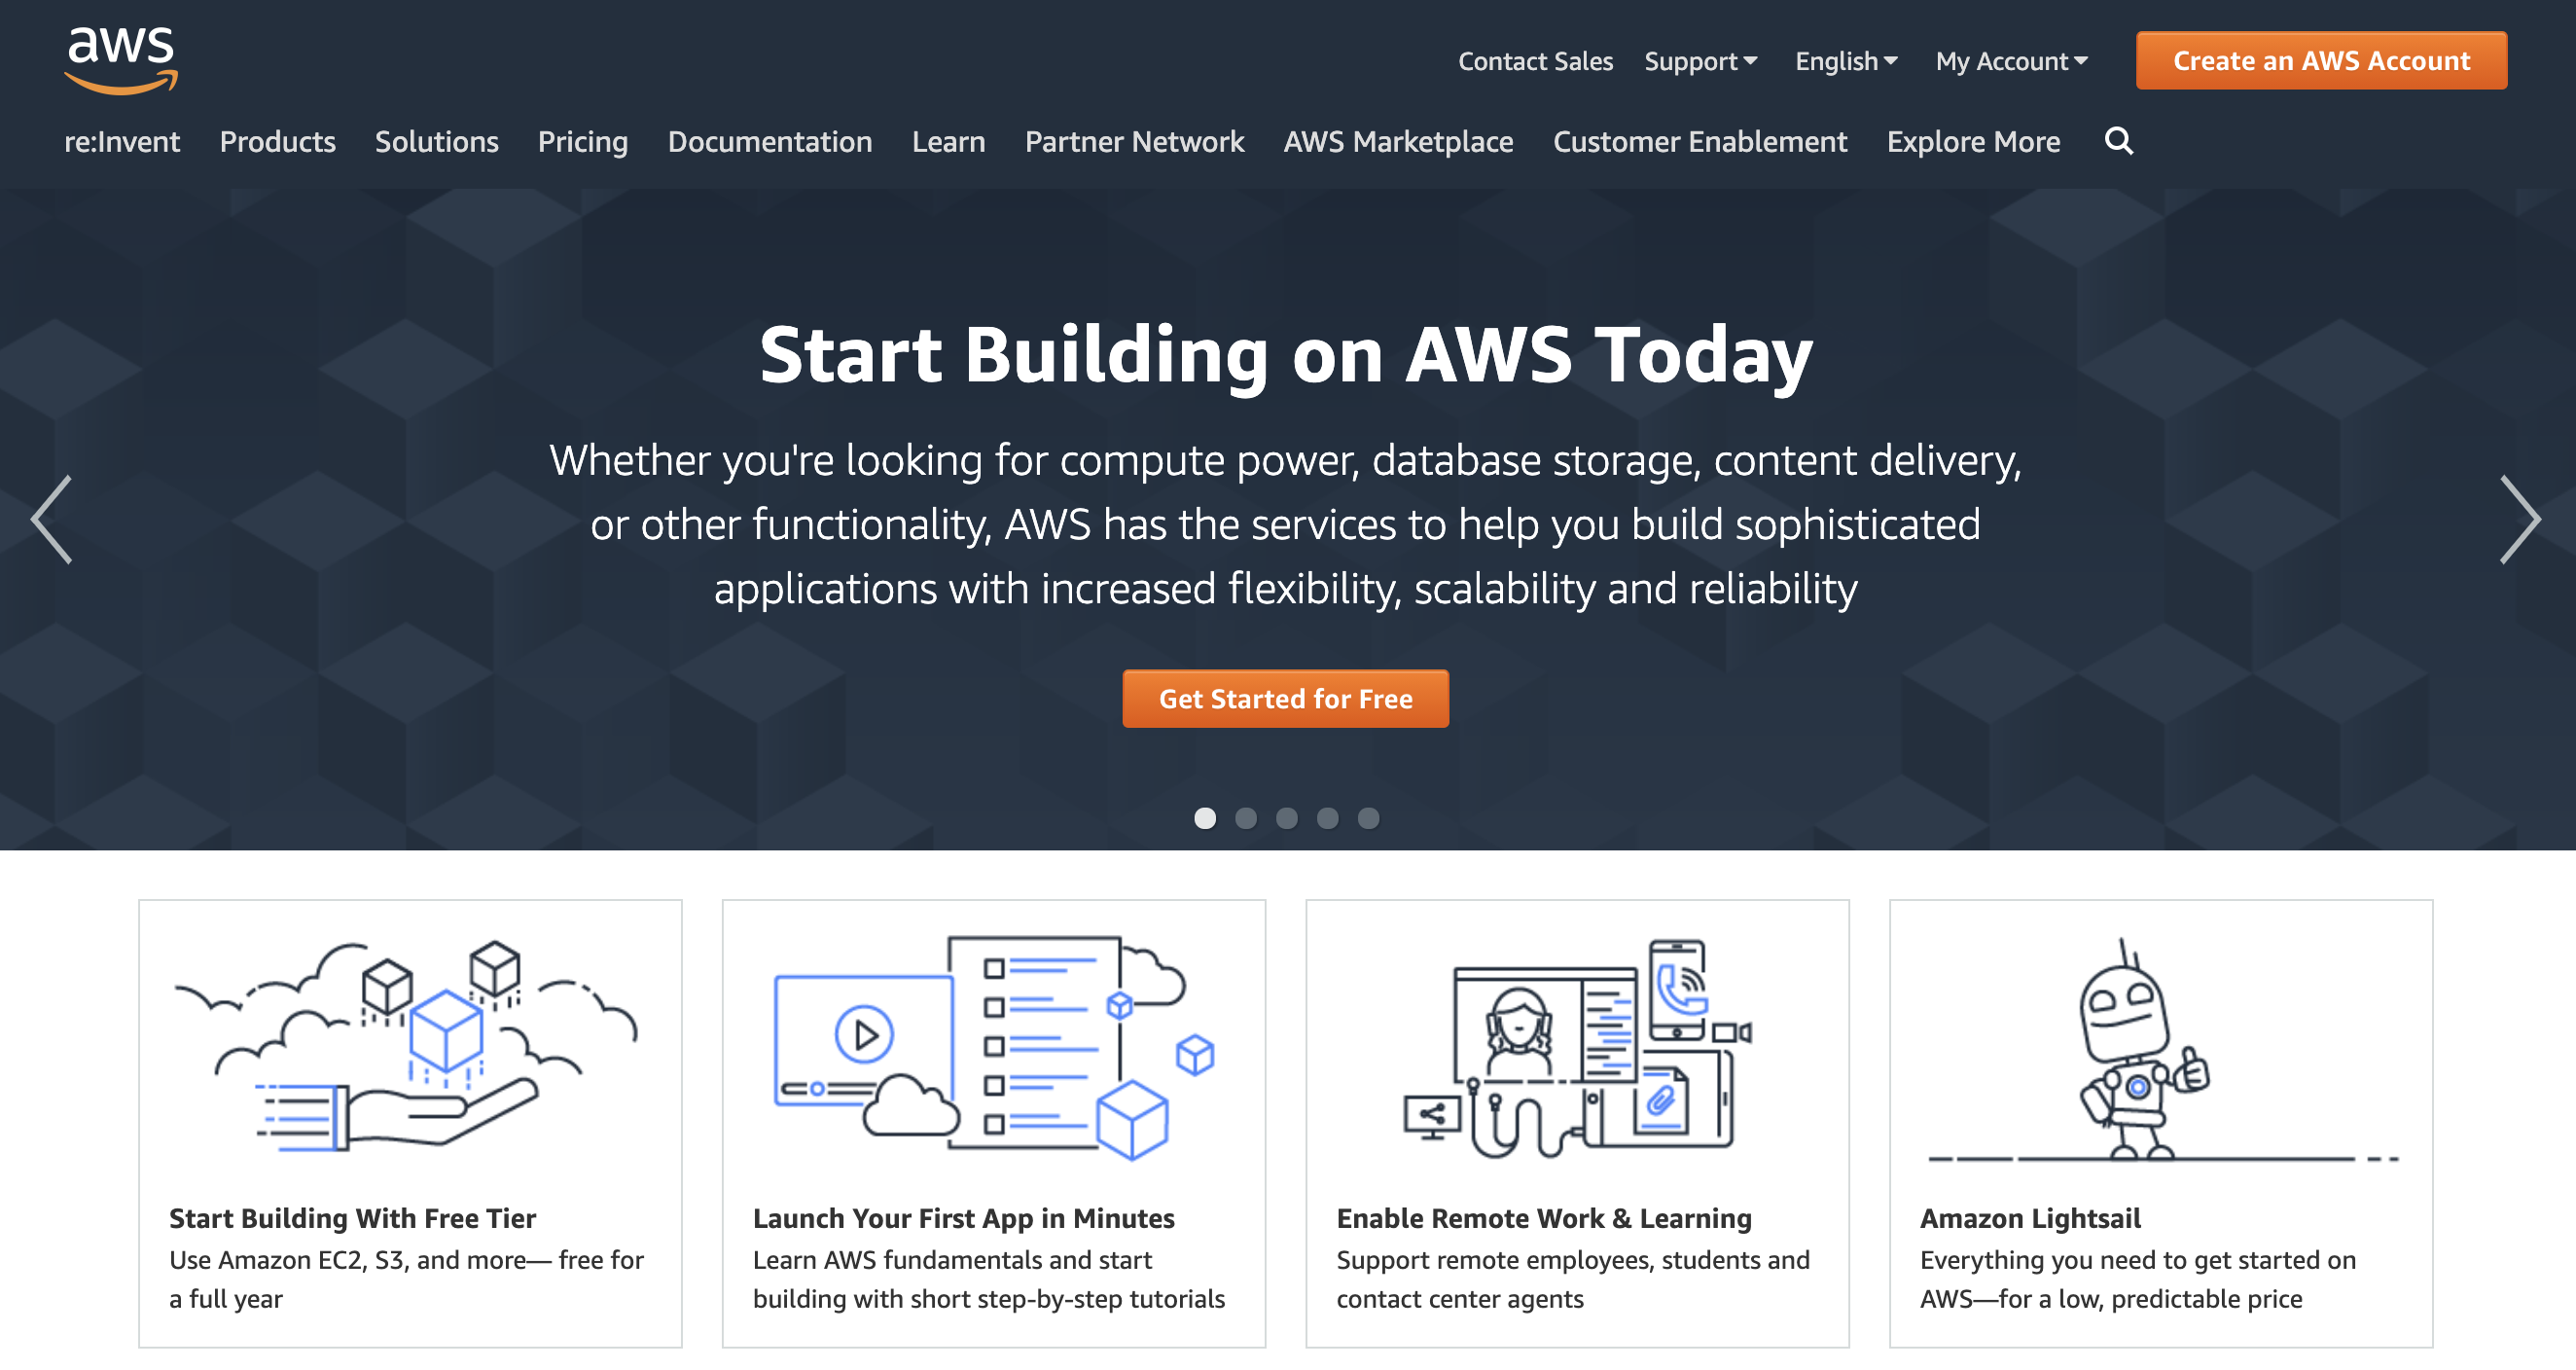
AWS home:
AWS log in:

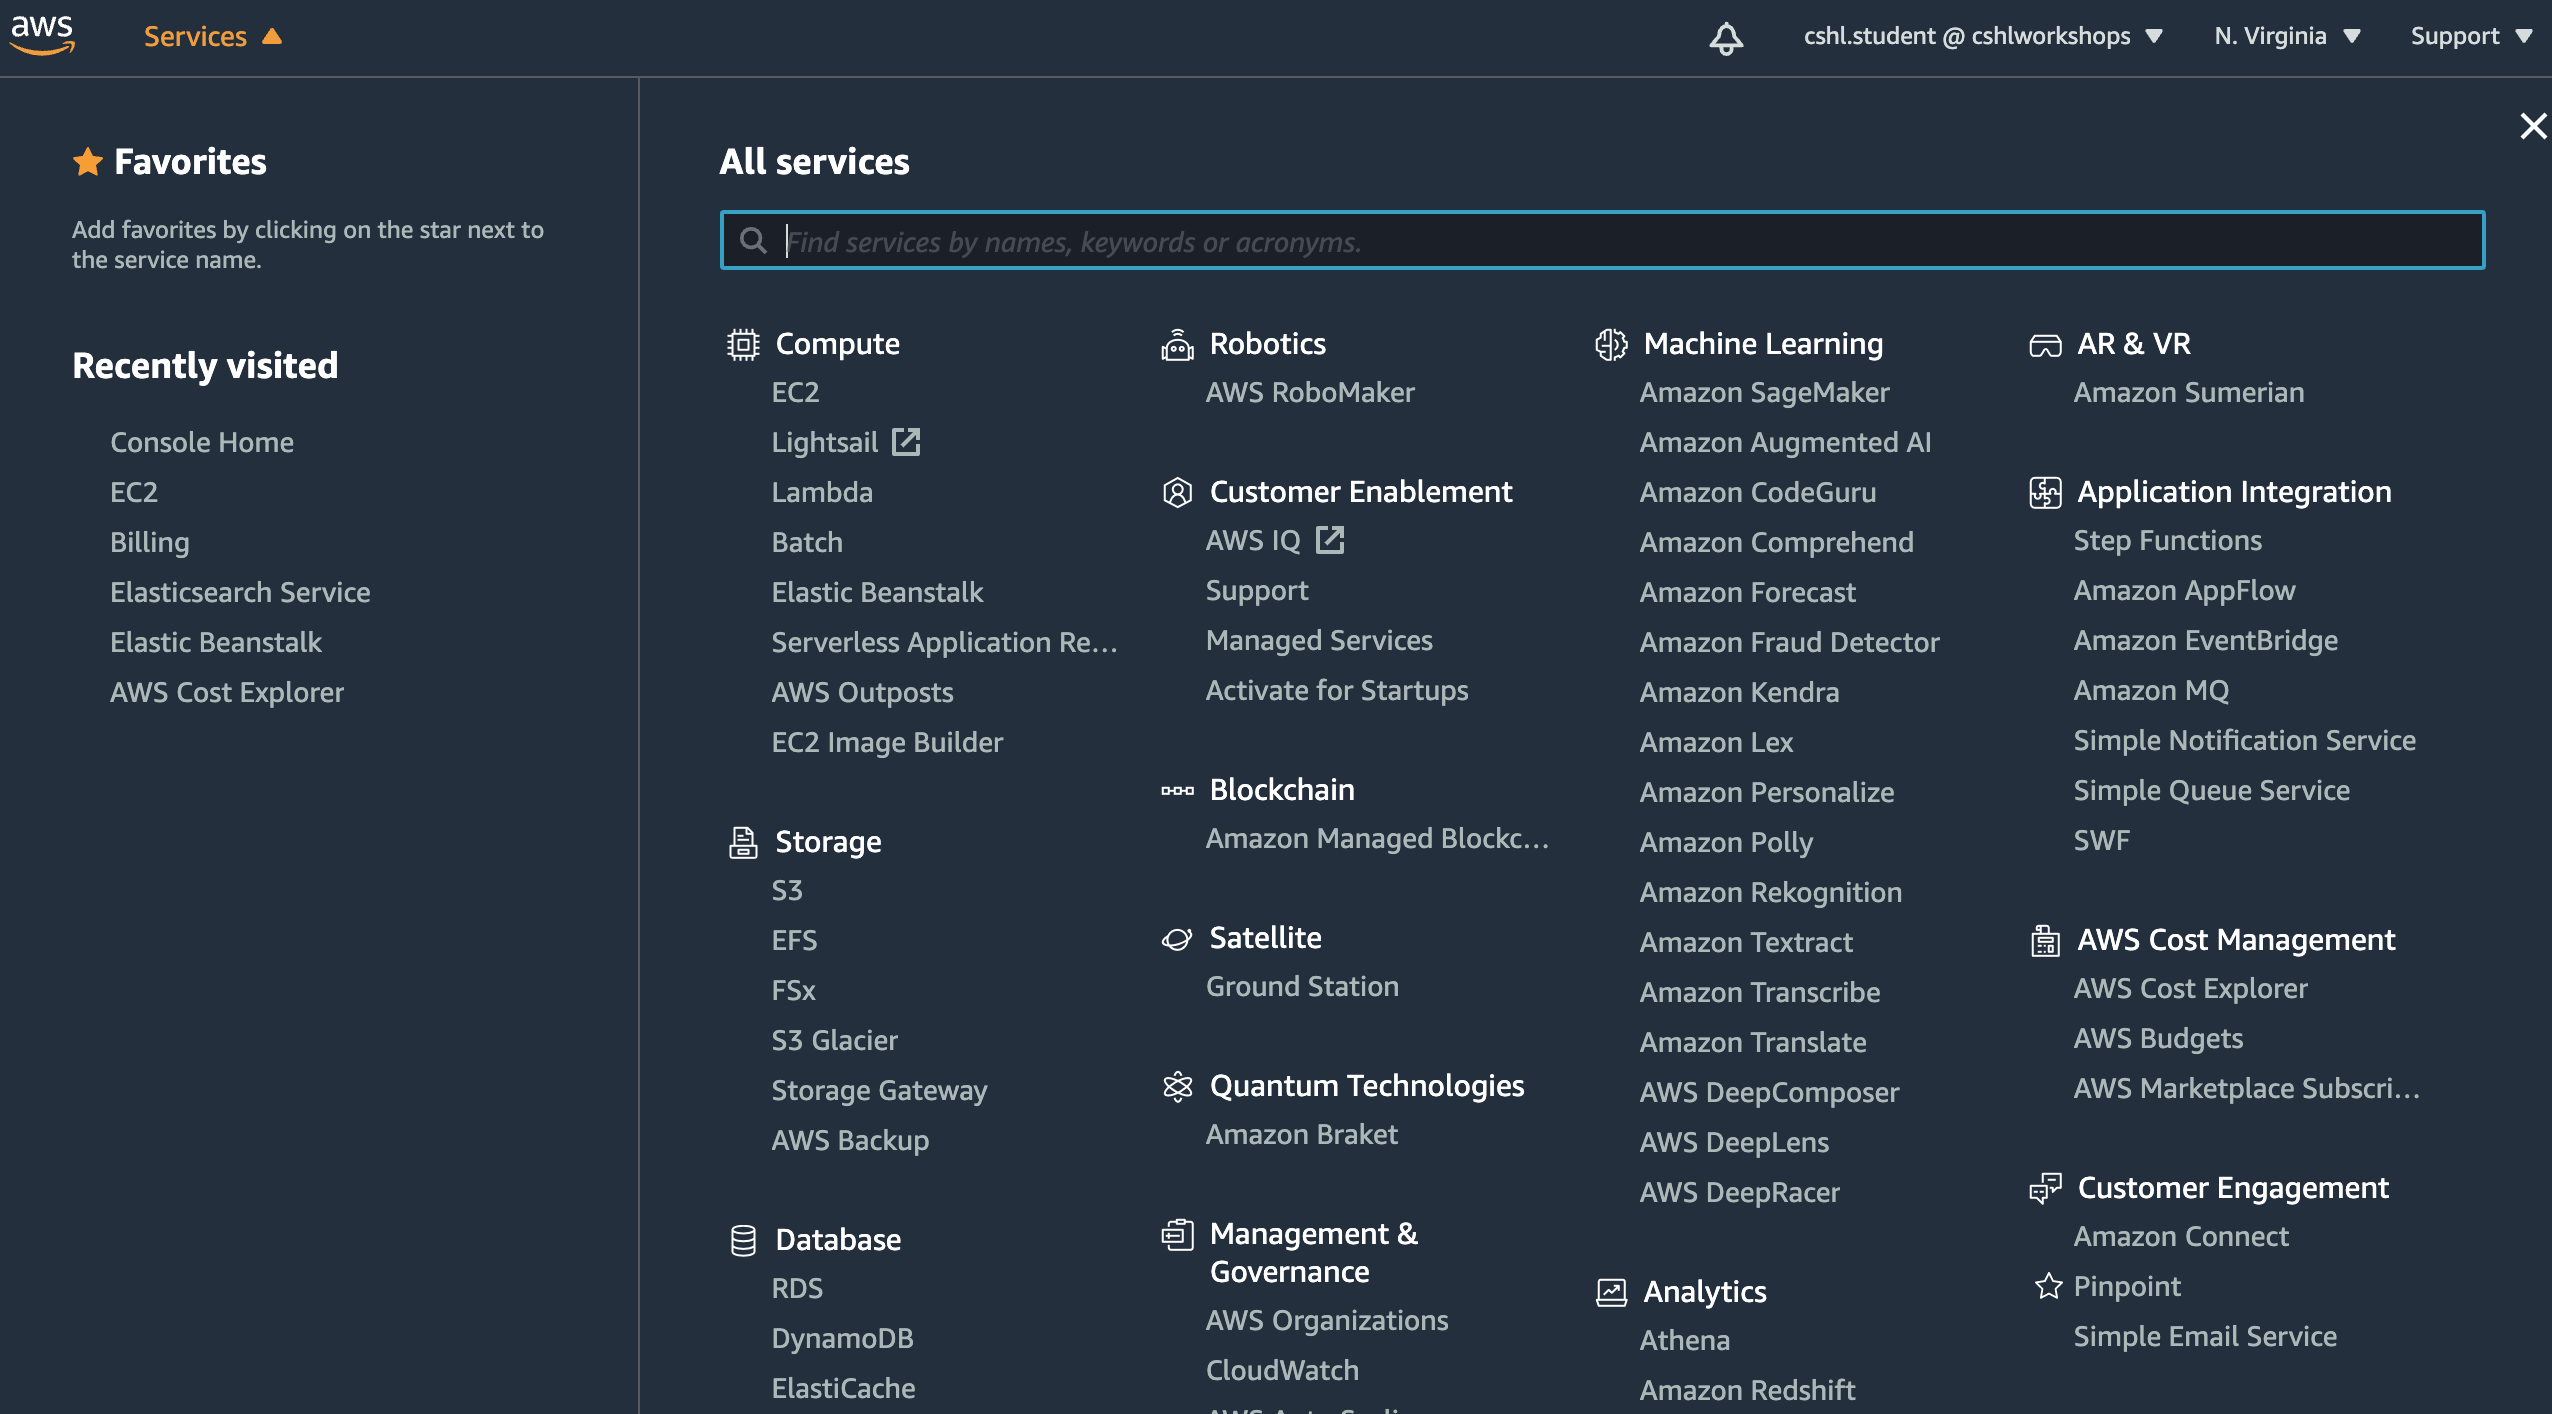
List of AWS services (select EC2 for this tutorial):
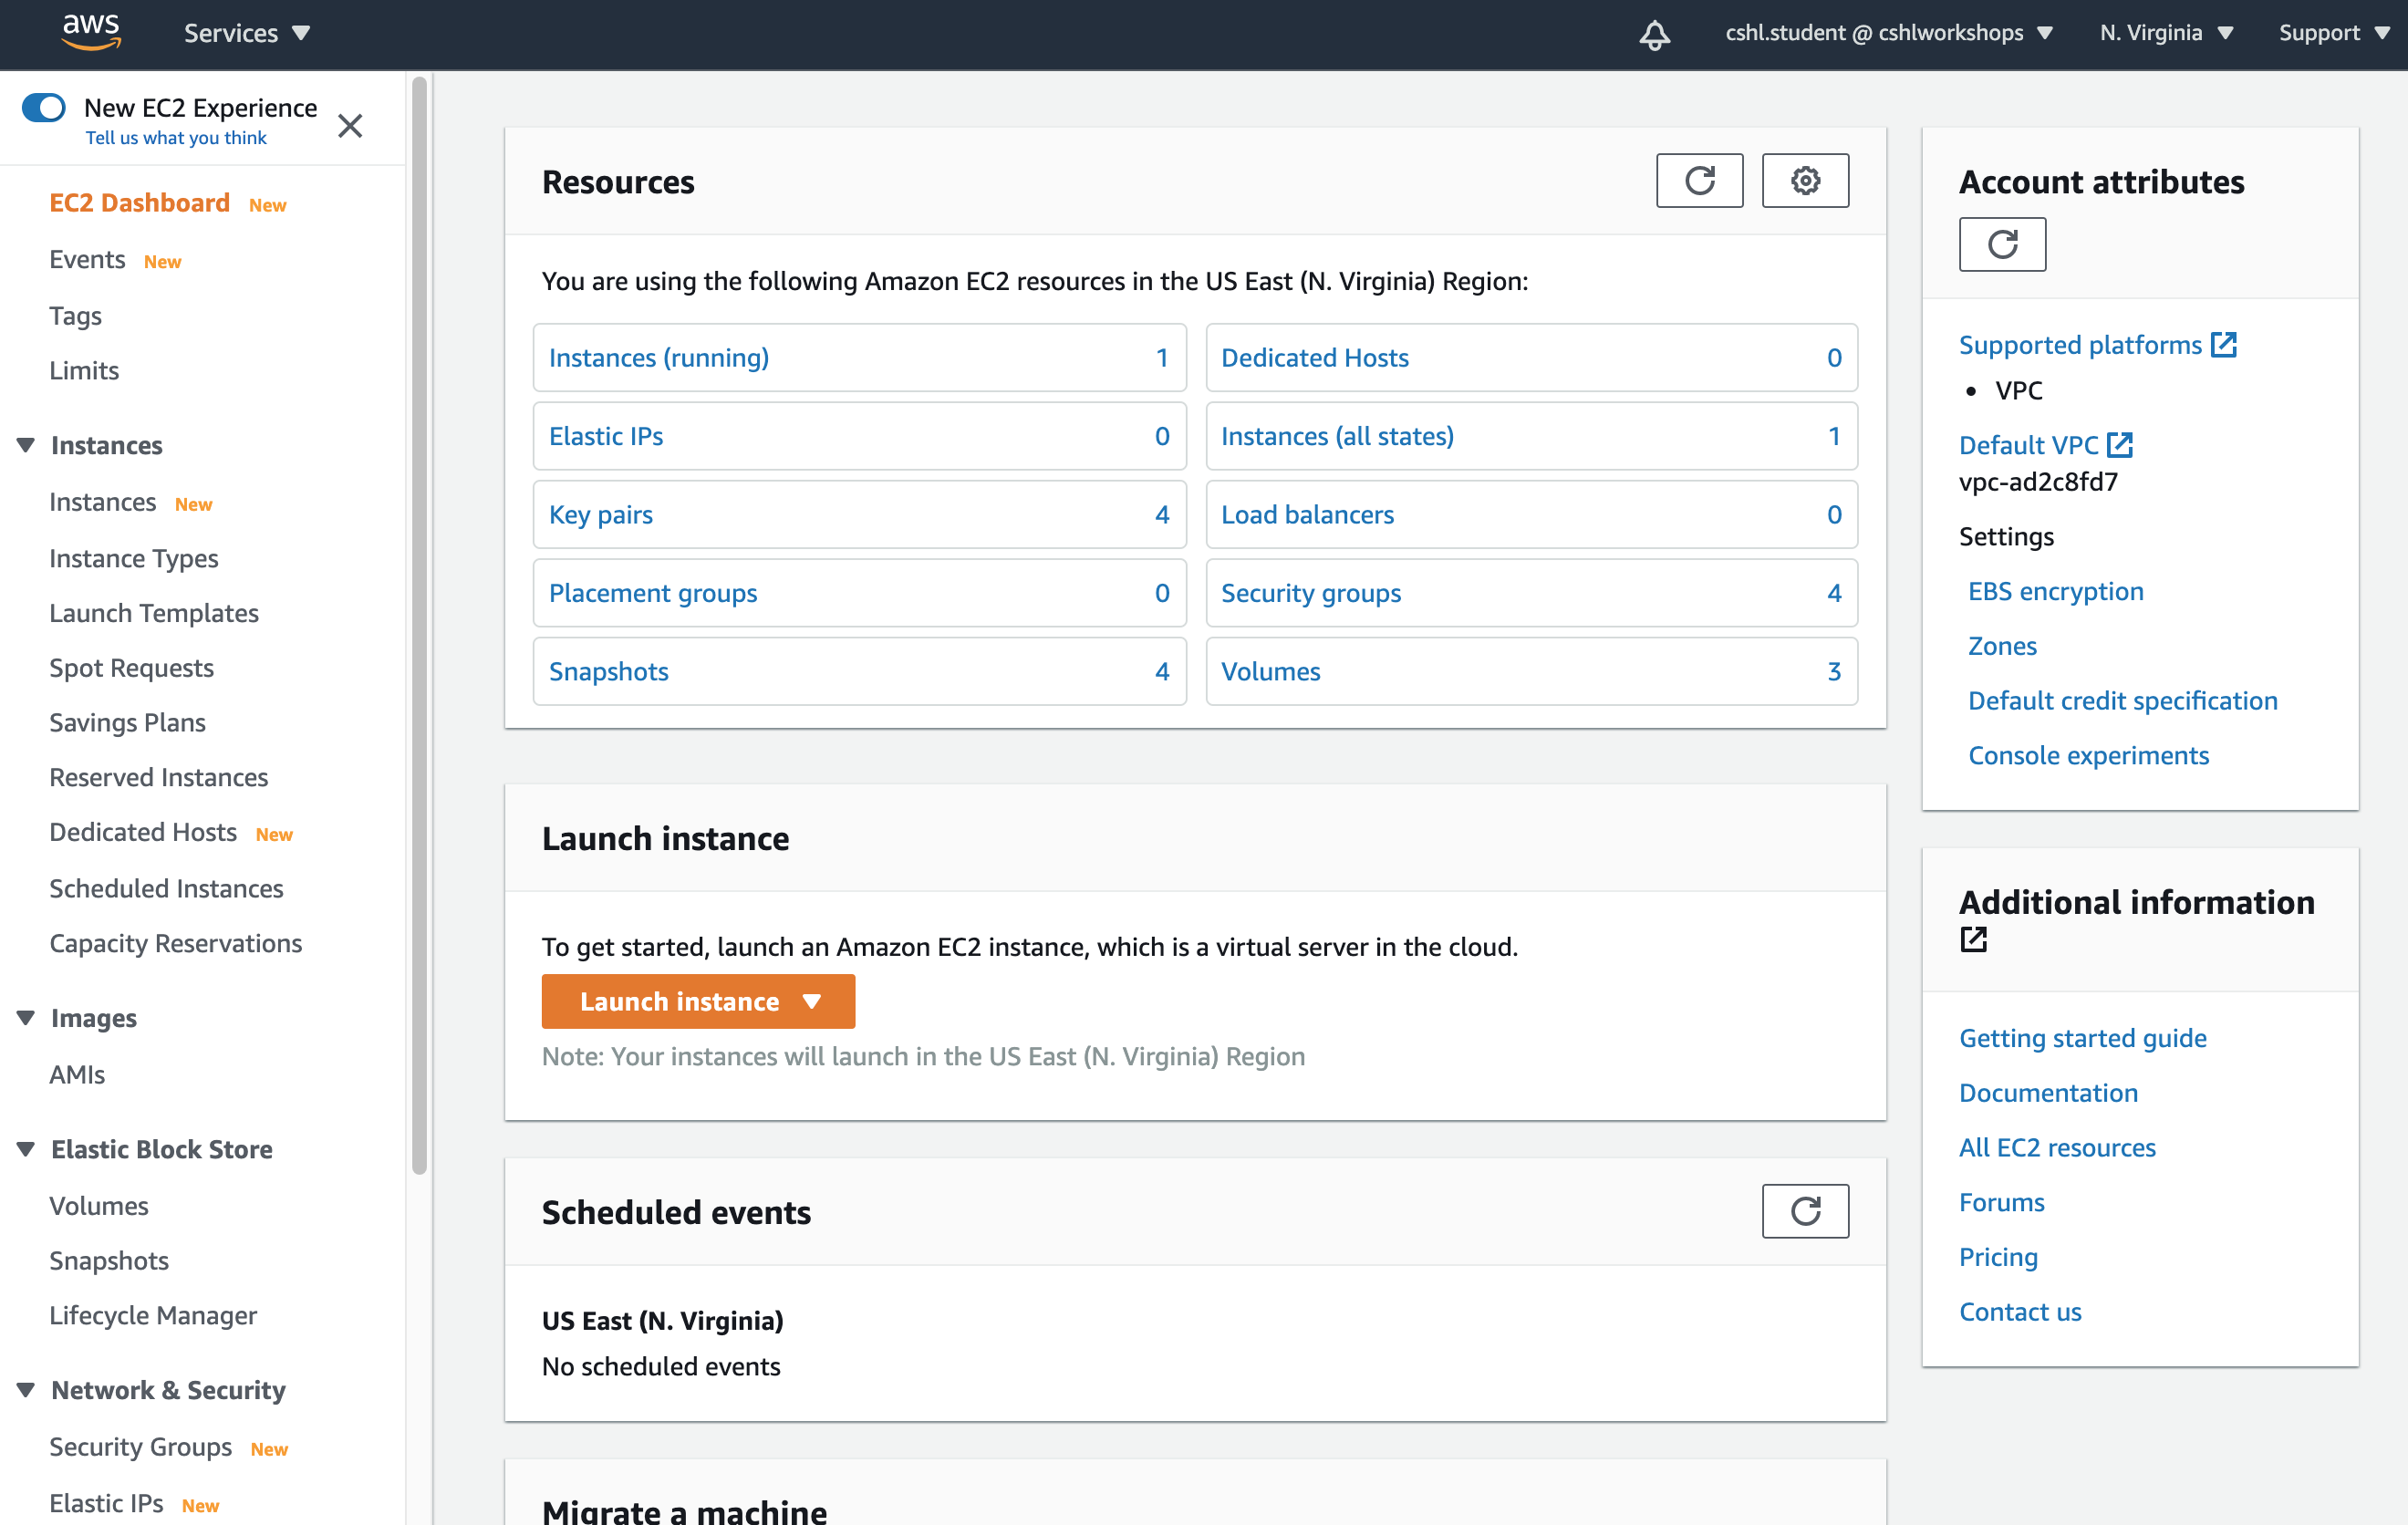
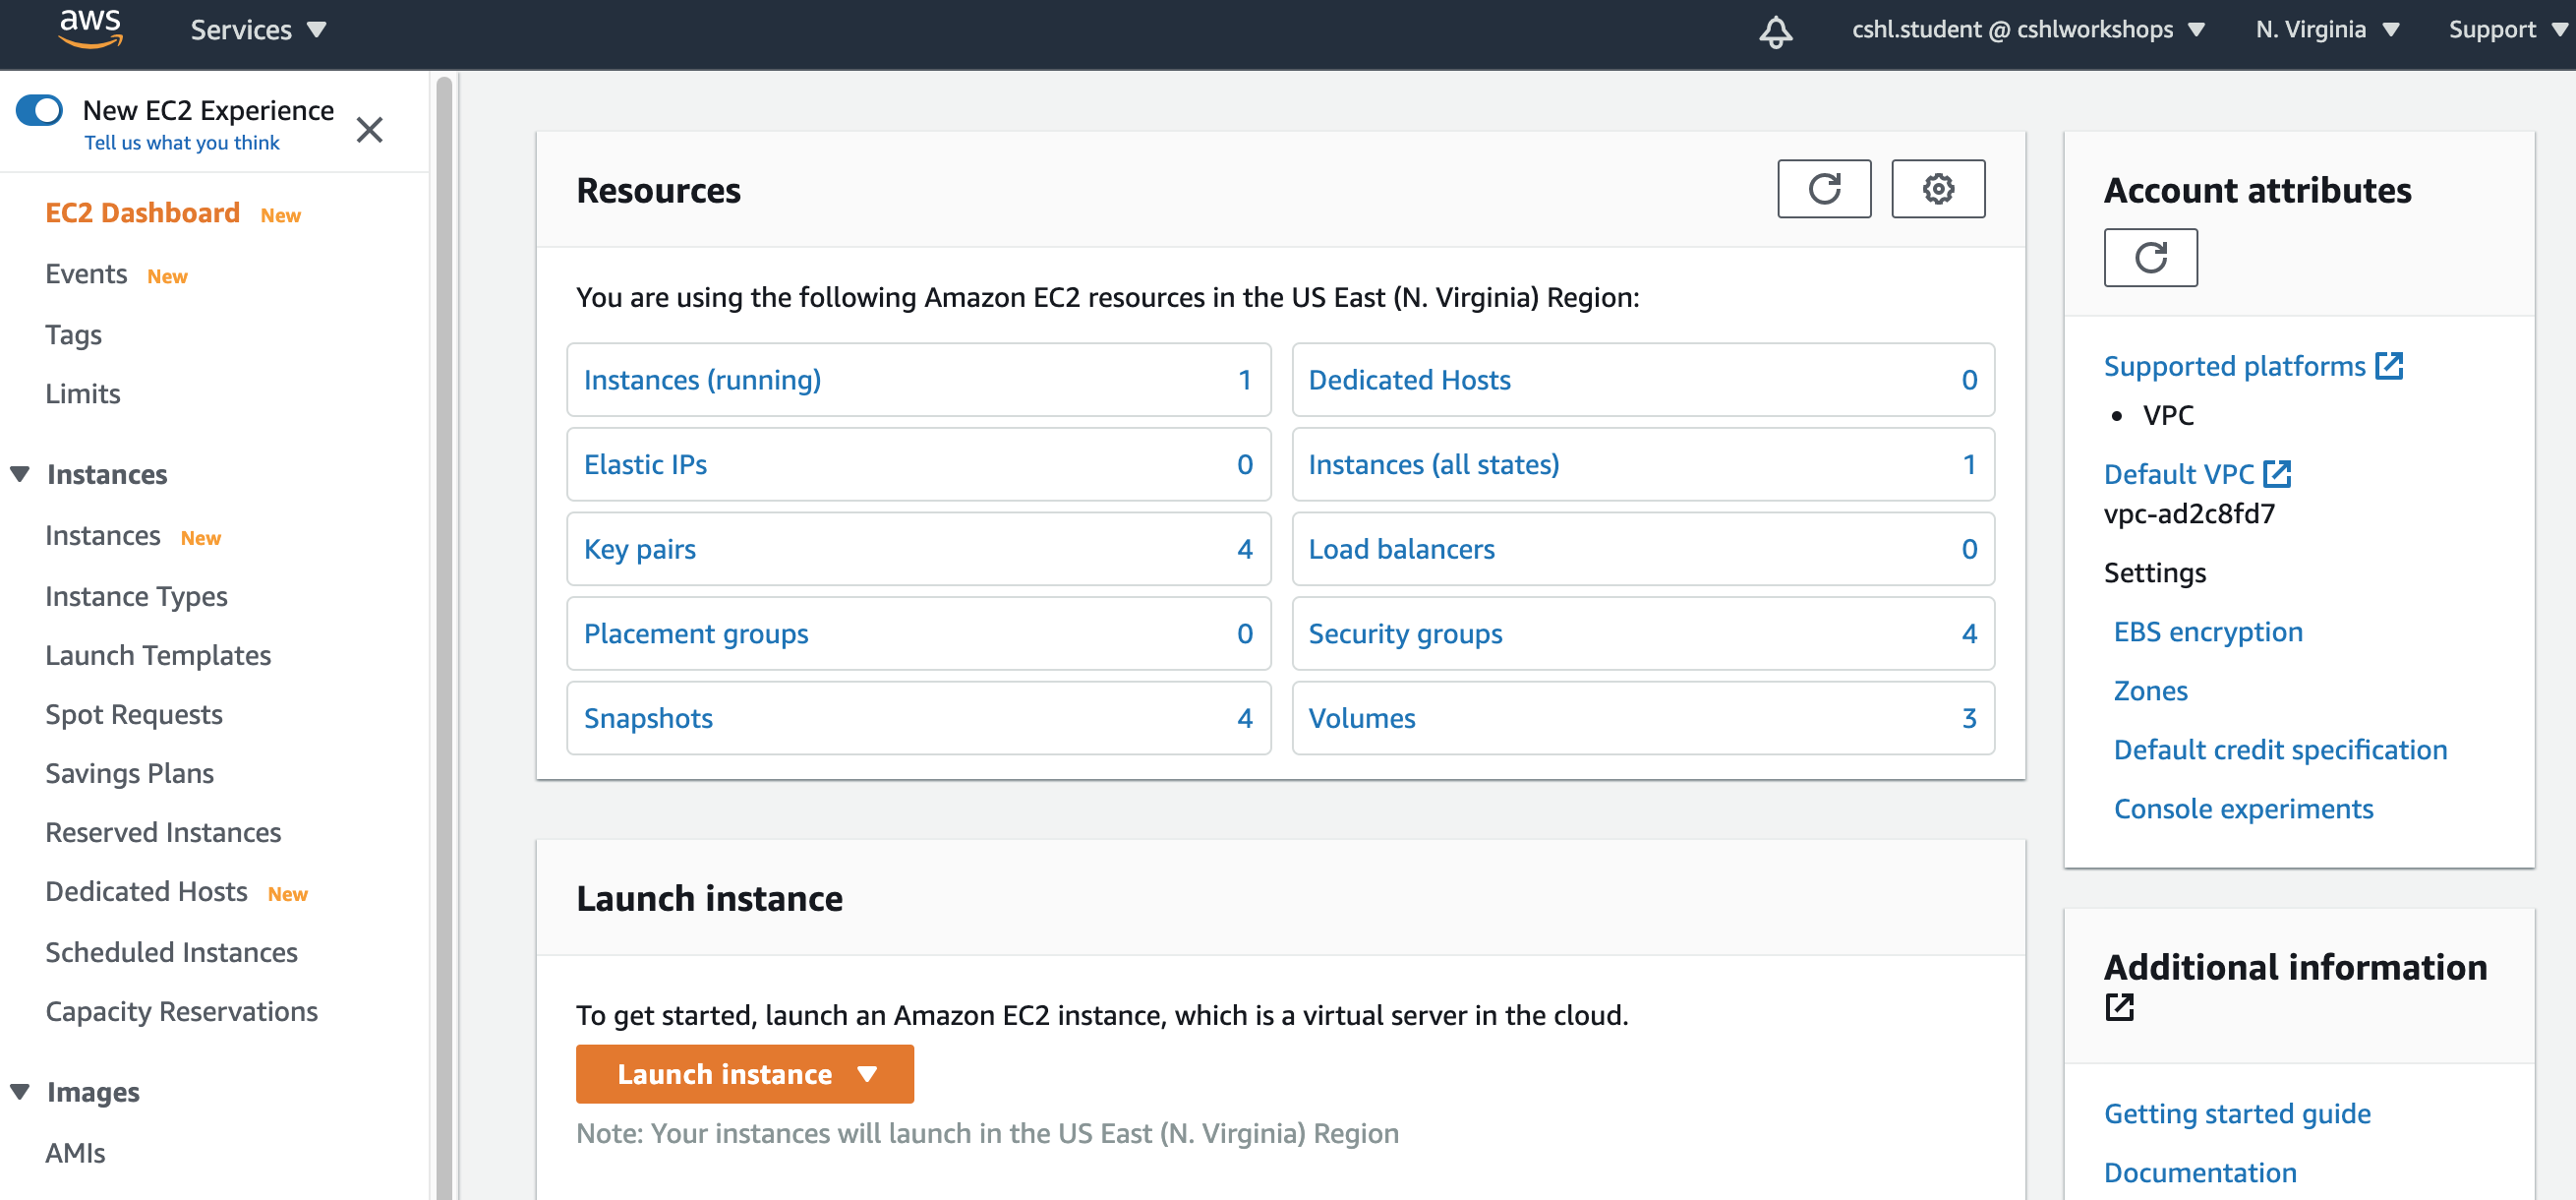
The AWS EC2 dashboard:
What is a Region?
An AWS Region is set of compute resources that Amazon maintains (each like the Data Center image shown above). Each Region corresponds to a physical warehouse of compute hardware (computers, storage, networking, etc.). At the time of writing there are 8 regions: (US East (N.Virginia), US West (Oregon), US West (N. California), EU (Ireland), EU (Frankfurt), Asia Pacific (Singapore), Asia Pacific (Tokyo), Asia Pacific (Sydney), and South America (Sao Paulo). When you are logged into the AWS EC2 console you are always operating in one of these 8 regions. The current region is shown in the upper right corner of the console between the User menu and Support menu. It is important to pay attention to what region you are using for several reasons. First, when you launch an EC2 instance, this happens in a specific region. If you switch regions later, you will not see this instance. To find info in the console you will have to switch back to the region where that instance was created. The same reasoning applies for EBS volumes, AMIs, and other resources. These are tracked within a region. Second, the cost to use many AWS resources varies by region. Third, since each region is located in a different part of the world, this may influence network performance when you are accessing the instance and especially if you need to transfer large amounts of data in or out. For example, if you are working in the US and you are going to be uploading RNA-seq data to EC2 instances, it probably does not make sense to create those instances in Asia Pacific (Sydney). Generally you should choose a region that is close to you or your users. But cost is also a consideration. It is important to be aware of regions when it comes to billing because if you are using resources in multiple regions it is easy to lose track of what you have running and you might wind up paying for something that you forgot to shut down. We will discuss billing and cost in further detail below.
How much does it cost to use AWS EC2 resources?
Estimating the cost to use AWS resources can get complicated. For the most part when you launch an EC2 instance or create an EBS or S3 volume, you are renting and reserving that resource. You will generally be charged for as long as you reserve that resource regardless of how you use it. For example, if you rent an 8-core machine with 1Tb of disk, and 64Gb of RAM, once you start that machine you will be charged an hourly rate for as long as it is running. Even if you do not use it much. Even if you do not log into it at all! You have reserved it, it is being run for you, that resource can not be rented to someone else, so you must pay for it. To get a sense of how much a particular resource costs, spend some time examining the AWS EC2 Pricing list. Remember that Region can influence cost, so once you decide on the type of resources you need you should compare the cost of that resource across multiple regions. The pricing list is an extremely long page, broken down into several major categories: Free Tier (light weight resources you can experiment with for free), On-Demand Instances (rent by the hour, as we do in this tutorial), Reserved Instances (get a discount by renting longer term), Reserved Instance Volume Discounts (get further discounts by being an enterprise scale user), Spot Instances (bid for unused Amazon EC2 capacity in an open market), Data transfer (moving data in and out of EC2), EBS-Optimized Instances (for high performance file I/O), Amazon Elastic Block Store (rent storage volumes separately from Instances), etc. Amazon provides a Monthly Calculator to help you predict what your costs might look like.
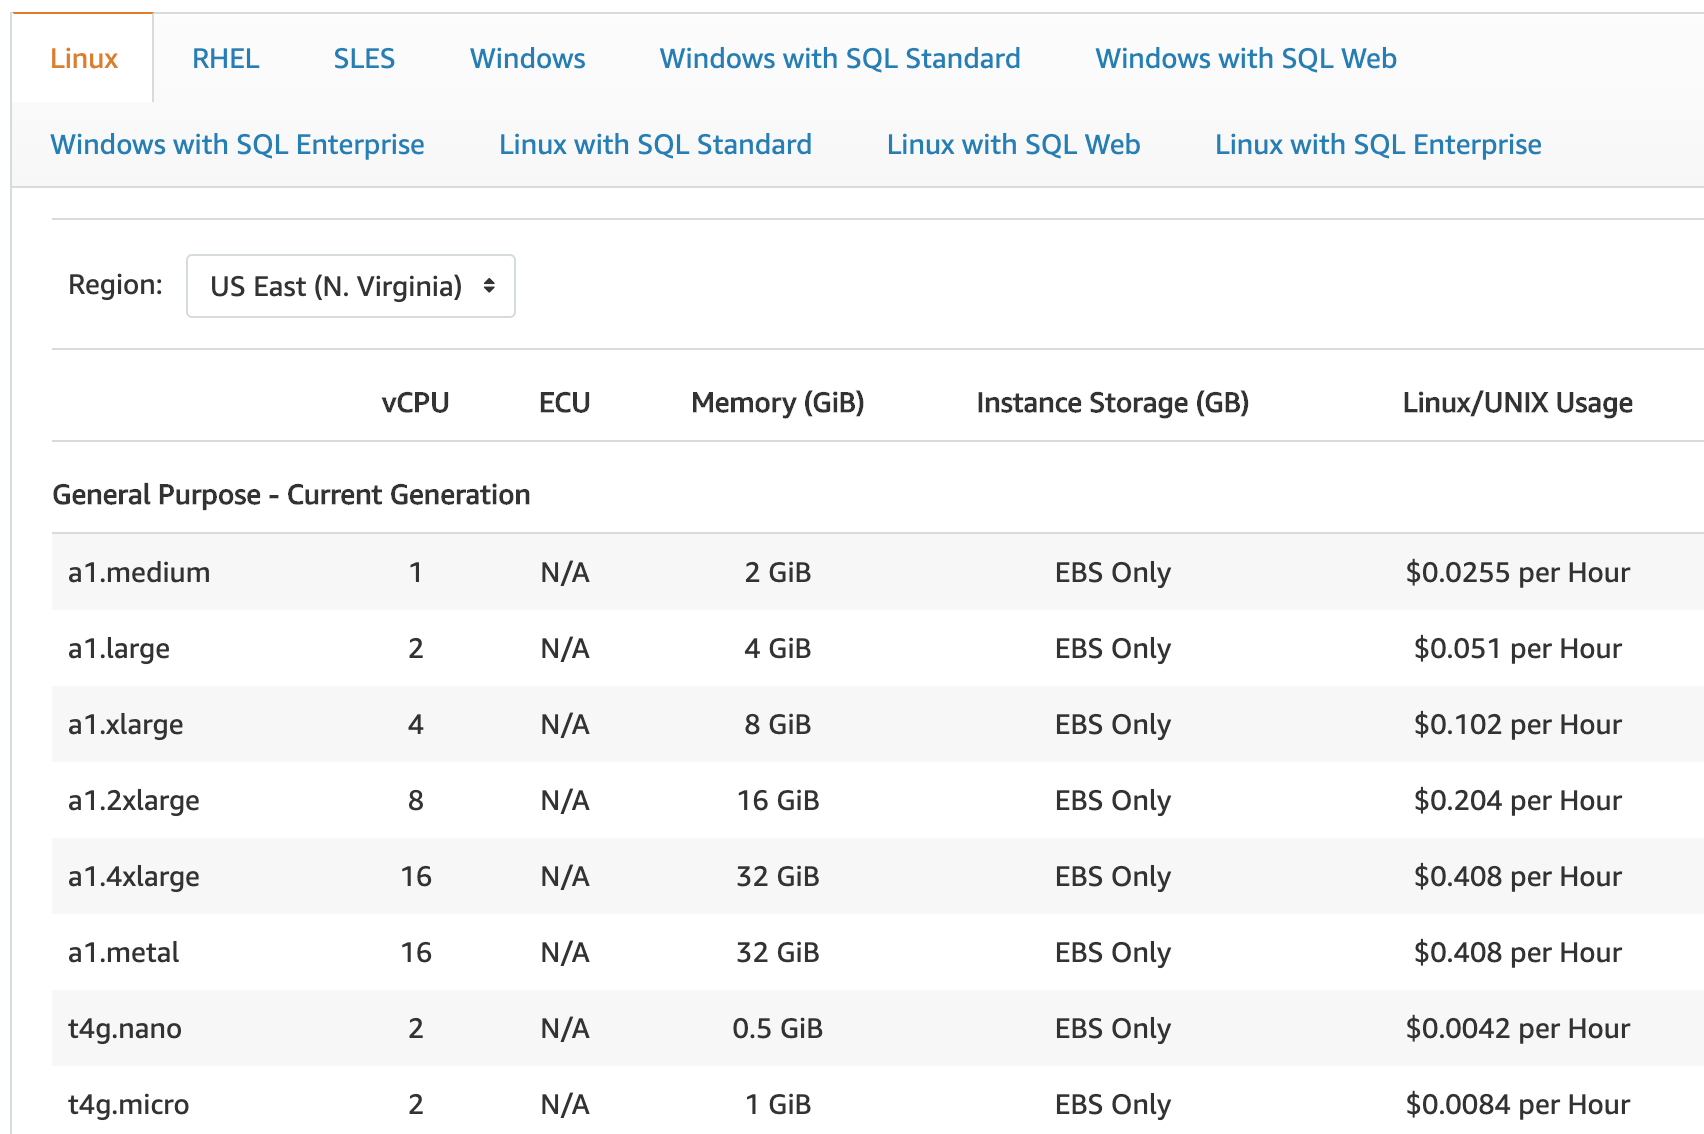
For this tutorial, we are going to use an On-Demand Instance. Let look more closely at that section of the pricing list by referring to the example screenshot below. Note that we have selected US West (Oregon) as our region and we are looking at the General Purpose section of the table and assuming that we will launch a Linux instance. These tables enumerate the features of various computer configurations that you can rent by the hour. Consider a particular instance type in this table, for example m5.2xlarge. For this instance, we are told the number of CPUs that will be available on the machine (8), the amount of memory (32 GiB), the storage that will be pre-configured (EBS volumes), and the cost per hour to rent this machine ($0.384 per Hour). Note how much jargon is used in these tables. Memory is reported in GiB and storage is reported in GB (1GiB ≈ 1.074GB). For the number of CPUs we are told both the number of vCPUs (virtual CPUs) and ECUs (Elastic Compute Units). A virtual CPU is a reference to the number of physical CPUs that are available on the machine. It is referred to as virtual because we are actually creating a virtual machine when we create an EC2 instance. This virtualization allows Amazon to create a set of smaller virtual computers of varying specifications from larger phyiscal computers that they maintain. An ECU is a unit of computing that is meant to allow more accurate comparisons between machines that might have different generations of CPUs, recognizing that not all CPUs are created equally. The storage descriptions for EC2 instances may use the terms: EBS only, SSD, and HDD. We will discuss EBS (Elastic Block Storage) in more detail below, but briefly EBS allows us to define one or more storage volumes of almost any size we wish. The hardware details of that storage will be handled for us behind the scenes. EBS volumes exist independently of an EC2 machine and can be moved from one machine to another and the contents can be stored and attached to multiple EC2 instances over time (though only one instance at a time). SSD refers to a solid state drive that is associated with the machine. HDD refers to a hard disk drive that is associated with the machine. SSD drives tend to be higher performance than HDD but also more expensive per unit of storage space. When an instance indicates that it has 2 x 40 SSD this means that is has two solid state drives, and each are 40GB in size. The SSD and HDD drives associated with each instance and described in the pricing list are considered ephemeral. We will discuss this important concept in more detail below.
An example AWS EC2 price list:
How does billing work? (I do not think I am using anything, why am I still getting a monthly bill)?
Generally you get an accounting of usage and cost on a 30 day cycle. You can get more detailed information on your account by going to the Billing and Cost Management section of the User menu in the EC2 console. You can also refer to the billing section of the EC2 FAQ page. Briefly, Amazon describes billing as follows:
You pay only for what you use and there is no minimum fee. Pricing is per instance-hour consumed for each instance type. Partial instance-hours consumed are billed as full hours. There is no Data Transfer charge between two Amazon Web Services within the same region (i.e. between Amazon EC2 US West and another AWS service in the US West). Data transferred between AWS services in different regions will be charged as Internet Data Transfer on both sides of the transfer. Usage for other Amazon Web Services is billed separately from Amazon EC2. Billing commences when Amazon EC2 initiates the boot sequence of an AMI instance. Billing ends when the instance terminates, which could occur through a web services command, by running “shutdown -h”, or through instance failure. Instance-hours are billed for any time your instances are in a “running” state. If you no longer wish to be charged for your instance, you must “stop” or “terminate” the instance to avoid being billed for additional instance-hours. Billing starts when an instance transitions into the running state.
This sounds simple but it tends to be more complicated than this. EBS usage is billed separately from EC2 resources, even though the two are often intricately linked. For example, the root volume on a Linux Instance often exists as an EBS volume. You will be charged for this whether the system is running or stopped. Similarly, if you have an EC2 instance with an extra EBS volume(s) attached to it, you will be charged for this storage even when the EC2 instance is stopped. When you terminate the instance, associated EBS volumes may or may not be automatically destroyed. This behavior depends on how you configured the instance. We will discuss this configuration in further detail below. Similarly, if you create a Snapshot of your instance, this gets saved to EBS storage and you will be charged for these as long as they exist. When you create an AMI to save the state of your instance for later, this is stored as a Snapshot. The good news is that small EBS volumes are very cheap and by default the root volume for most instances is small (usually 8GB).
If you choose an instance type with pre-configured storage or you attach EBS volumes for storage but set them to be deleted upon termination of the instance, and you never create any Snapshots or save the instance as an AMI, when you terminate that instance, all costs associated with it will be gone. The cost will therefore be the hourly rate from the pricing list multiplied by the number of hours it was running rounded up to closest whole hour.
In the Billing and Cost Management section of the EC2 console you can create billing alerts that will warn you of ongoing costs. If you find that you are being charged a monthly fee but you are not intentionally using any resources, you should follow these steps. Log into the AWS EC2 console. Now, for each AWS Region, determine the following: are there any Running Instances? Volumes? Elastic IPs? or Snapshots? If any of these values are greater than 0, in any one or more regions, you are likely being billed monthly for resources that Amazon is reserving for you until told otherwise. If you terminate or delete all of these items, your monthly bill should return to $0.
Necessary steps for launching an Instance
In the following sections we are going to launch an example instance, configure it in the AWS EC2 console, discuss some of the important concepts of this configuration and log into the instance once it is running. In each case, screenshots from an example instance will be shown and discussed. To get started, make sure you are logged into AWS and go to the EC2 dashboard. To start using EC2 we will launch a virtual server running the latest stable version of the Ubuntu operating system. We will decide on the basic hardware for this server, configure storage that will be available on it, configure its security, and so on. Once it is running we will log into this server and perform some additional exercises and configuration. To get started press the blue Launch Instance button. Remember that you are launching this instance in a particular Region. In the following example we launched an instance in US East (N. Virginia).
Launching an instance:
Step 1. Choosing an AMI
An AMI or Amazon Machine Instance is a template for launching an instance. The AMI includes a template for a pre-configured root volume that contains an operating system (e.g. Ubuntu Linux, Windows, etc.). The AMI also includes basic configuration of storage volumes that will be available within an instance.
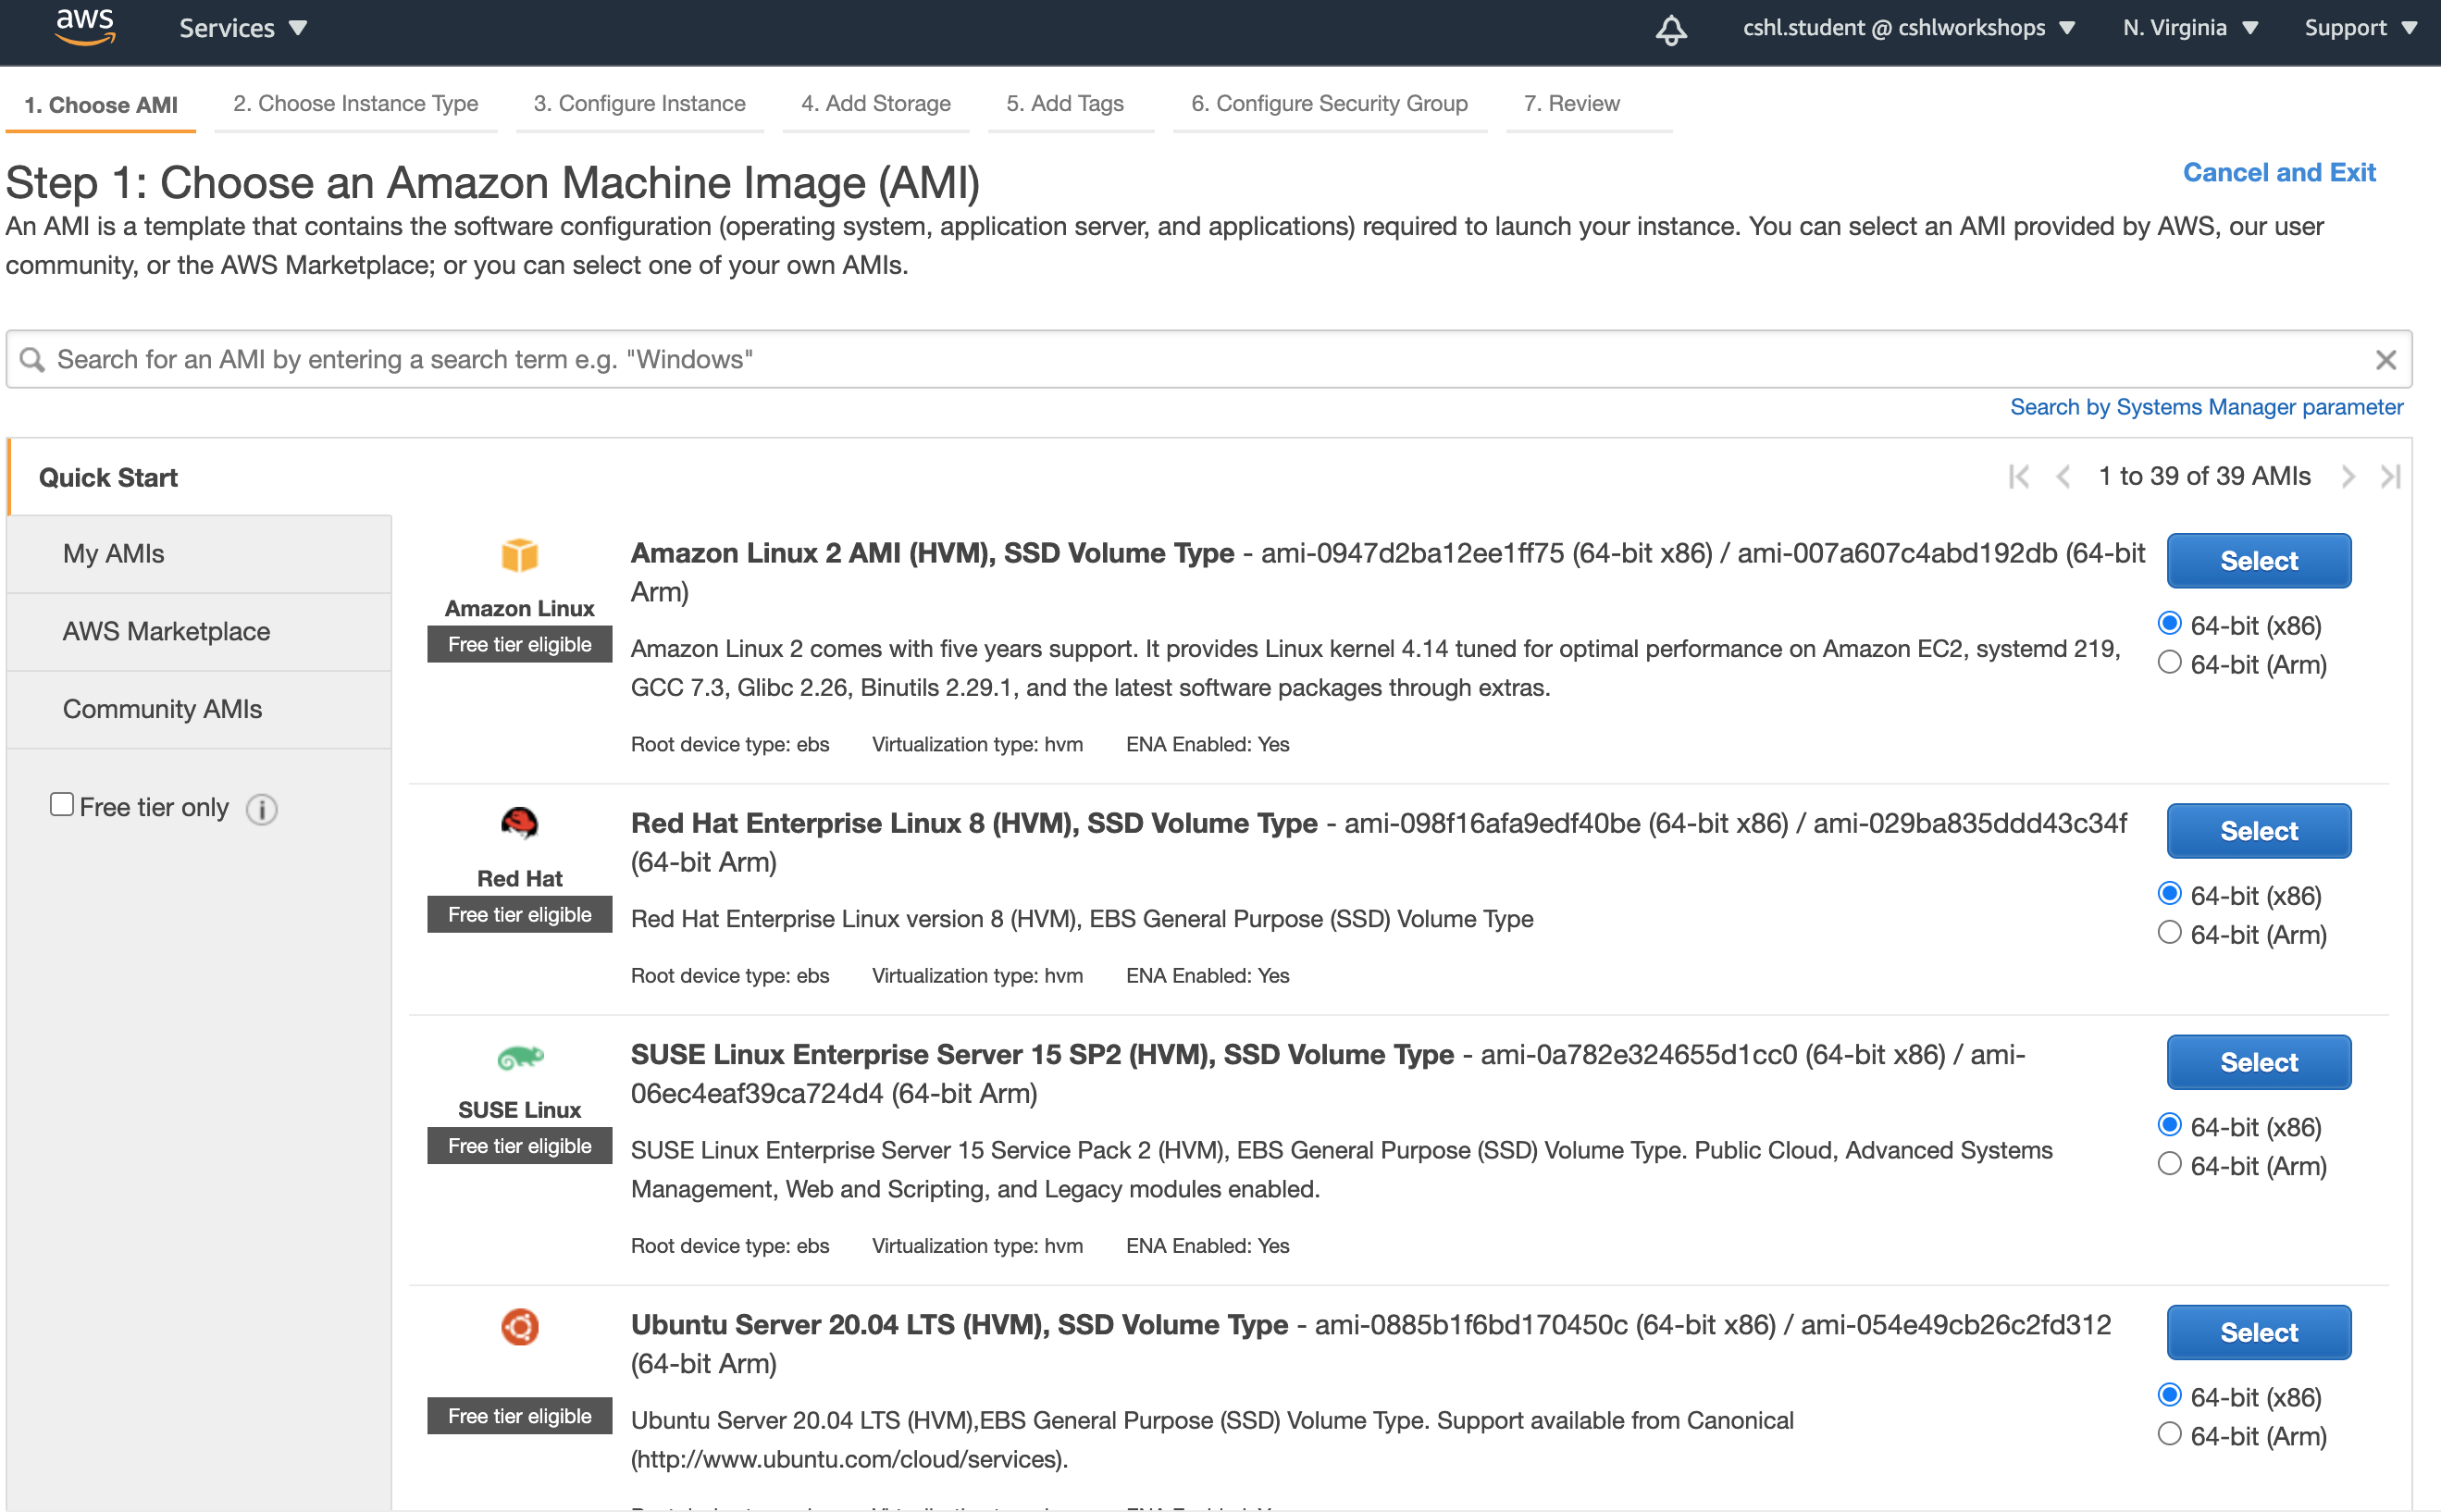
The first step to launching an instance is to select an AMI. Refer to the screenshot below. There are four main options when selecting an AMI: Quick Start, My AMIs, AWS Marketplace, and Community AMIs. In the Quick Start list we will select an Ubuntu AMI as our starting point. The Quick Start AMIs section is a relatively short list of basic systems that have been chosen by Amazon as common starting points. These have some degree of “official” support and testing on AWS. The My AMIs section contains AMIs that you have created youself, perhaps using a Quick Start or Community AMI as a starting point. For example, you might start with an Ubuntu AMI and install all of the bioinformatics software and other infrastructure you need to run an analysis pipeline. You could then store this configured machine as an AMI to save your work. Having an AMI allows you to share a complete system configuration, and to fire up a cluster of identical instances that are ready to go. The AWS Marketplace contains AMIs where a company (often a software company) has configured a machine for certain applications. You can browse through this section to get an idea what kinds applications are available. Finally, the Community AMI section contains thousands of AMIs created by users around the world. These AMIs are specific to each Region so if someone tells you about an AMI they want to share, be sure to search for it in the correct region. If you create you own AMI and you want to share it with others, you can ‘publish’ it to the community. It will still appear in you My AMIs section, but it will also then appear and be searchable in the Community AMI section.
For this tutorial we will select the following AMI from the Quick Start list: ami-00ddb0e5626798373. This number is a unique ID for the AMI. The full length description for this AMI is Ubuntu Server 18.04 LTS (HVM), SSD Volume Type. We are also told that the Root device type is EBS and the Virtualization type is HVM. Ubuntu Server 18.04 LTS, refers to the version of the Ubuntu OS. This version is also known as Ubuntu ‘Bionic Beaver’. If you were going to install it directly onto your own hardware instead of on the AWS cloud you would download the 18.04 LTS image from the Ubuntu releases site. We are told that the Root device type of the AMI is EBS. We will discuss storage in more detail but this means that the AMI is configured so that the root volume of the operating system will be installed on an EBS volume. In practical terms, this means that information stored on the root volume, including the OS itself will persist if we stop the instance (i.e. the root volume is not ephemeral). The term HVM refers to a type of virtualization technologythat will be used by the instance, the other common type being PV. A detailed discussion of virtualizition technology is outside of the scope of this tutorial but you can learn more details here: Linux AMI virtualization types and Ubuntu PV vs HVM. On balance, the HVM option is now perhaps recommended over the PV option. Once you are ready to proceed, press the blue Select button next to the Ubuntu Server description.
Step 1. Choose an Amazon Machine Image (AMI):
Step 2. Choosing an Instance Type
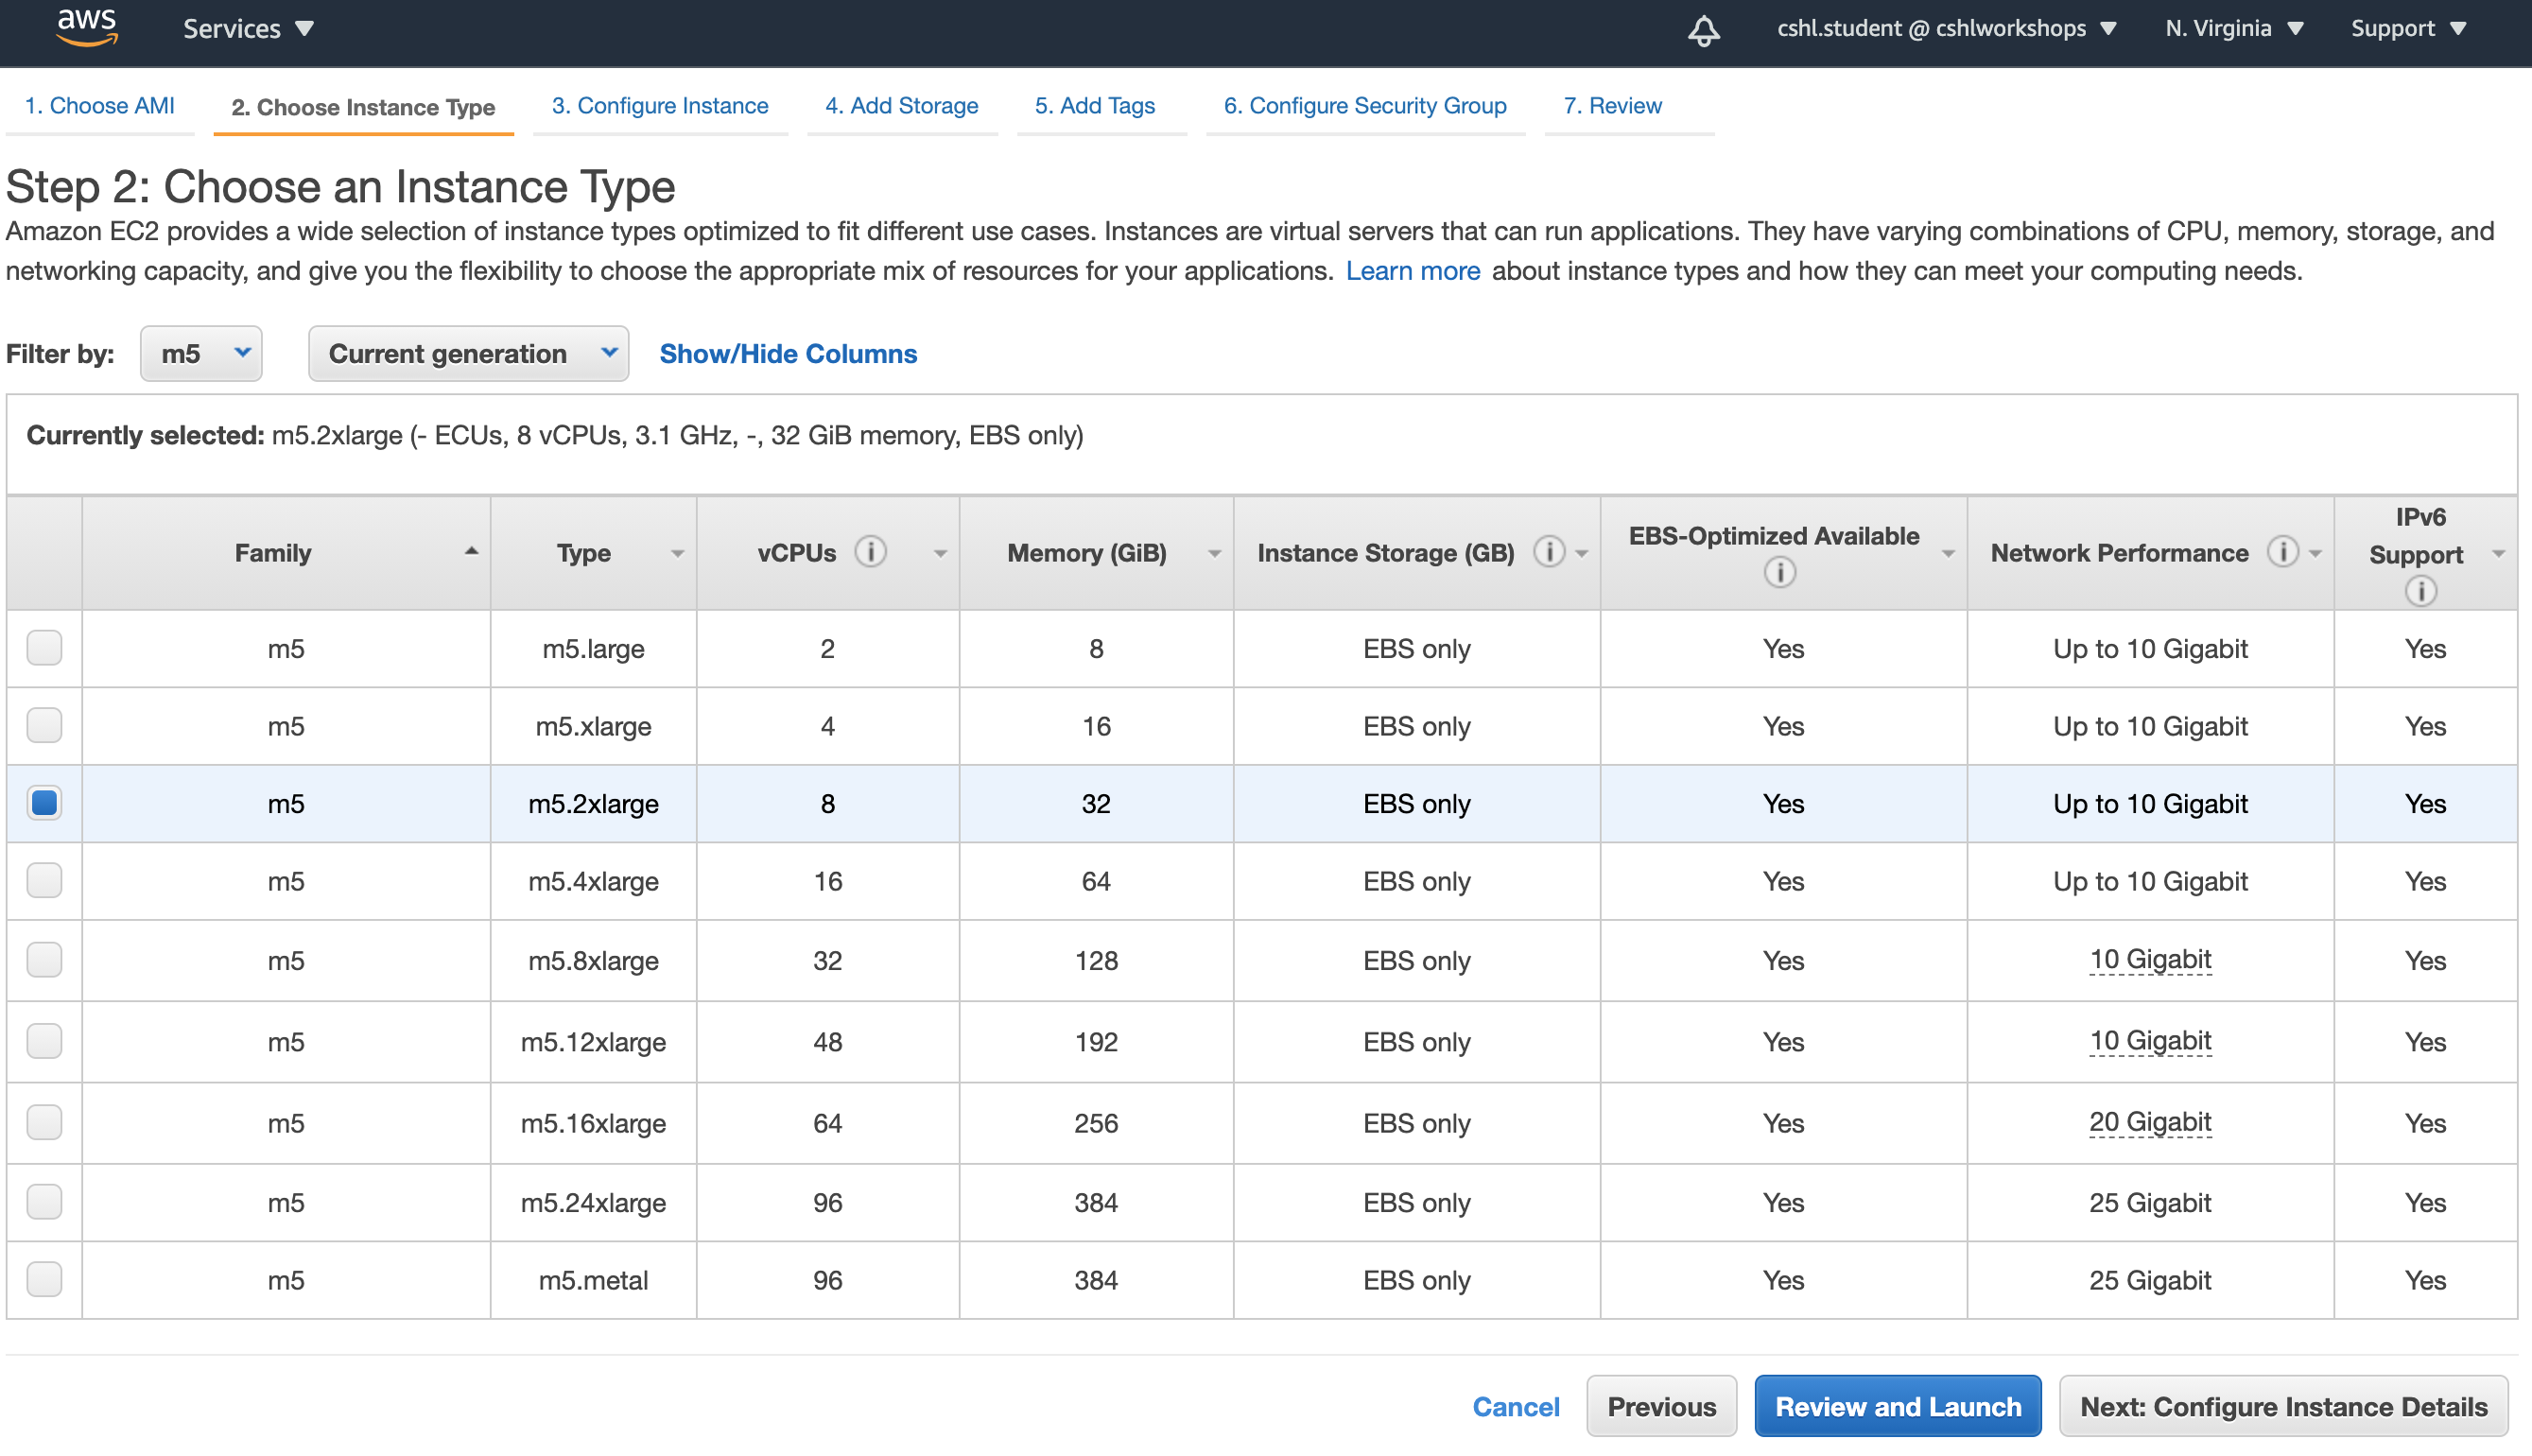
Once an AMI is selected, the next step is to choose an instance type. In simple terms, in the previous step we decided on the operating system we want to run (Ubuntu v14.04), and now we need to chose the hardware that it will run on. Refer to the following screenshot for this discussion. Note that in this example, we have selected General purpose in the drop down filter. This leaves us 7 choices for hardware configuration. Note that the price per hour for each of these options is not listed here. To get the price, note the instance type name (e.g. m5.2xlarge) and refer back to the EC2 pricing list. At the time of writing, an m5.2xlarge instance in US East (N. Virginia) rented on an On Demand basis costs $0.384 per Hour. We discussed many of the details described in this table of instance types in the pricing discussion above. Briefly, we are given a series of options that differ in their number of CPUs, memory, pre-configured storage, network performance, etc. To view more or less details you can adjust this table using the Show/Hide Columns option. In the example depicted below we have selected the m5.2xlarge option with 8 CPUs, 32 GiB of memory, EBS Instance Storage, and Up to 10 Gigabit network performance. Once you are ready, proceed to the next step by pressing the Next: Configure Instance Details button.
Step 2. Choose an Instance Type:
Step 3. Configuring Instance Details
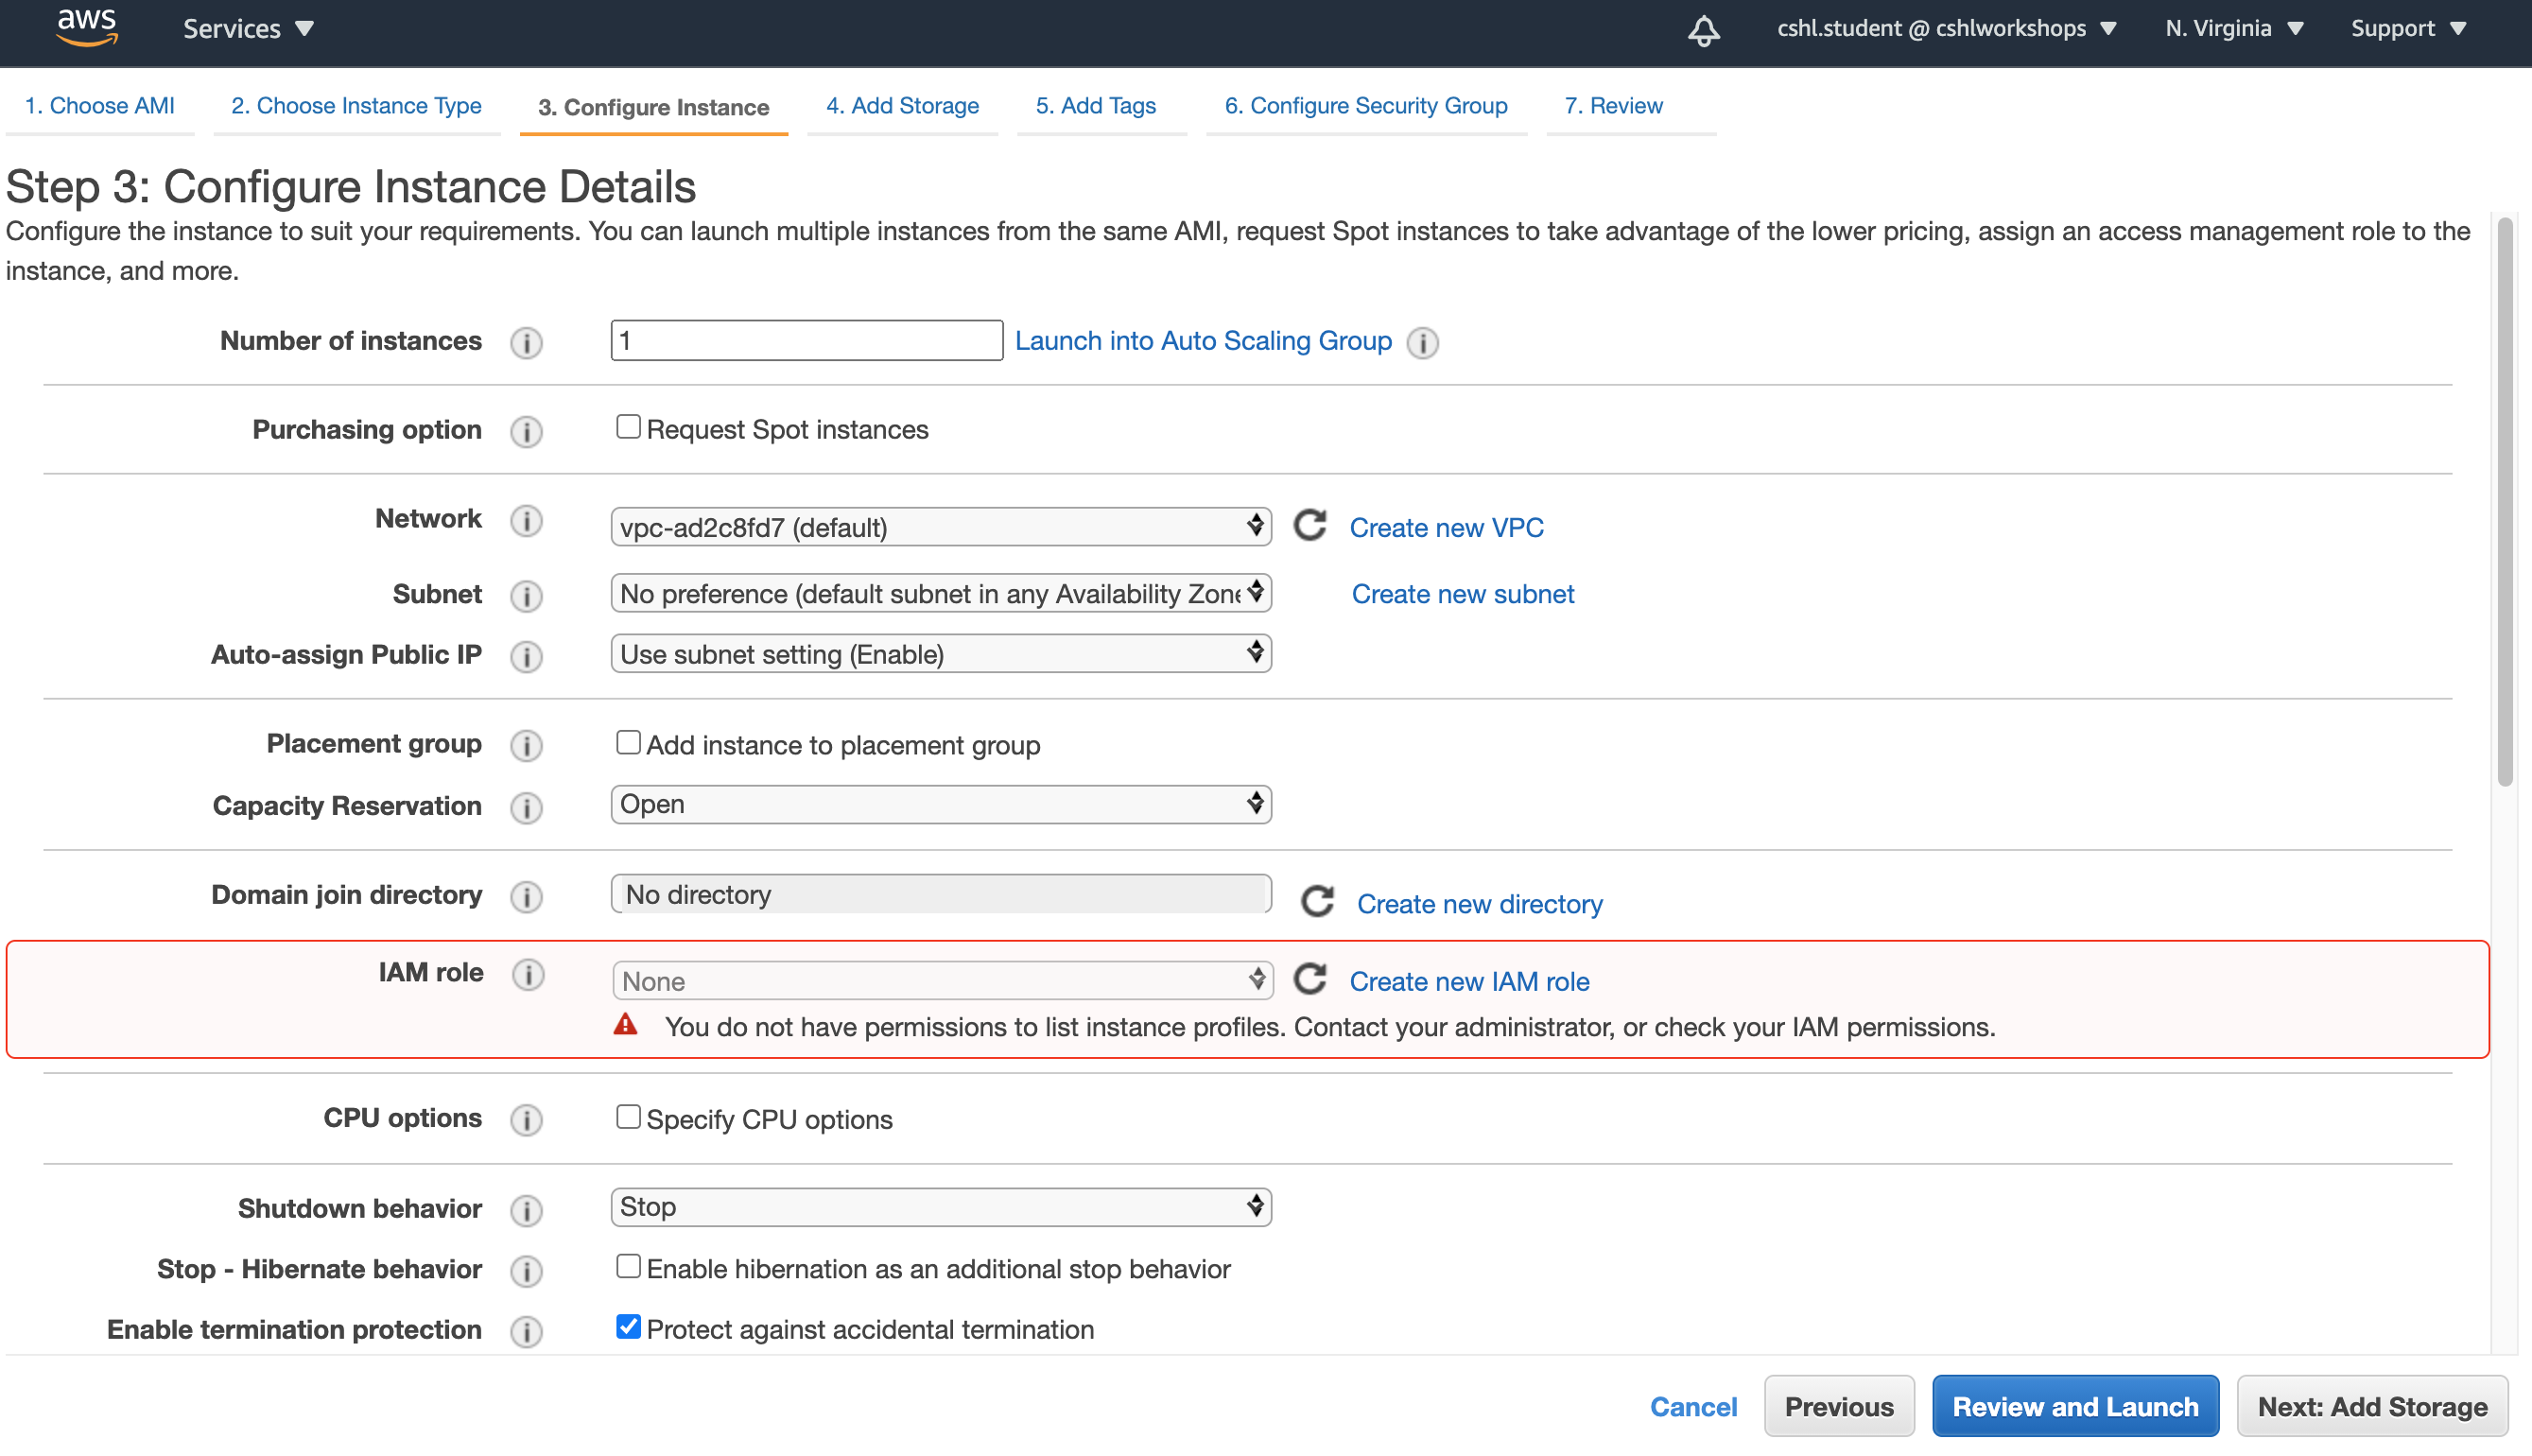
Once an instance type is selected the next step is to configure the instance details. This step in the launch-an-instance procedure introduces many advanced concepts that will be covered only briefly here. To learn more about each of the options available in this step you can mouse over the i symbol beside each. For the most part, leaving all of these options at their default value will be fine. Refer to the following screenshot while we discuss a few of these options briefly. Using the Number of instances option you could launch multiple instances of the same AMI with the same hardware configurations at the same time. However, in our example, only one instance will be launched. You also have the option to attempt to negotiate a cheaper rental by using the Request Spot Instances option. The Shutdown behavior option determines what will happen if you shutdown the instance from within the AMI (e.g. by issuing a sudo shutdown command in ubuntu linux). To prevent accidental termination of your instance, you may want to set this option to Stop. You can also help to prevent accidental termination of your instance by using the Enable termination protection option. These options can also adjusted later for any instance in the console. Once you are ready, proceed to the next step by pressing the Next: Add Storage button.
Step 3. Configure Instance Details:
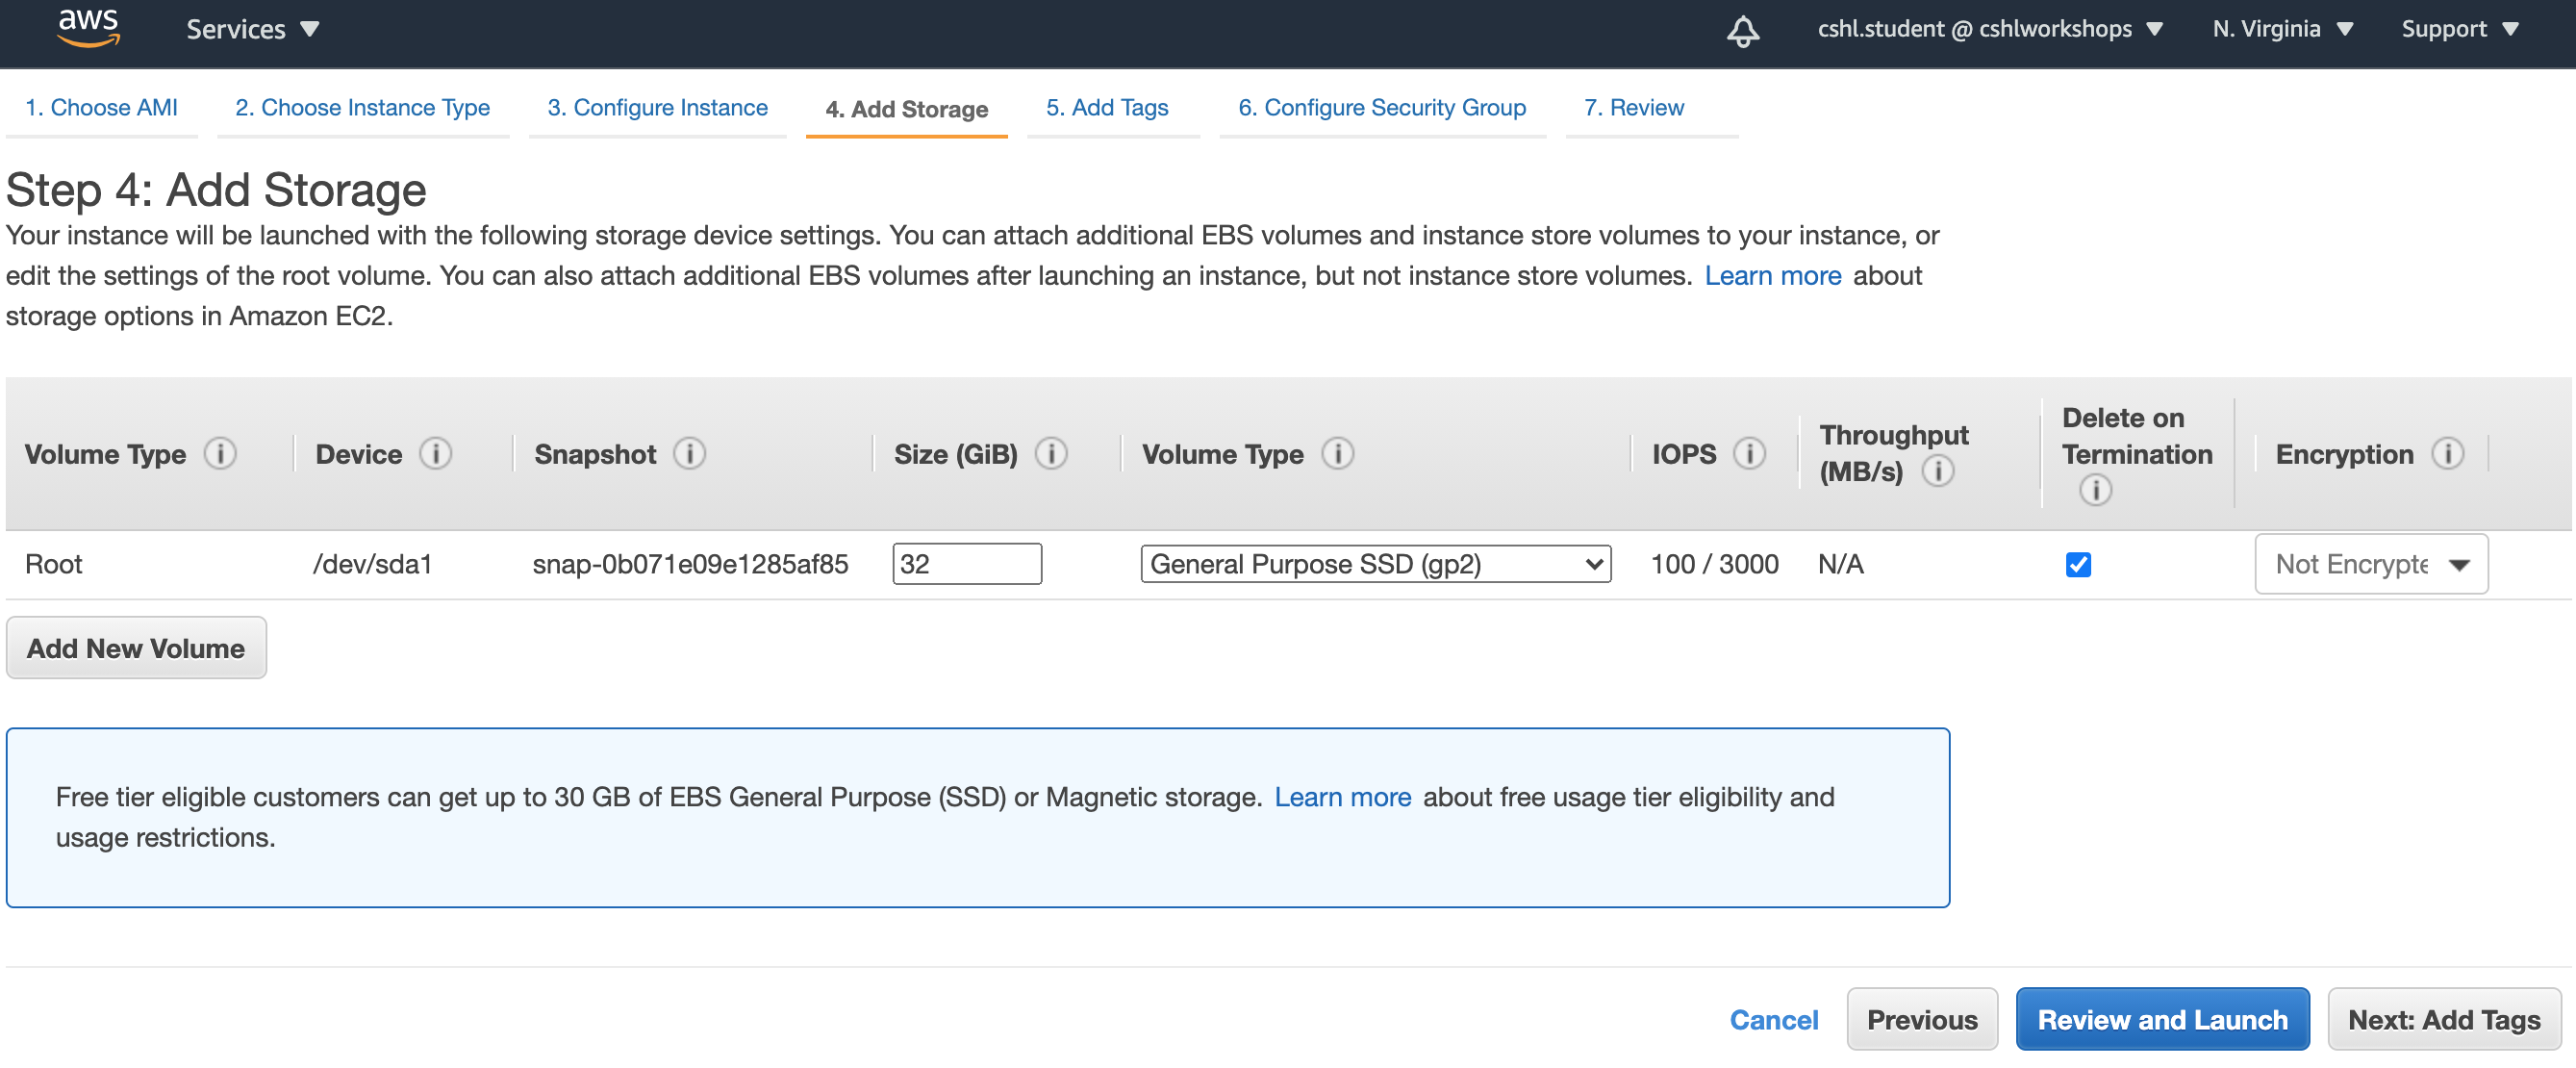
Step 4. Adding Storage
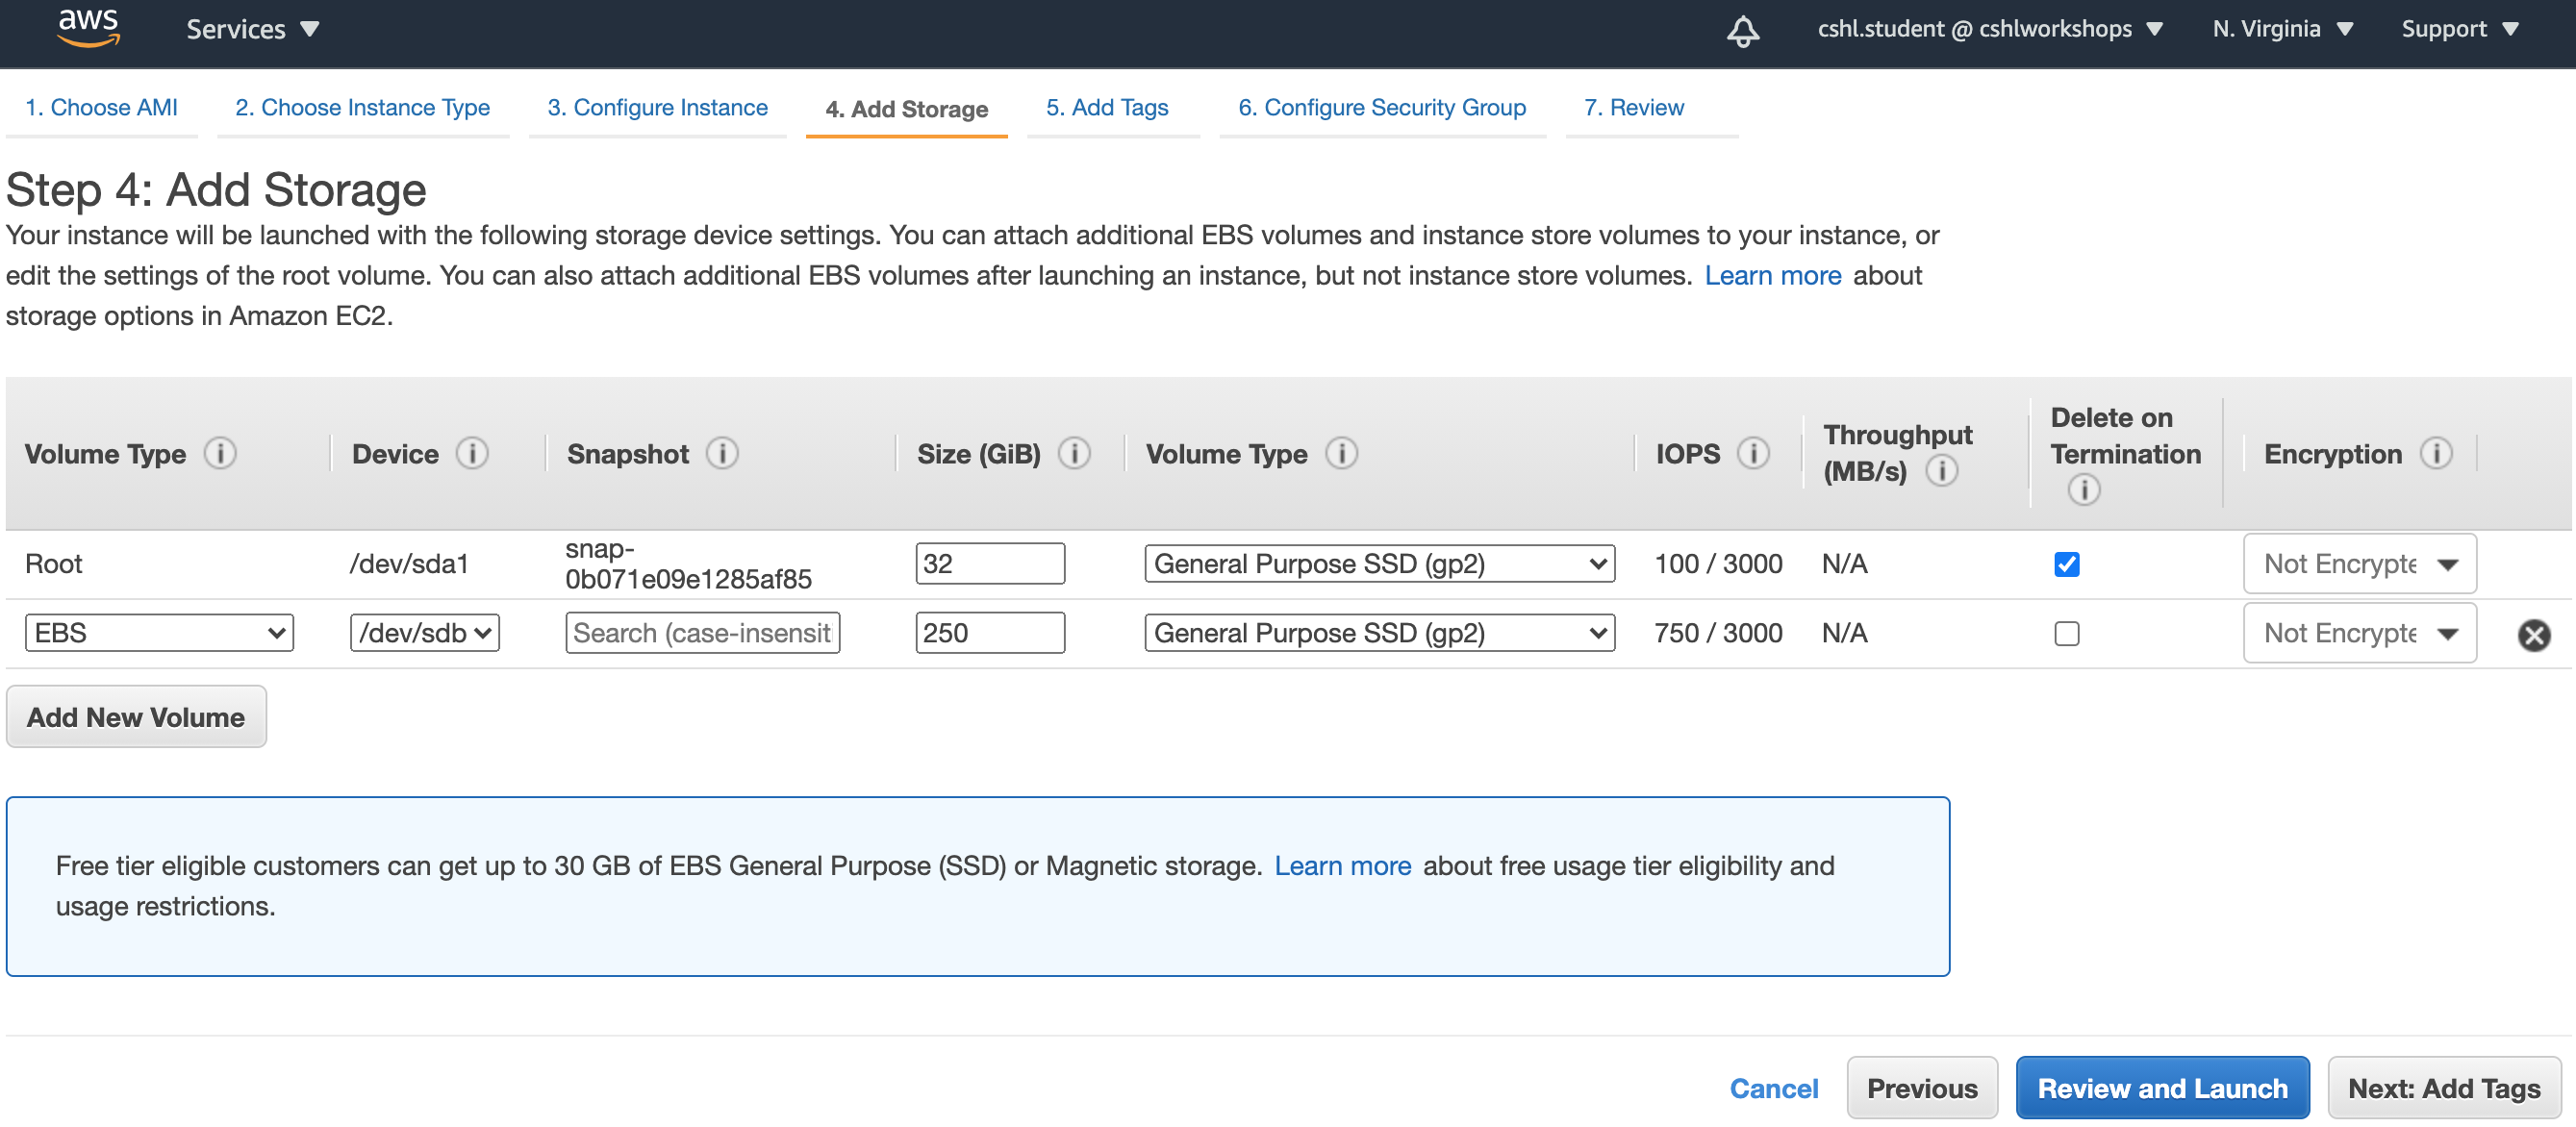
The next step is to configure the disk/storage that will be available in the instance. The starting point of this page depends on what instance type we selected in Step 2. Remember that we selected an instance type with an EBS root volume (during AMI selection) and an additional 1 x 32 GB SSD drive. These two volumes are summarized in the Add Storage view. The first volume is 8 GiB. This is the root volume where the operating system will exist. It is set to be deleted on termination of the instance but we could chose to keep it as well. The second row of the table shows as instance store 0. This is the 32 GiB SSD drive (though confusingly, the size is not shown here). Our two volumes are projected to be attached to the instance as /dev/sda and /dev/sdb. Sometimes this does not exactly match what we see inside the instance because device mapping behavior depends on the operating system. Since the second volume is an Instance Store device, it is akin to a drive physically attached to the computer we are renting. This should ensure high performance, but it is important to remember that such volumes are ephemeral and the contents will not persist if the instance is stopped or destroyed. To demonstrate the difference, lets use the Add New Volume button to add a third volume to our instance (see Step 4b screenshot below). Choose EBS as the Type, set the device to /dev/sdc, give it a size of 500 GiB, and set the volume type to General Purpose (SSD). Now when we log into the instance we will expect to find three distinct storage volumes/devises.
Step 4a. Add Storage:
Step 4b. Add additional Storage:
Storage volume options
What is ephemeral or Instance Store storage? What is EBS storage? Which is the better option for Root device type?
An EBS (elastic block storage) volume can be linked to single instance. EBS volumes can be set to persist even if the instance is destroyed. They could therefore later be reassigned to a different instance. In the context of bioinformatics analysis, you might decide to write your analysis results to an EBS volume. Once analysis was complete you could then shut down the instance to save money but keep your results indefinitely on the EBS volume. The Instance Store volumes are considered ‘ephemeral’ or transient. Therefore, you must be careful when storing data to these volumes because if the machine is stopped or terminated, the data will be unrecoverable. Instance store volumes are created from disks that are physically attached to the host computer while EBS volumes are created from disk arrays in the same Availability Zone but are not physically attached to the host computer. Instead the host computer accesses EBS volumes over a network. EBS volumes can be added at will to an existing instance. On the other hand, Instance Store volumes can only be added or configured when the instance is created.
The Root device type refers to the type of volume used to store the operating system itself. This is usually a small volume (often 8 GiB) that can be either EBS or Instance Store type. This type option can be selected during the choice of AMI or when configuring storage during setup of the AMI. Once you launch the AMI though you can not change the Root device type. There are pros and cons to both EBS and Instance Store for the root device type. The Instance Store type may have a performance advantage but the EBS type is more flexible and safer from the perspective of accidental data loss. For a beginniner just starting to use AWS, we recommend EBS. A bioinformatics analysis instance might use an EBS volume for Root device type, use an Instance Store volume for /tmp where all temporary files and staging of data will occur, and use an additional EBS volume to store the final results. Notice that this is how we have configured the example instance in this tutorial. You can examine the types of volumes for an existing Instance in the EC2 dashboard by selecting a running Instance and examining the Root device type value. Once you are ready, proceed to the next step by pressing the Next: Tag Instance button.
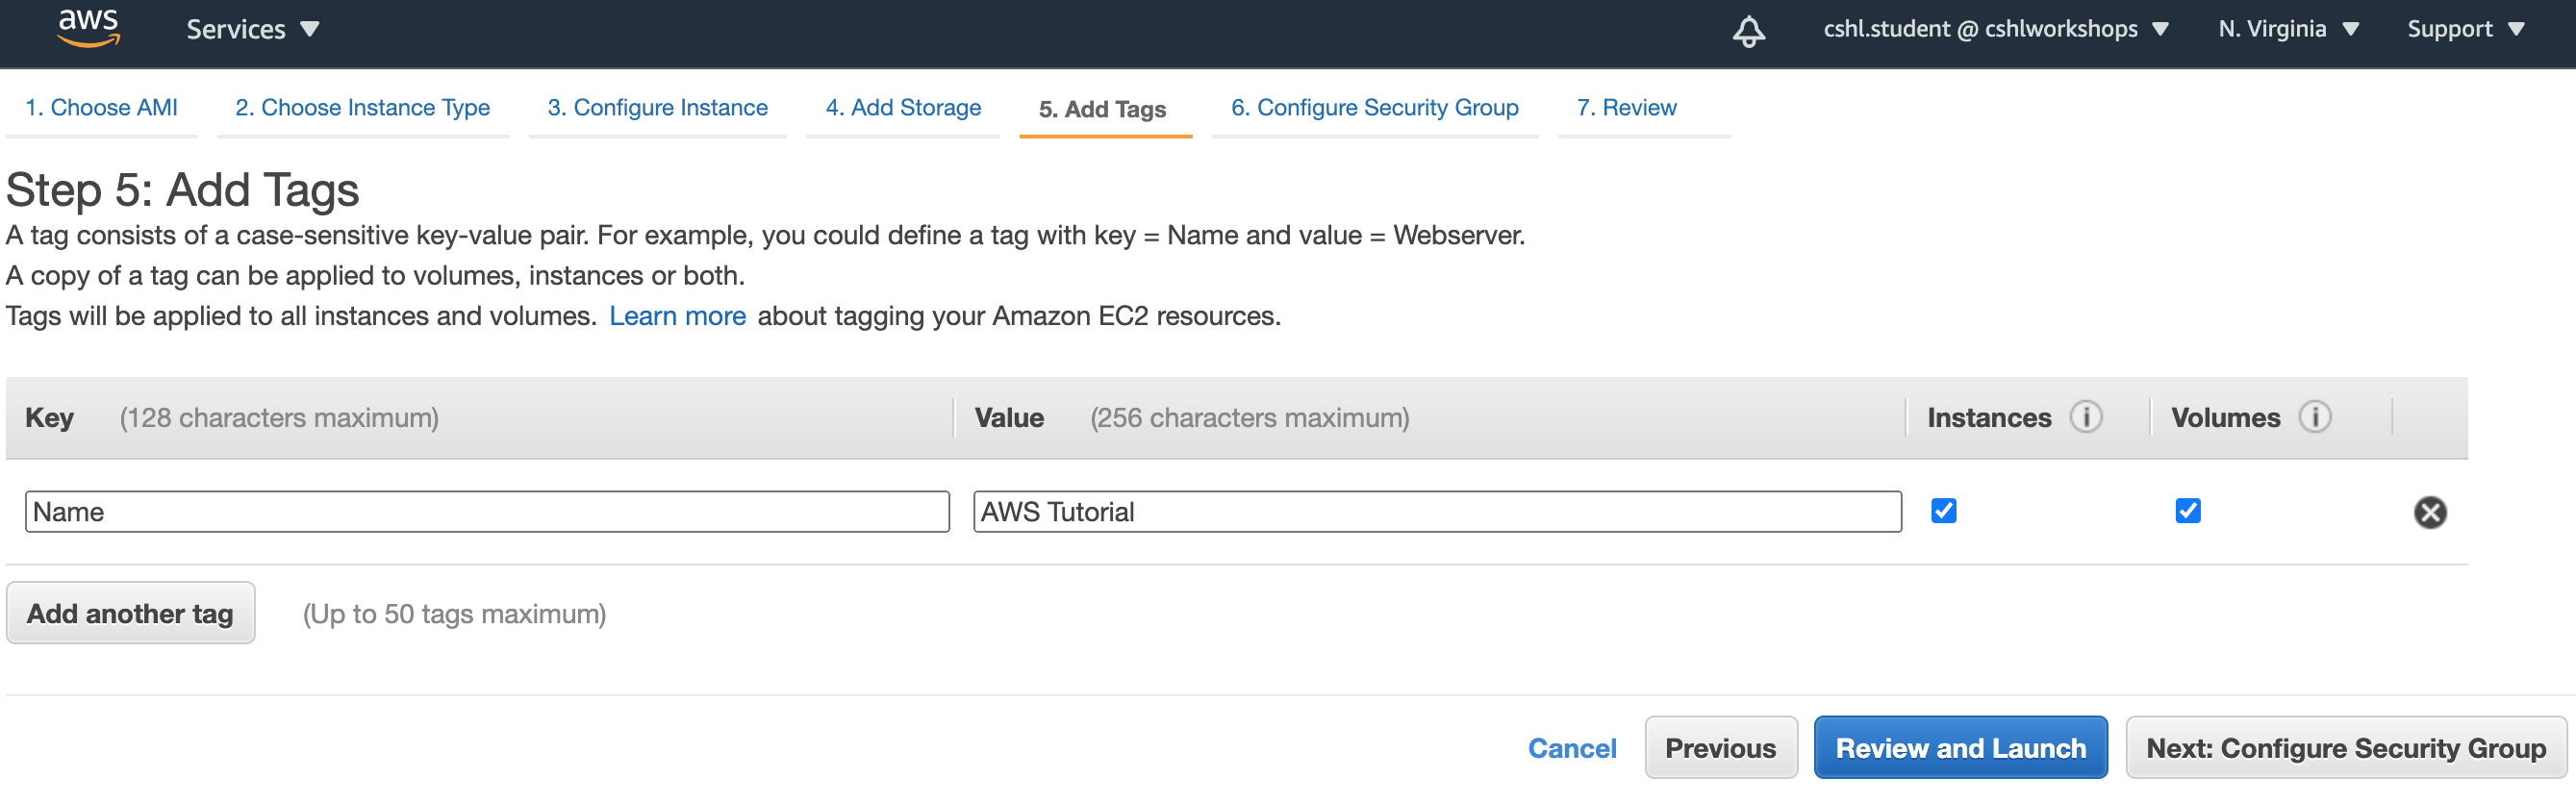
Step 5. Tagging the Instance
As you start to have a large number of instances running or saved you may want to start assigning Tags to these instances to help track their usage and billing details. Try creating a Tag as a simple key/value pair. In the example below we created a name tag with a value of AWS Tutorial. Once you are ready, proceed to the next step by pressing the Next: Configure Security Group button.
Step 5. Tag Instance:
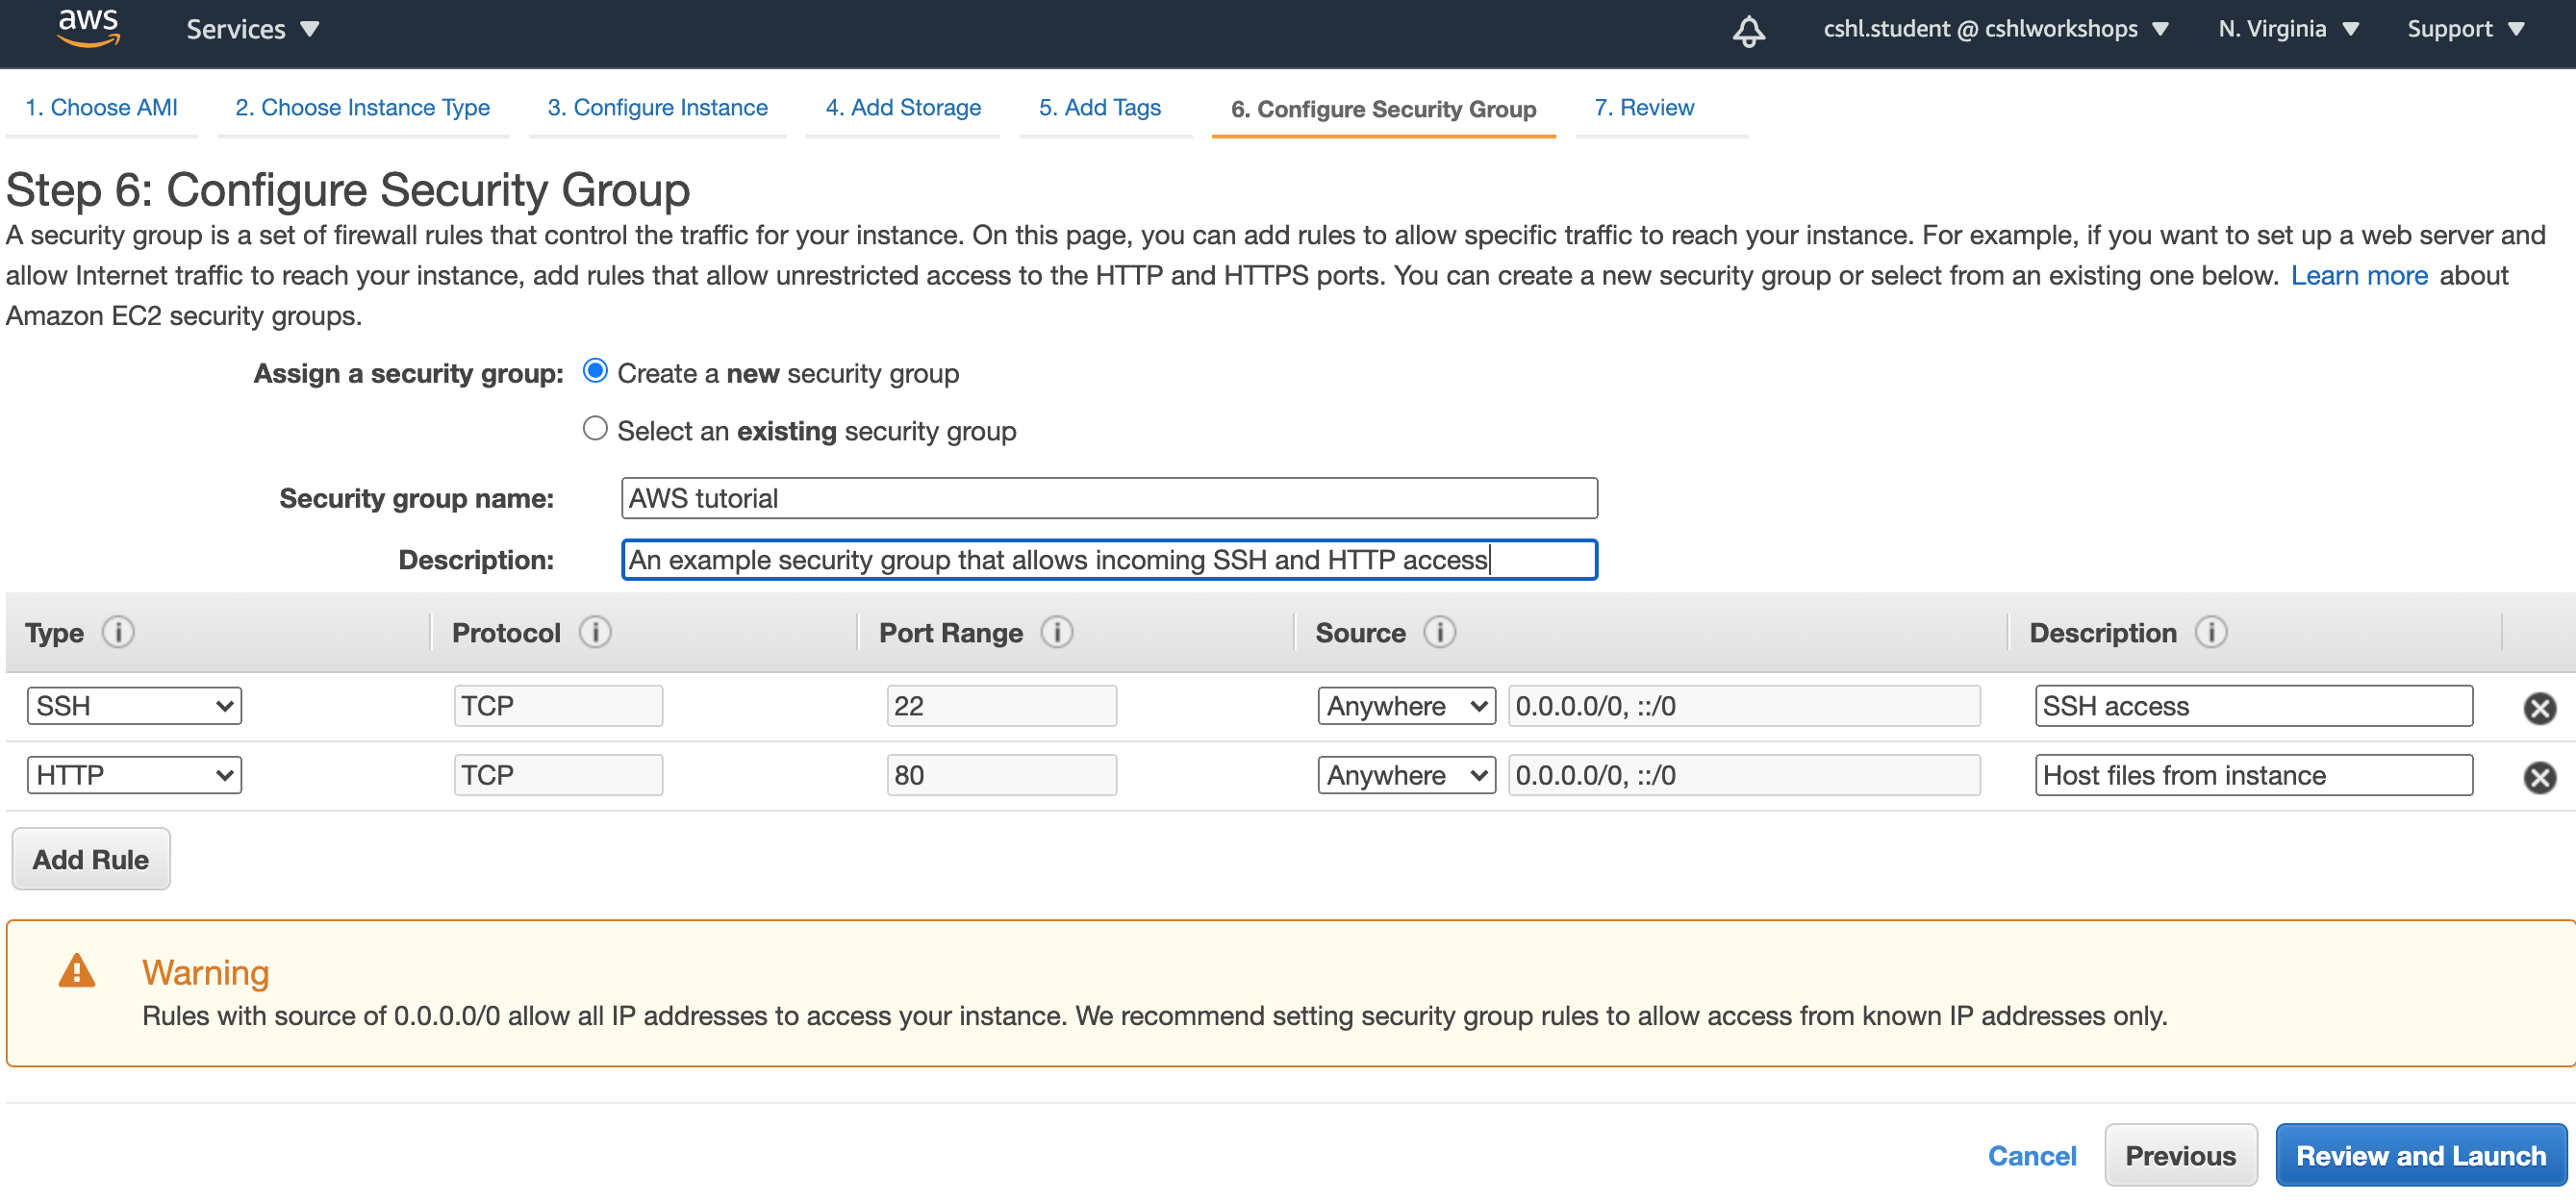
Step 6. Configuring a Security Group:
A Security Group controls how services and users can access your instance once it is running. When you launch a new instance you can choose to configure a new Security Group and use it or select one that you created previously. You can also select a default security group. The purpose of Security Group settings is to determine what Inbound and Outbound network traffic will be allowed on the instance. Since Inbound traffic could be coming from anyone (including those with malicious intentions) it is highly recommended that most incoming traffic be blocked and only certain incoming services be allowed on an as needed basis. In the example below we created a Security Group called AWS-Tutorial that only allows incoming traffic of two types: SSH (over port 22) and HTTP (over port 80). The first rule, will allow us to log into our instance remotely using the SSH protocol. The second rule, will allow us to set up a web server on the instance and access web content remotely using a web browser. Both of these rules could be made significantly more secure by limiting access to only certain IP addresses. For example, if you will access your AWS instances only from your university you could limit access to your universities IP address (or a range of addresses). You can reconfigure the Security Group settings at any time, but they will not take effect until the instance has been rebooted. Create two Incoming rules that match those in the screenshot and name your new security group. Once you are ready, proceed to the next step by pressing the Review and Launch button.
Step 6. Configure Security Group:
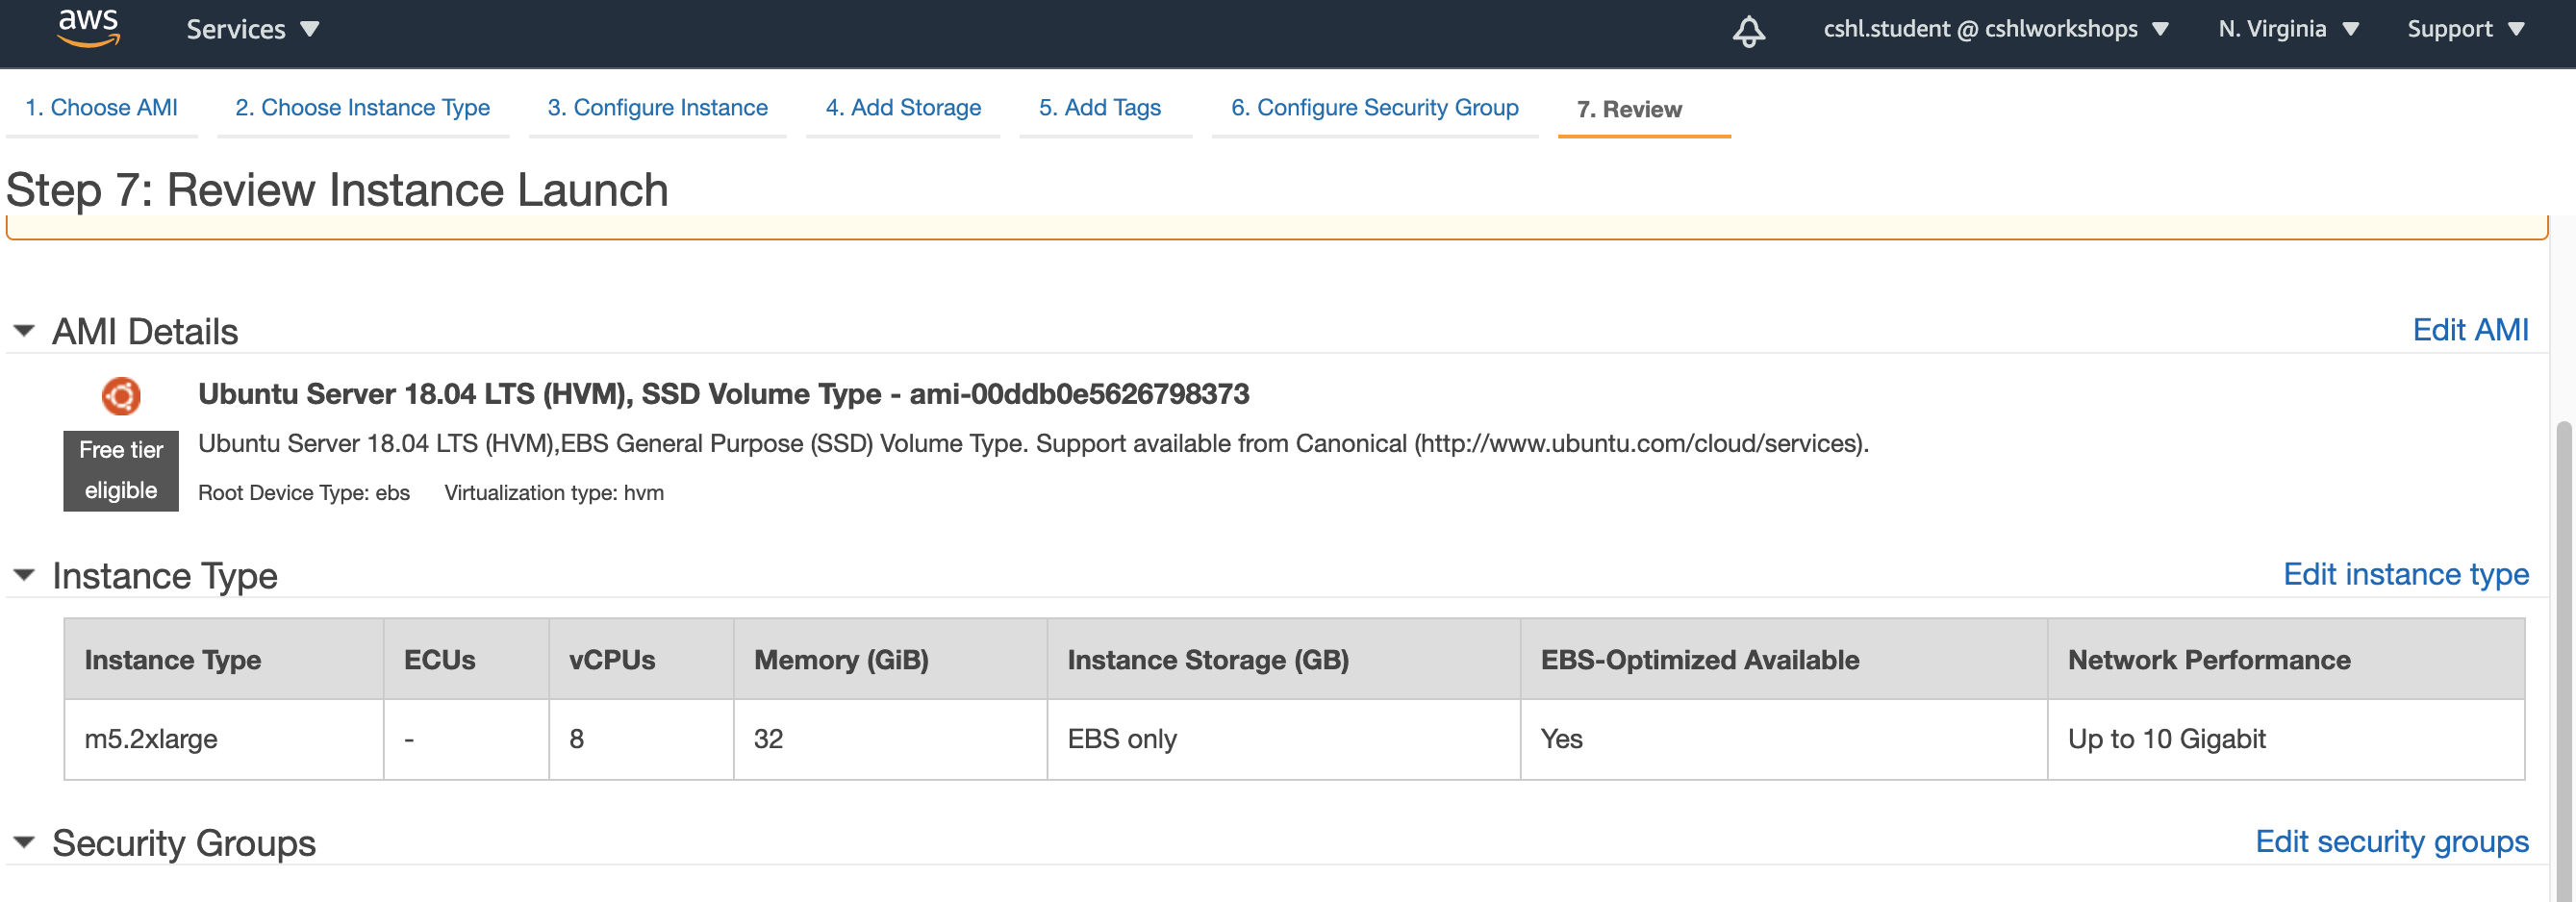
Step 7. Reviewing the Instance before Launch
At this stage you will be presented with a final summary describing the configuration of your instance. Some warnings may appear. A conservative security warning is often presented here if you have allowed any broad Incoming access to the instance. Once you are ready, proceed to the next step by pressing the Launch button.
Step 7. Review Instance Launch:
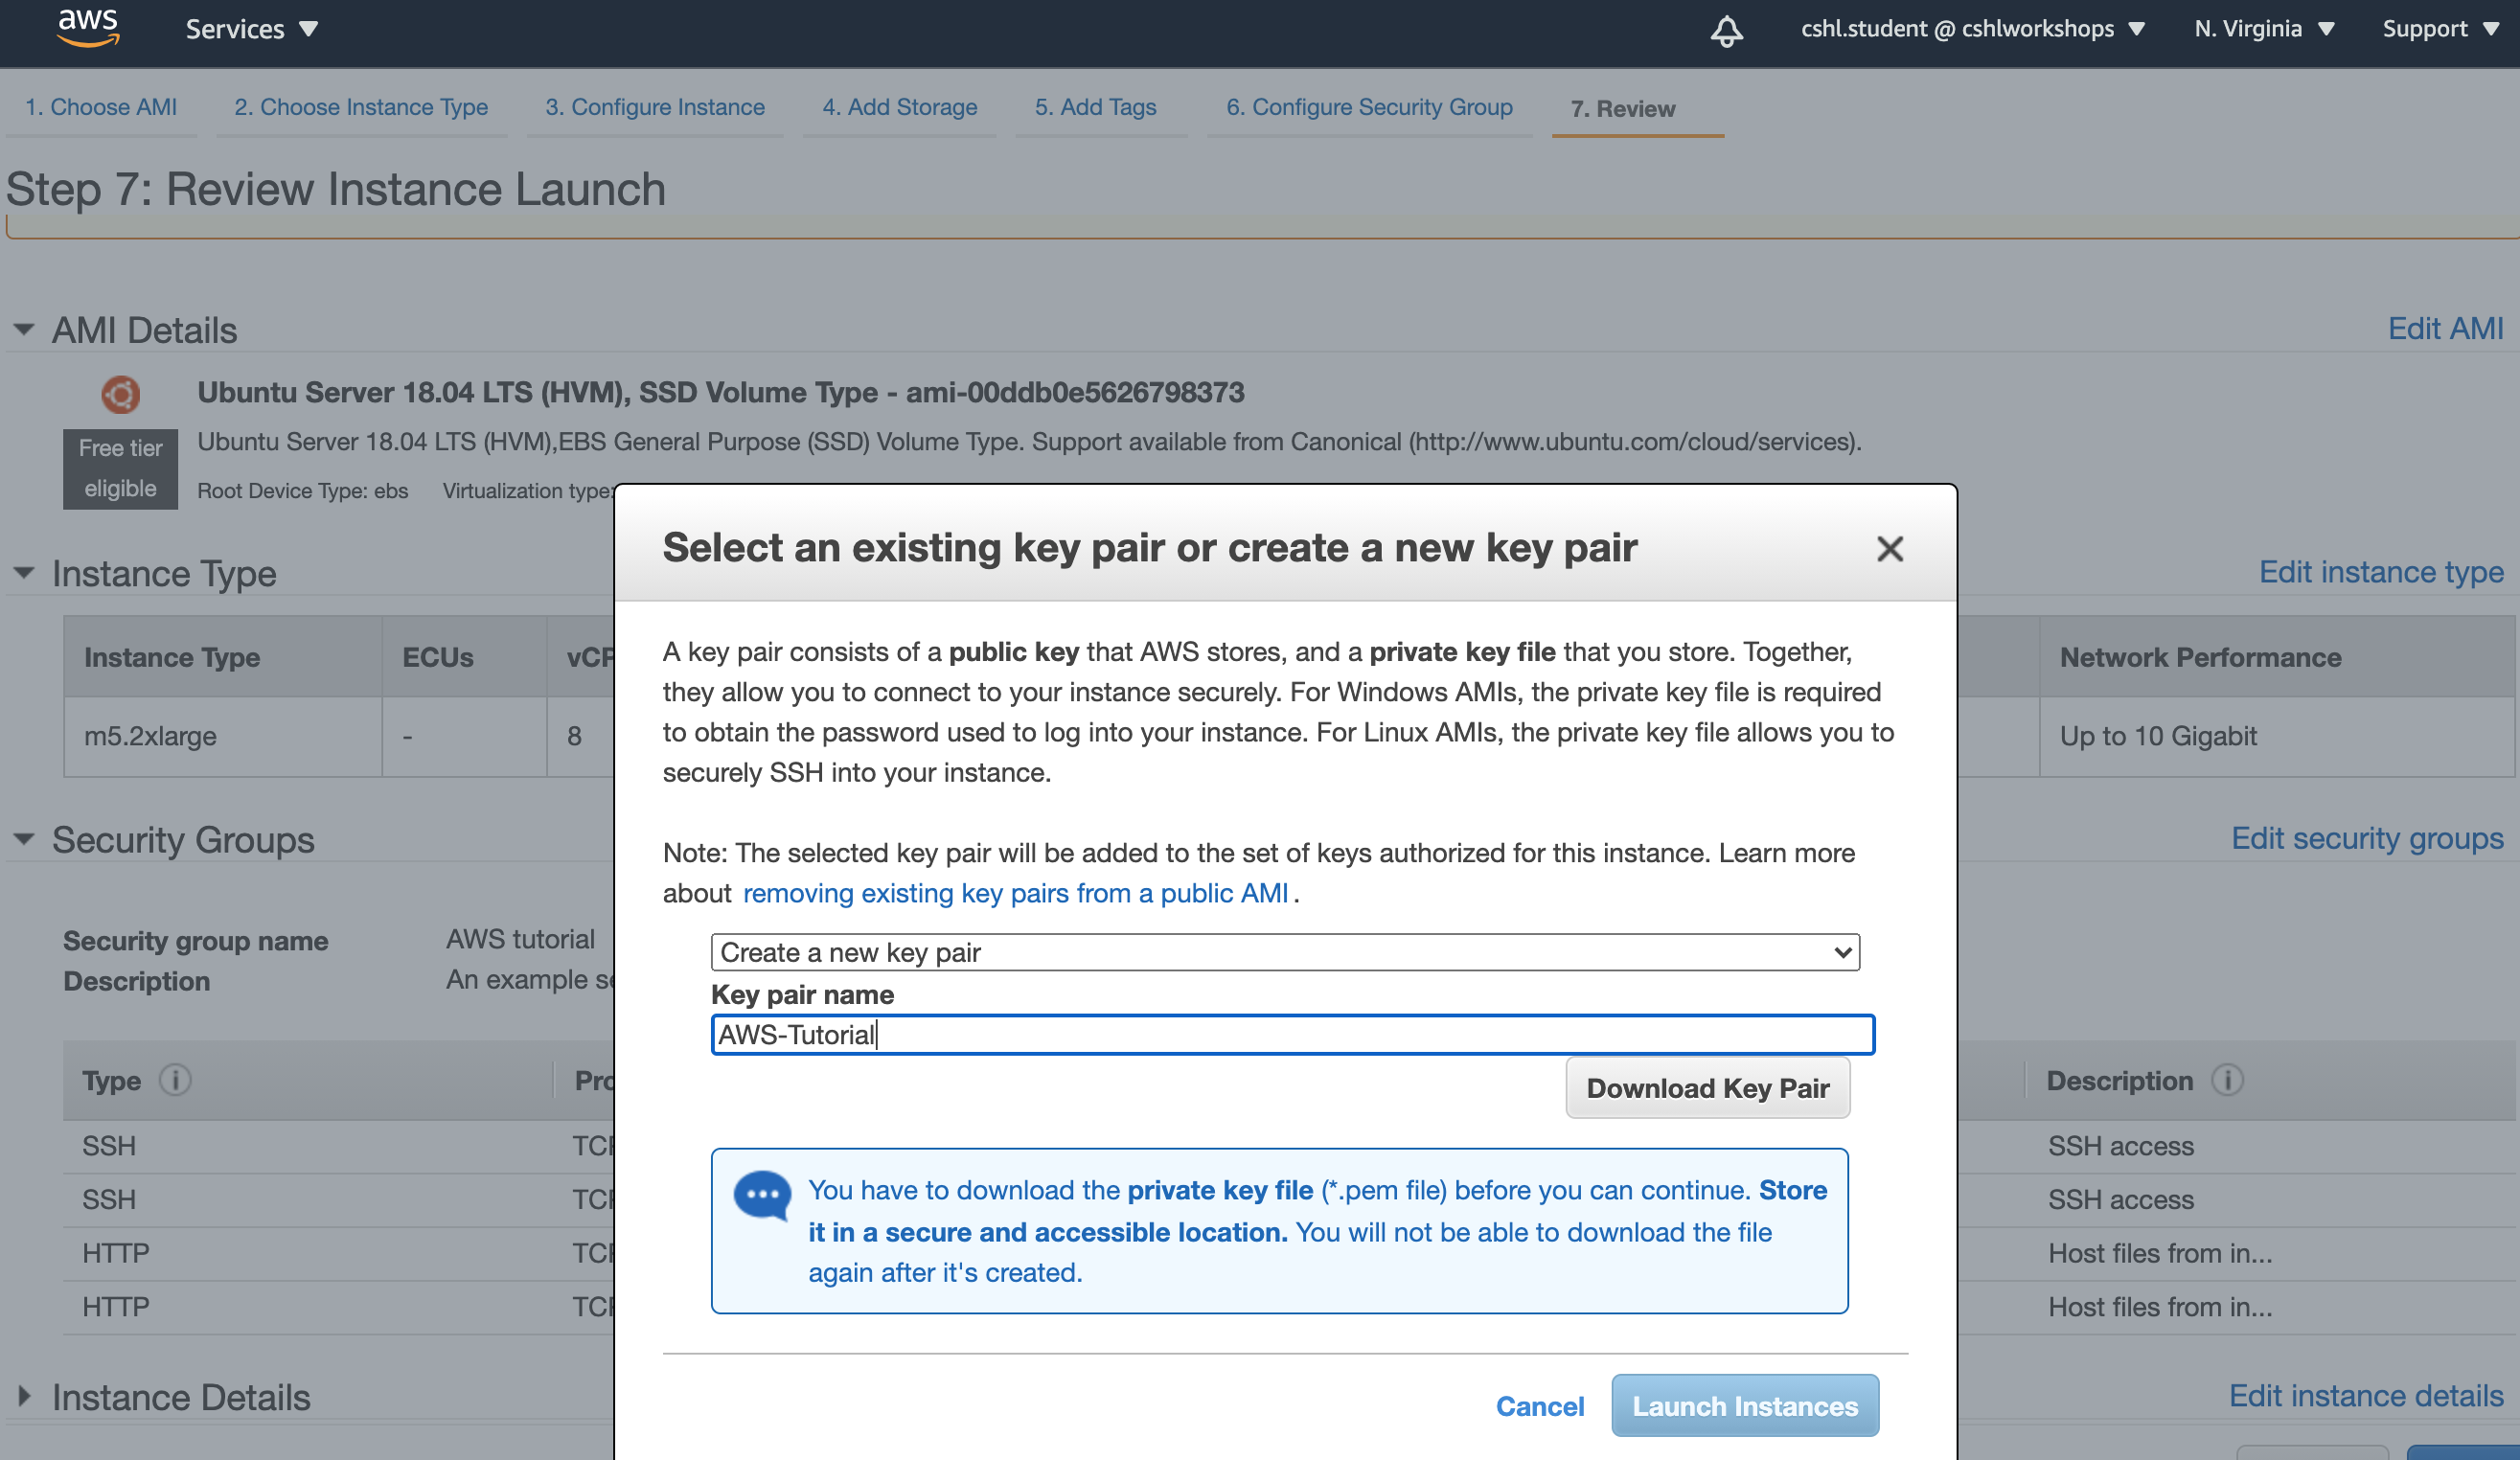
Step 8. Assigning a Key Pair
You will now be presented with a final, but very important configuration step, assignment of a Key Pair. A Key Pair consists of two keys, a public key and a private key. The public key will be stored in AWS. The private key will will be presented to you on creation and it must be saved by you to allow you to log into your instance later. If this is your first instance you will have to Create a new key pair. In the example below we have chosen to create a new key pair called AWS-Tutorial. Once the name is chosen, press the Download Key Pair button. You will download a simple text file called AWS-Tutorial.pem. Store this file somewhere on your computer (e.g. your home directory) and remember the location. The contents of this file will contain an RSA key that should look something like this:
-----BEGIN RSA PRIVATE KEY-----
MIIEpAIBAAKCAQEAhEpF18lIUouMH8qia/BSB70vrQVq/mTTkiRbsACB78rzy3XGRMfvwUseIsGY
H6SDOAFrRlmTrAArH5A0t2TZ8PKrq7b9FtEAvMCeE7rWEiqBblAWiER0k1pbnIqyKJJCo1YRSUs0
oNMdvjB4CUylYraSsSNFYJG5gRwcNhBENLDVnDS79geQcPLu/JeEiJ9V+w+CCYAG40f7li/TuULr
rSy6Oq6jgn2Gy7rrHU7XHU5hcEvxuSeoLb8h/bH1N+cN/H7x3ipEjIDdA2ScCkRXum1V6/kTFQFq
vDG0lqoTlmTNKgDGpb+rdzJgOg/3QX4RSrX/c0W6aFkV9Ib/jQxT+wIDAQABAoIBADAvWXc6wpQG
bjiaN0T3mPlmqHnuEkWs9f8yLQ9TcACmvNwr/tbIuISAVu6z8zP7WSxKIAfU0twAh7SMcxclrdh8
m5kFIvRvlkQqKKnpENY3E0PZ+gsSXB/b9qhzQGdUtt8Fl3BJ61Z07016HA7PEyJ8e7v3q+p7ycTE
N2Zd0GocRIX8zxdRo9GS8ouS0QcFgNF8KblzlJ6Vs0gI7o7mIRZIm9vWkuR9Lp9uEPD2flUIvN3z
yRmY/FE/R1yc76Uq+g8eywifRAh+GFyyO8PmFoYRni4Ki6+tEIFaq5JauT0JJF66EZeZP8ZKoWm9
1K30Ucti2D5l8t+CpbBM5JxhmjECgYEAxz1ET42F1sBGYqNn5hmfjrRp+YF3EYz2awRSibOeerpJ
Bh1QZeB7/QD3wcB00XFiMu/3haP9xs4eesjSSug+1F59nyzDplNsybz1sYpUQwP9LjX0loUCIb8r
3O2VdLJ5ZJ9dfNgpStC/wi7kkr8xjK5XiHgP6DLk6+H1Lr2d+kMCgYEAqfpUseZ/sm1vYt80LlWI
r8ozsUmzuISRspGVUppyDD47Iyj/1mkiWnsFDDl07oBcFIUFIEd1rkJNB3gXKSr76kcY0X4lav7a
0dvse2T9PC/pLSFkax9UjVnydCN8ElyNoXI2wT5HuLDjjCmHBD/4E9ZOO201JICSbRxaykl17+kC
gYEAxRiWuxwFiqwq9Okxny856LIRJAIvB+2q17Mu84n8/OvL0YCuSBoKjf6nGcSJy6eevUUmV84i
/sho3o5Lek7F2NCg9RYTdjaRKAEGDNwK/0Cy9UPq8fwiX7/+ZE+jyg3EiQYeNaKhNqHLEQ3SkFkT
a1gMv7QGCG5QiAi/w71QyoECgYARcn+VDyrWXsNLK8wIYYE5QhESRpVrADiQUr84DmBcf1rEniW8
lWgQT4ZSHeexv300If9Hs+4RZ/7OIHaIJEBdaNTUVBV1KRm+5sscU15m+if+GOpc0Id2RuBLKYVH
wTZMdxPFvCXSgF2q+mxAdGx7ZMj88pW83HGrP3jWQLoZWQKBgQCX5jxy3QXlPpwDppqwKKBQ8cGn
YDDQHCeD5LhrVCUqo5DCobswzmGKU/xEqYsqlk/Mz1Zkvg4FbJwJDgQGkSyAu071NLi0O6w27dm+
UHuvF5mCDdAHWirFUBSiebxOpEQnkZ9IPXUUCSC6IQvPFbdGN8G3WjoER6Lw121Q4rJxGA==
-----END RSA PRIVATE KEY-----
If this is not your first instance and you have already created a key pair, and you still have that key file, you can choose to use the existing key pair.
Step 8. Select an existing Key Pair or create a new Key Pair:
To prepare for logging into our instance, lets create a directory on our own local computer (i.e. the one you are sitting at) and store the key file there. Later we will use this file to log onto the AWS instance. We are using a mac system. To create a directory and move the key file we downloaded into that directory we can down the following in a Mac Terminal session:
mkdir ~/AWS-Tutorial
mv ~/Downloads/AWS-Tutorial.pem ~/AWS-Tutorial
cd ~/AWS-Tutorial
chmod 400 AWS-Tutorial.pem
ls
The chmod 400 AWS-Tutorial.pem command changes the permissions of your key file so that only you can read it. This is an important security setting. If you attempt to log into your instance using a key file with inappropriate permissions, the login command may fail. So you should always perform this command on any new key file (or copy of such a file) before attempting to use it to log into an instance.
Step 9. Reviewing launch status
Once you have launched your instance, you will be presented with yet another review page. When you are ready, proceed to the next step by hitting the View Instances button.
Step 9. Review launch status:

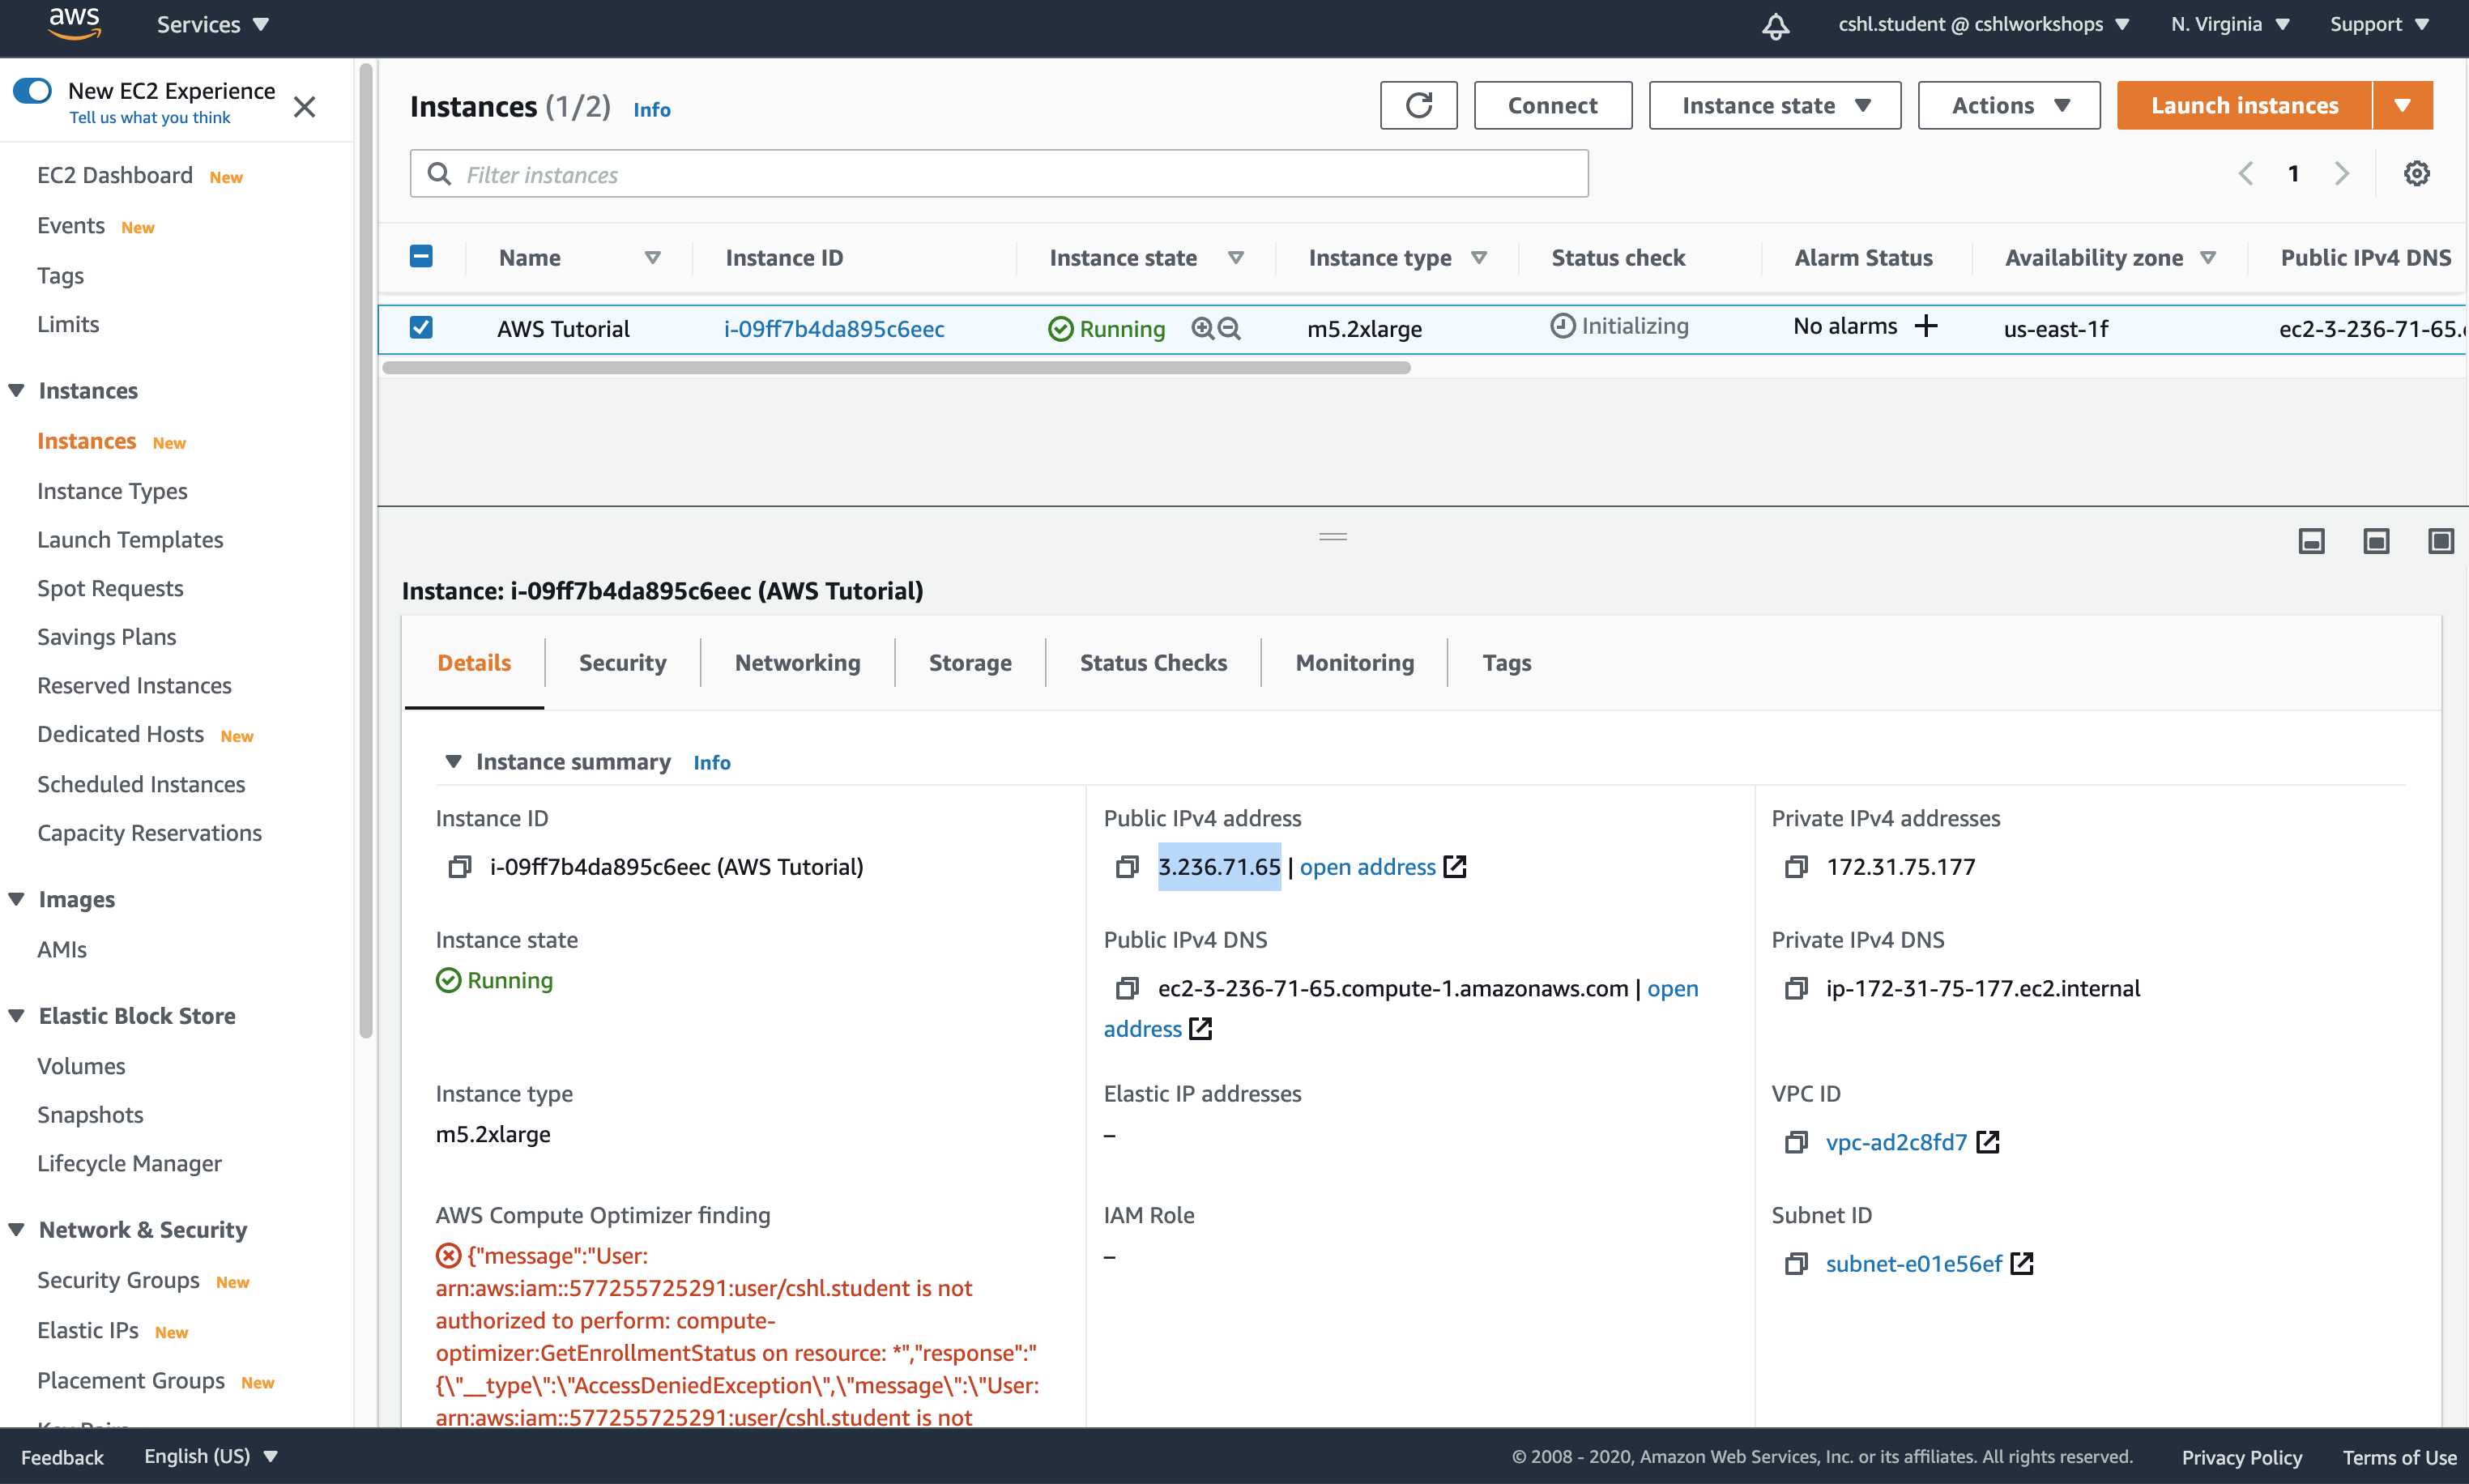
Step 10. Examining a new Instance in the EC2 Console
You should now see the EC2 Console view for a new instance. This view shows a table of all Instances you have created in the current Region. When an instance is terminated it will remain visible in this table for a brief time and then will be automatically removed. You should see a single entry that when selected looks much like the example below. After a few minutes, your instance should achieve an Instance State of running. Note the incredible wealth of information available both in the table and in the Description view below. Much of the configuration we described above will be summarized here. To work effectively with your instances you will need to become familiar with certain features of this EC2 console view. For example, the Name, Instance Type, AMI ID, Root device type, Root device, and Block devices will help to remind you what kind of instance you configured. In order to remotely log into the instance, the following items in the console will be relevant: Instance State, Key Pair Name, Security Groups, and Public IP (or Public DNS). Try to familiarize yourself with each of these features and how to find them in the console for each instance you have have running.
To modify an instance in the EC2 console you can select that instance (or a series instances) using the blue check boxes at the left. You can then perform various tasks using the Actions menu. You can also right click on a single instance to obtain a similar menu. Before logging into this instance lets take a momemt to examine various important sections of the EC2 console in particular the EC2 Dashboard, Volumes, Security Groups, and Key Pairs. In each of these views you should see new entities that correspond to the instance we just created.
Step 10. EC2 Console view of a new Instance:
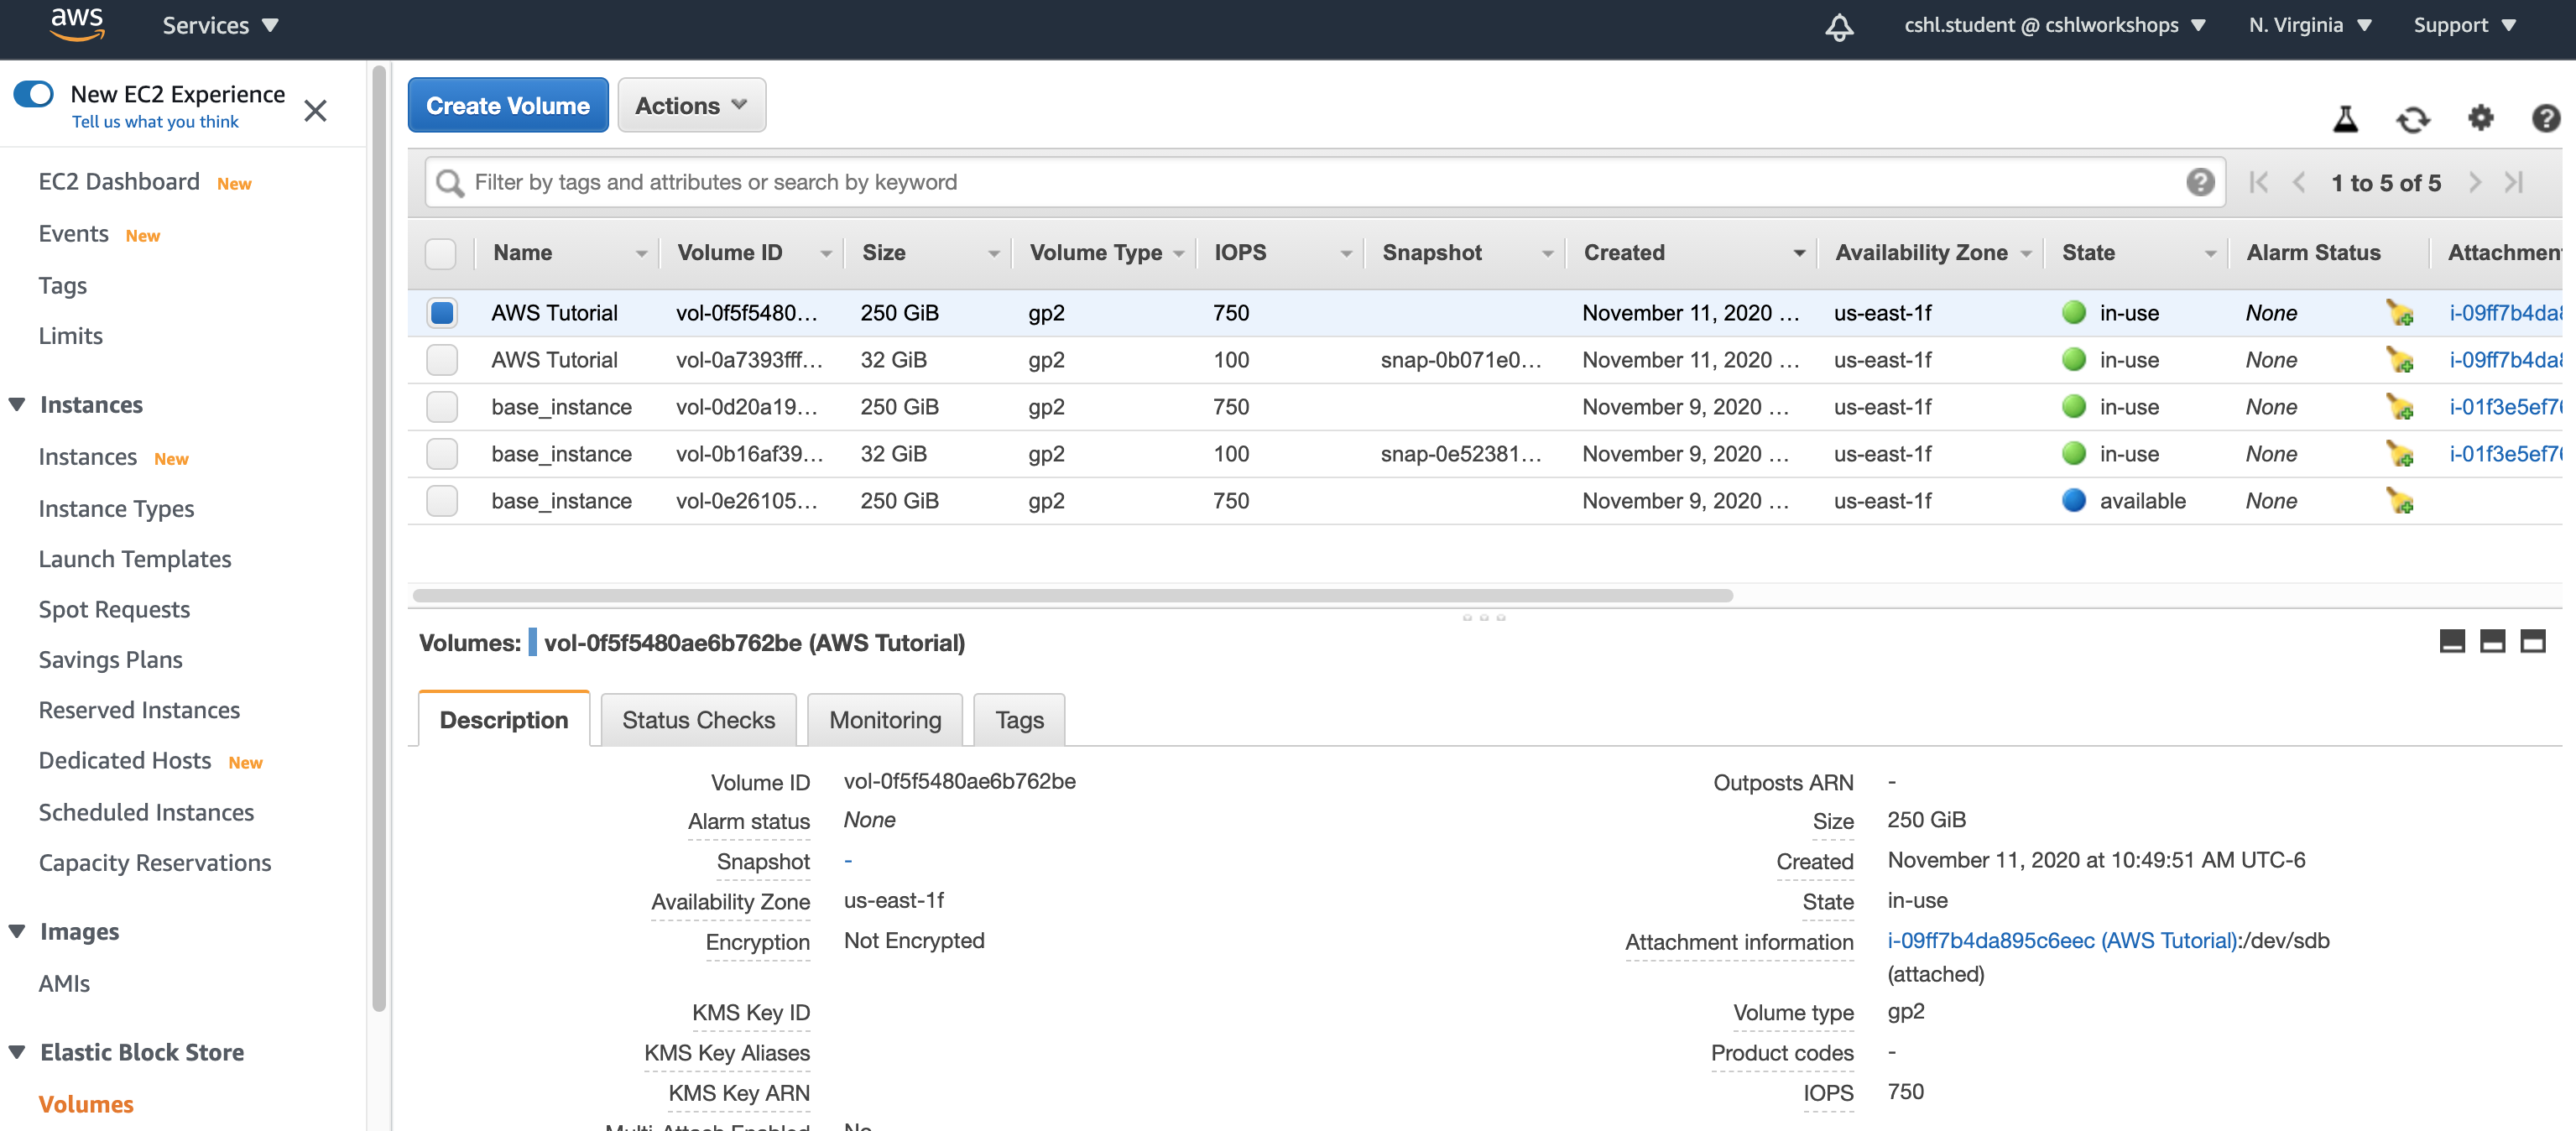
The EC2 dashboard should now show a running Instance, Volumes, etc.:

Review new Volumes:
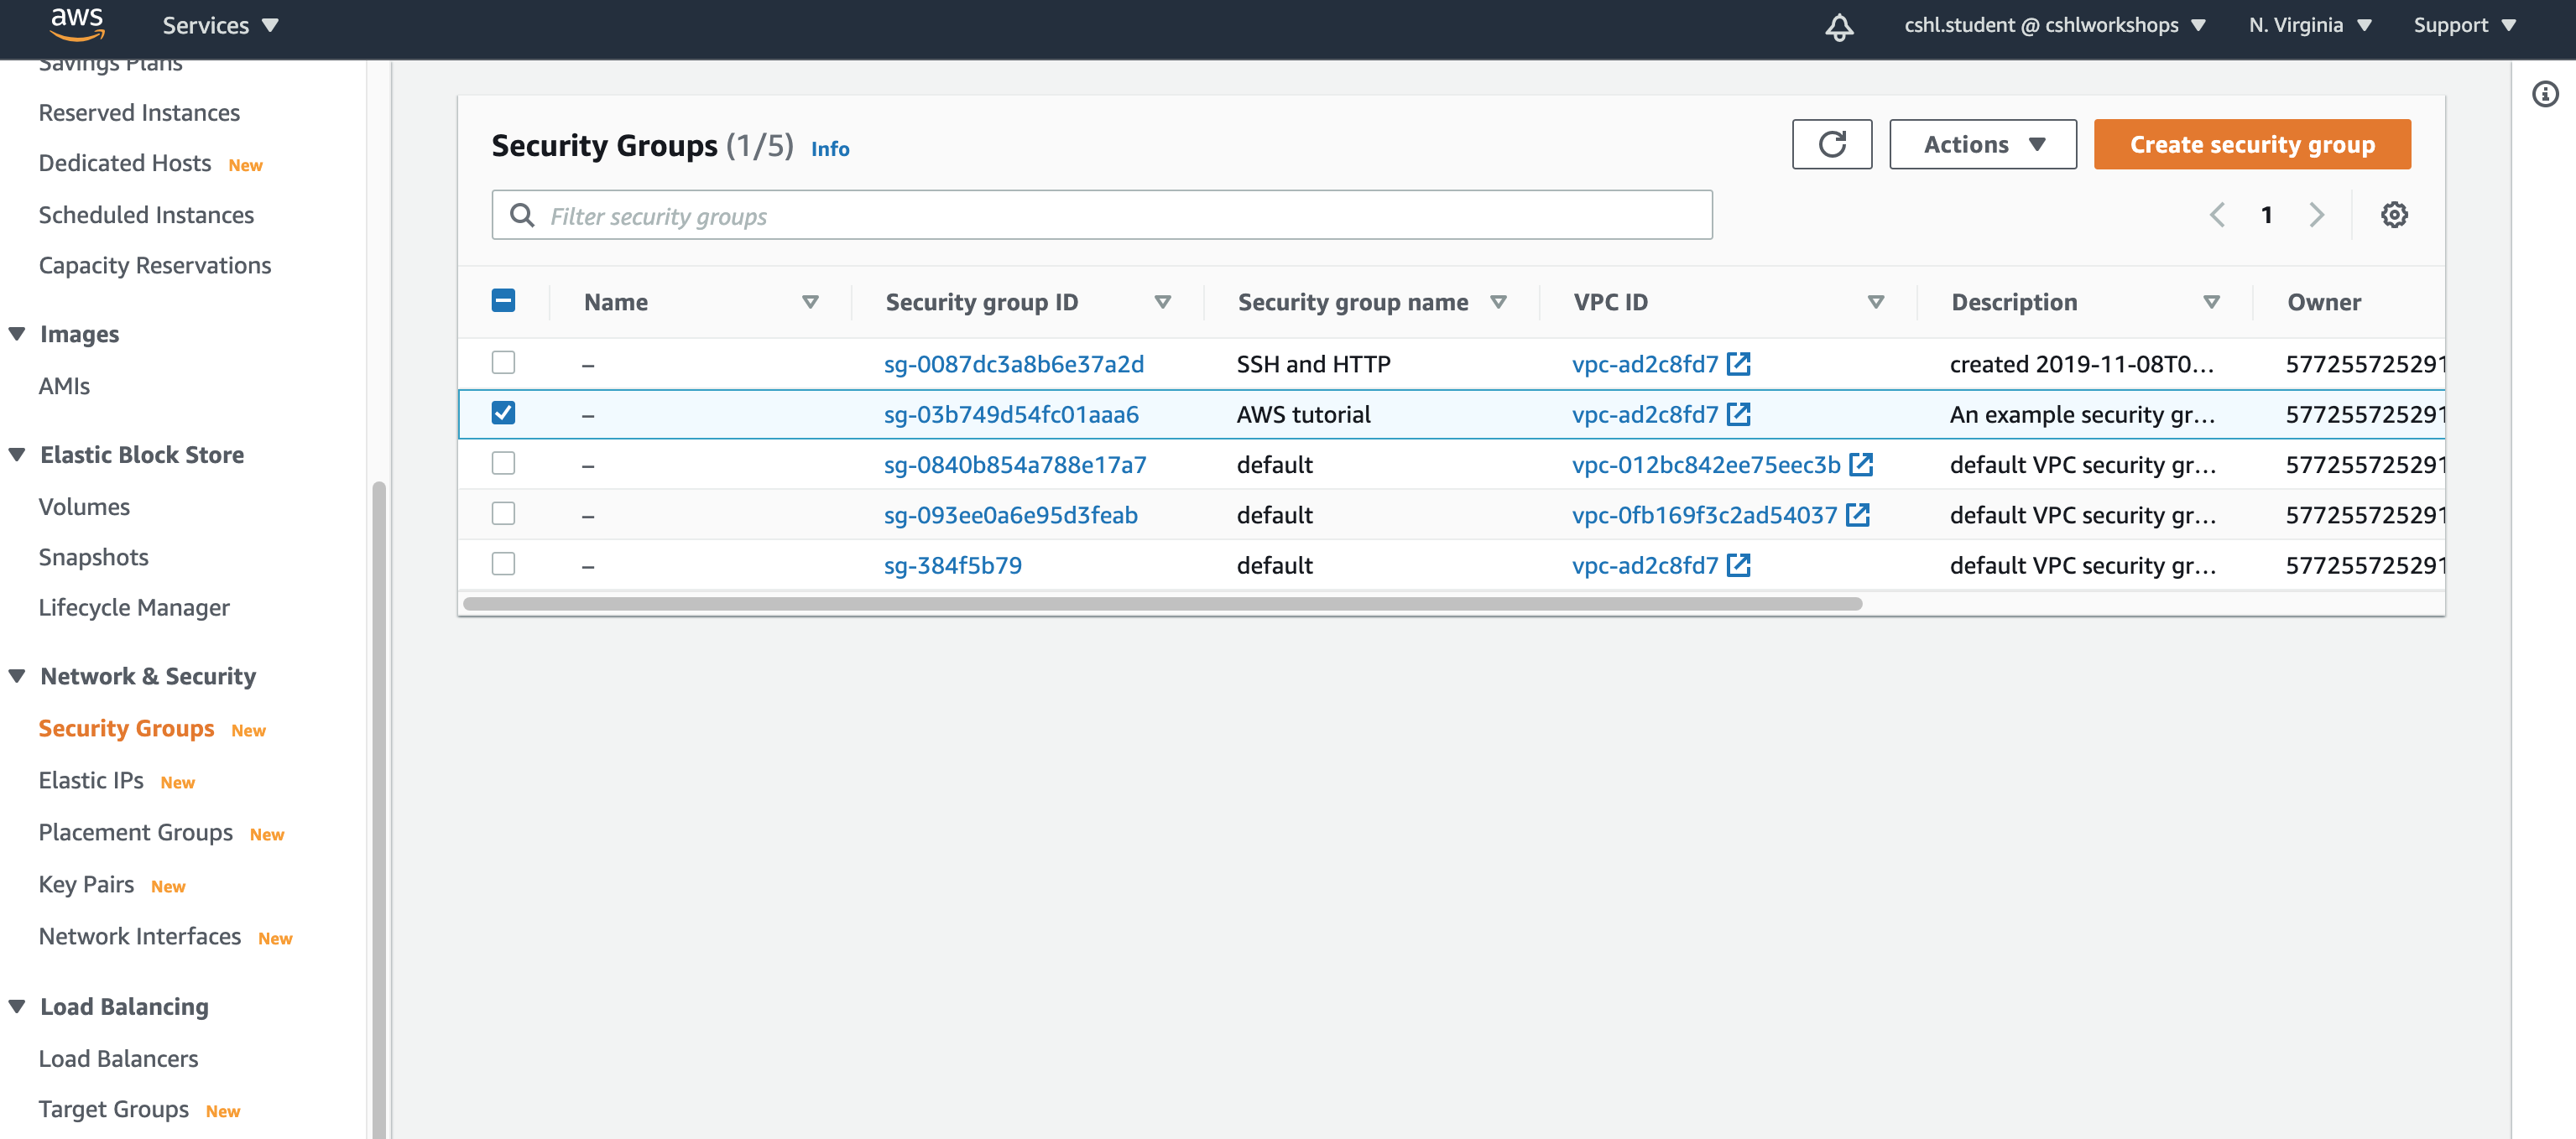
Review new Security Groups:
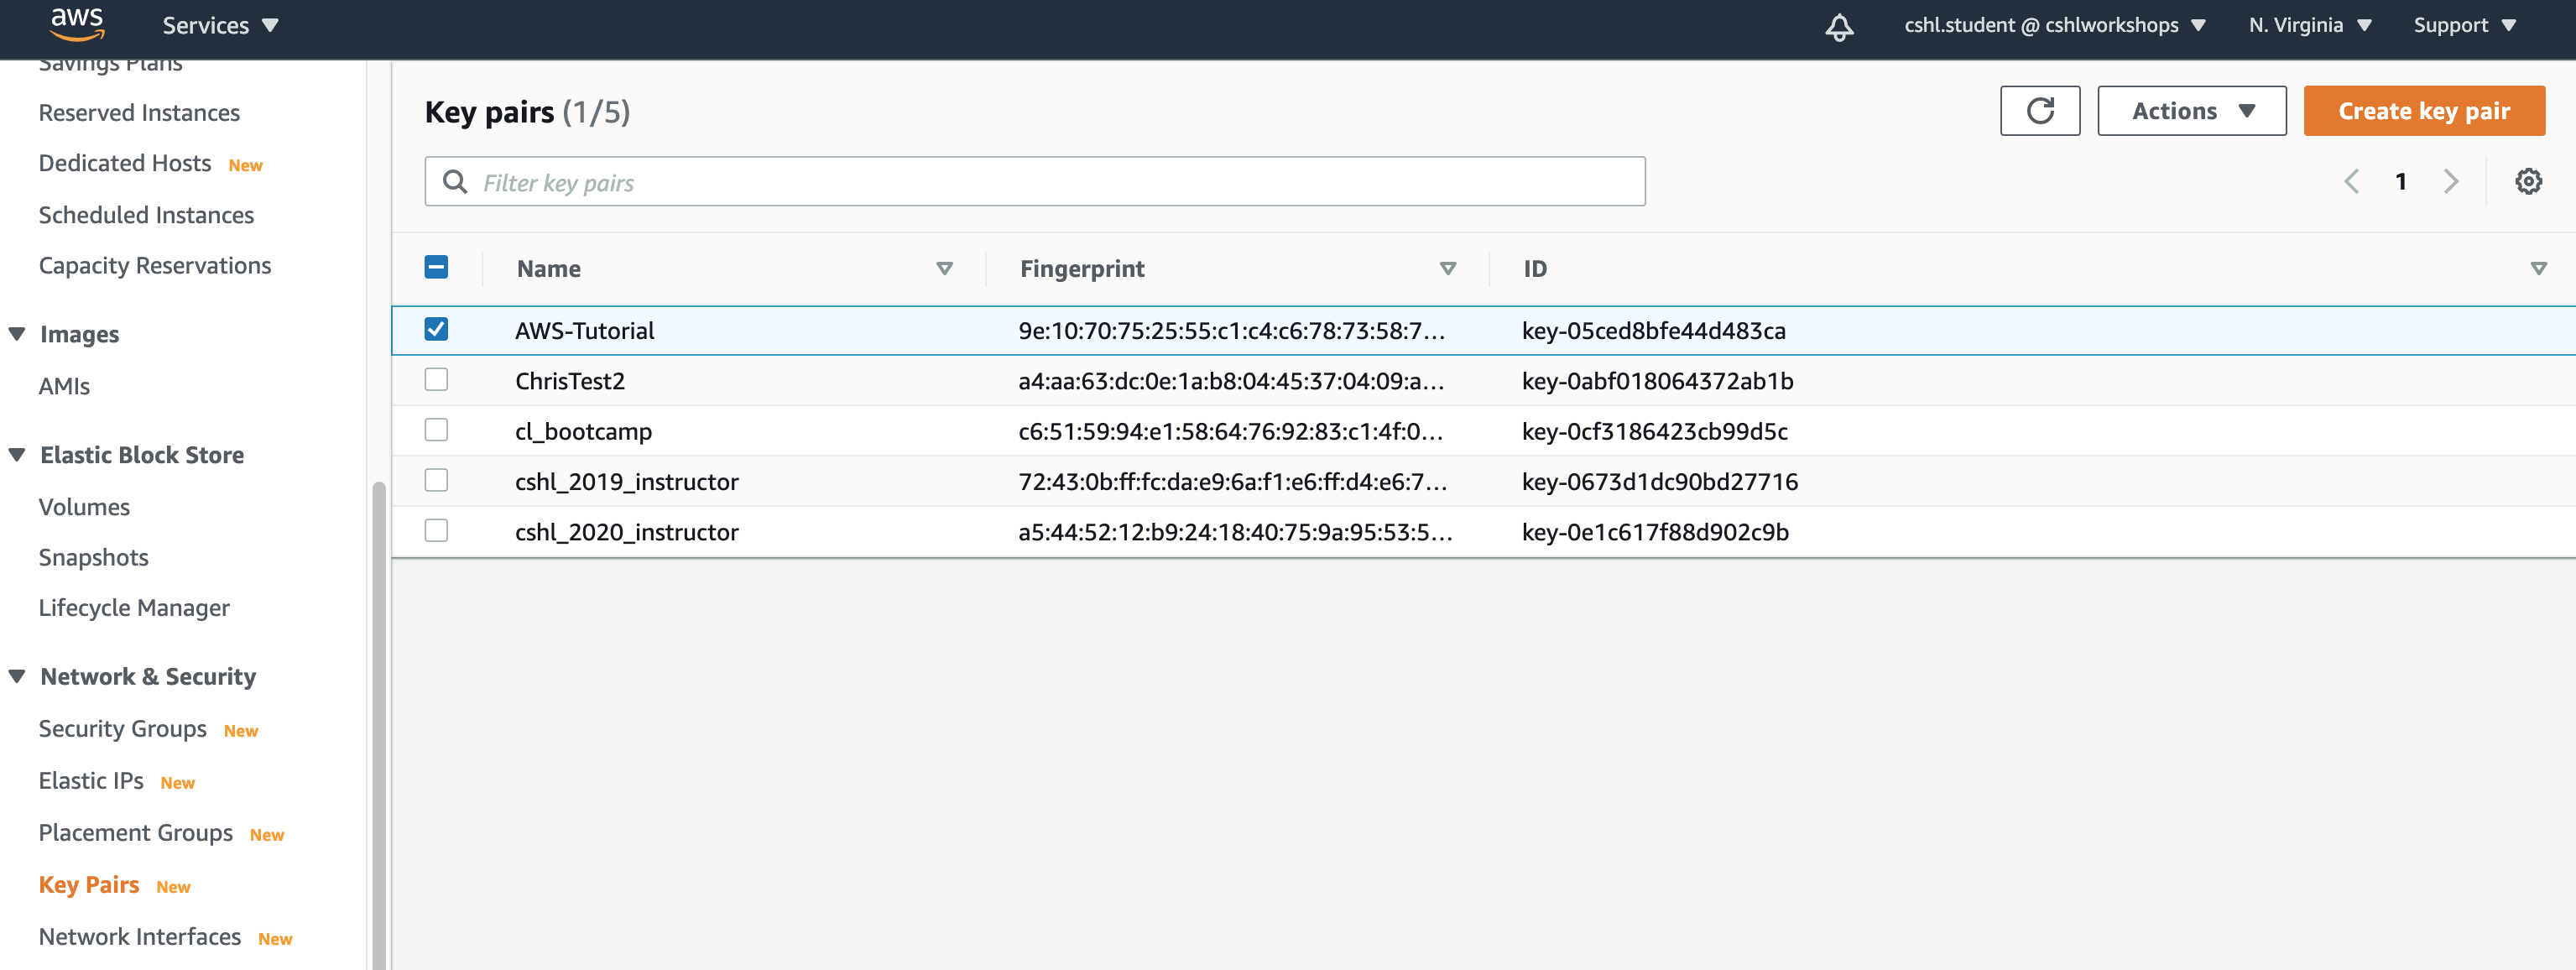
Review new Key Pairs:
Step 11. Logging into an instance
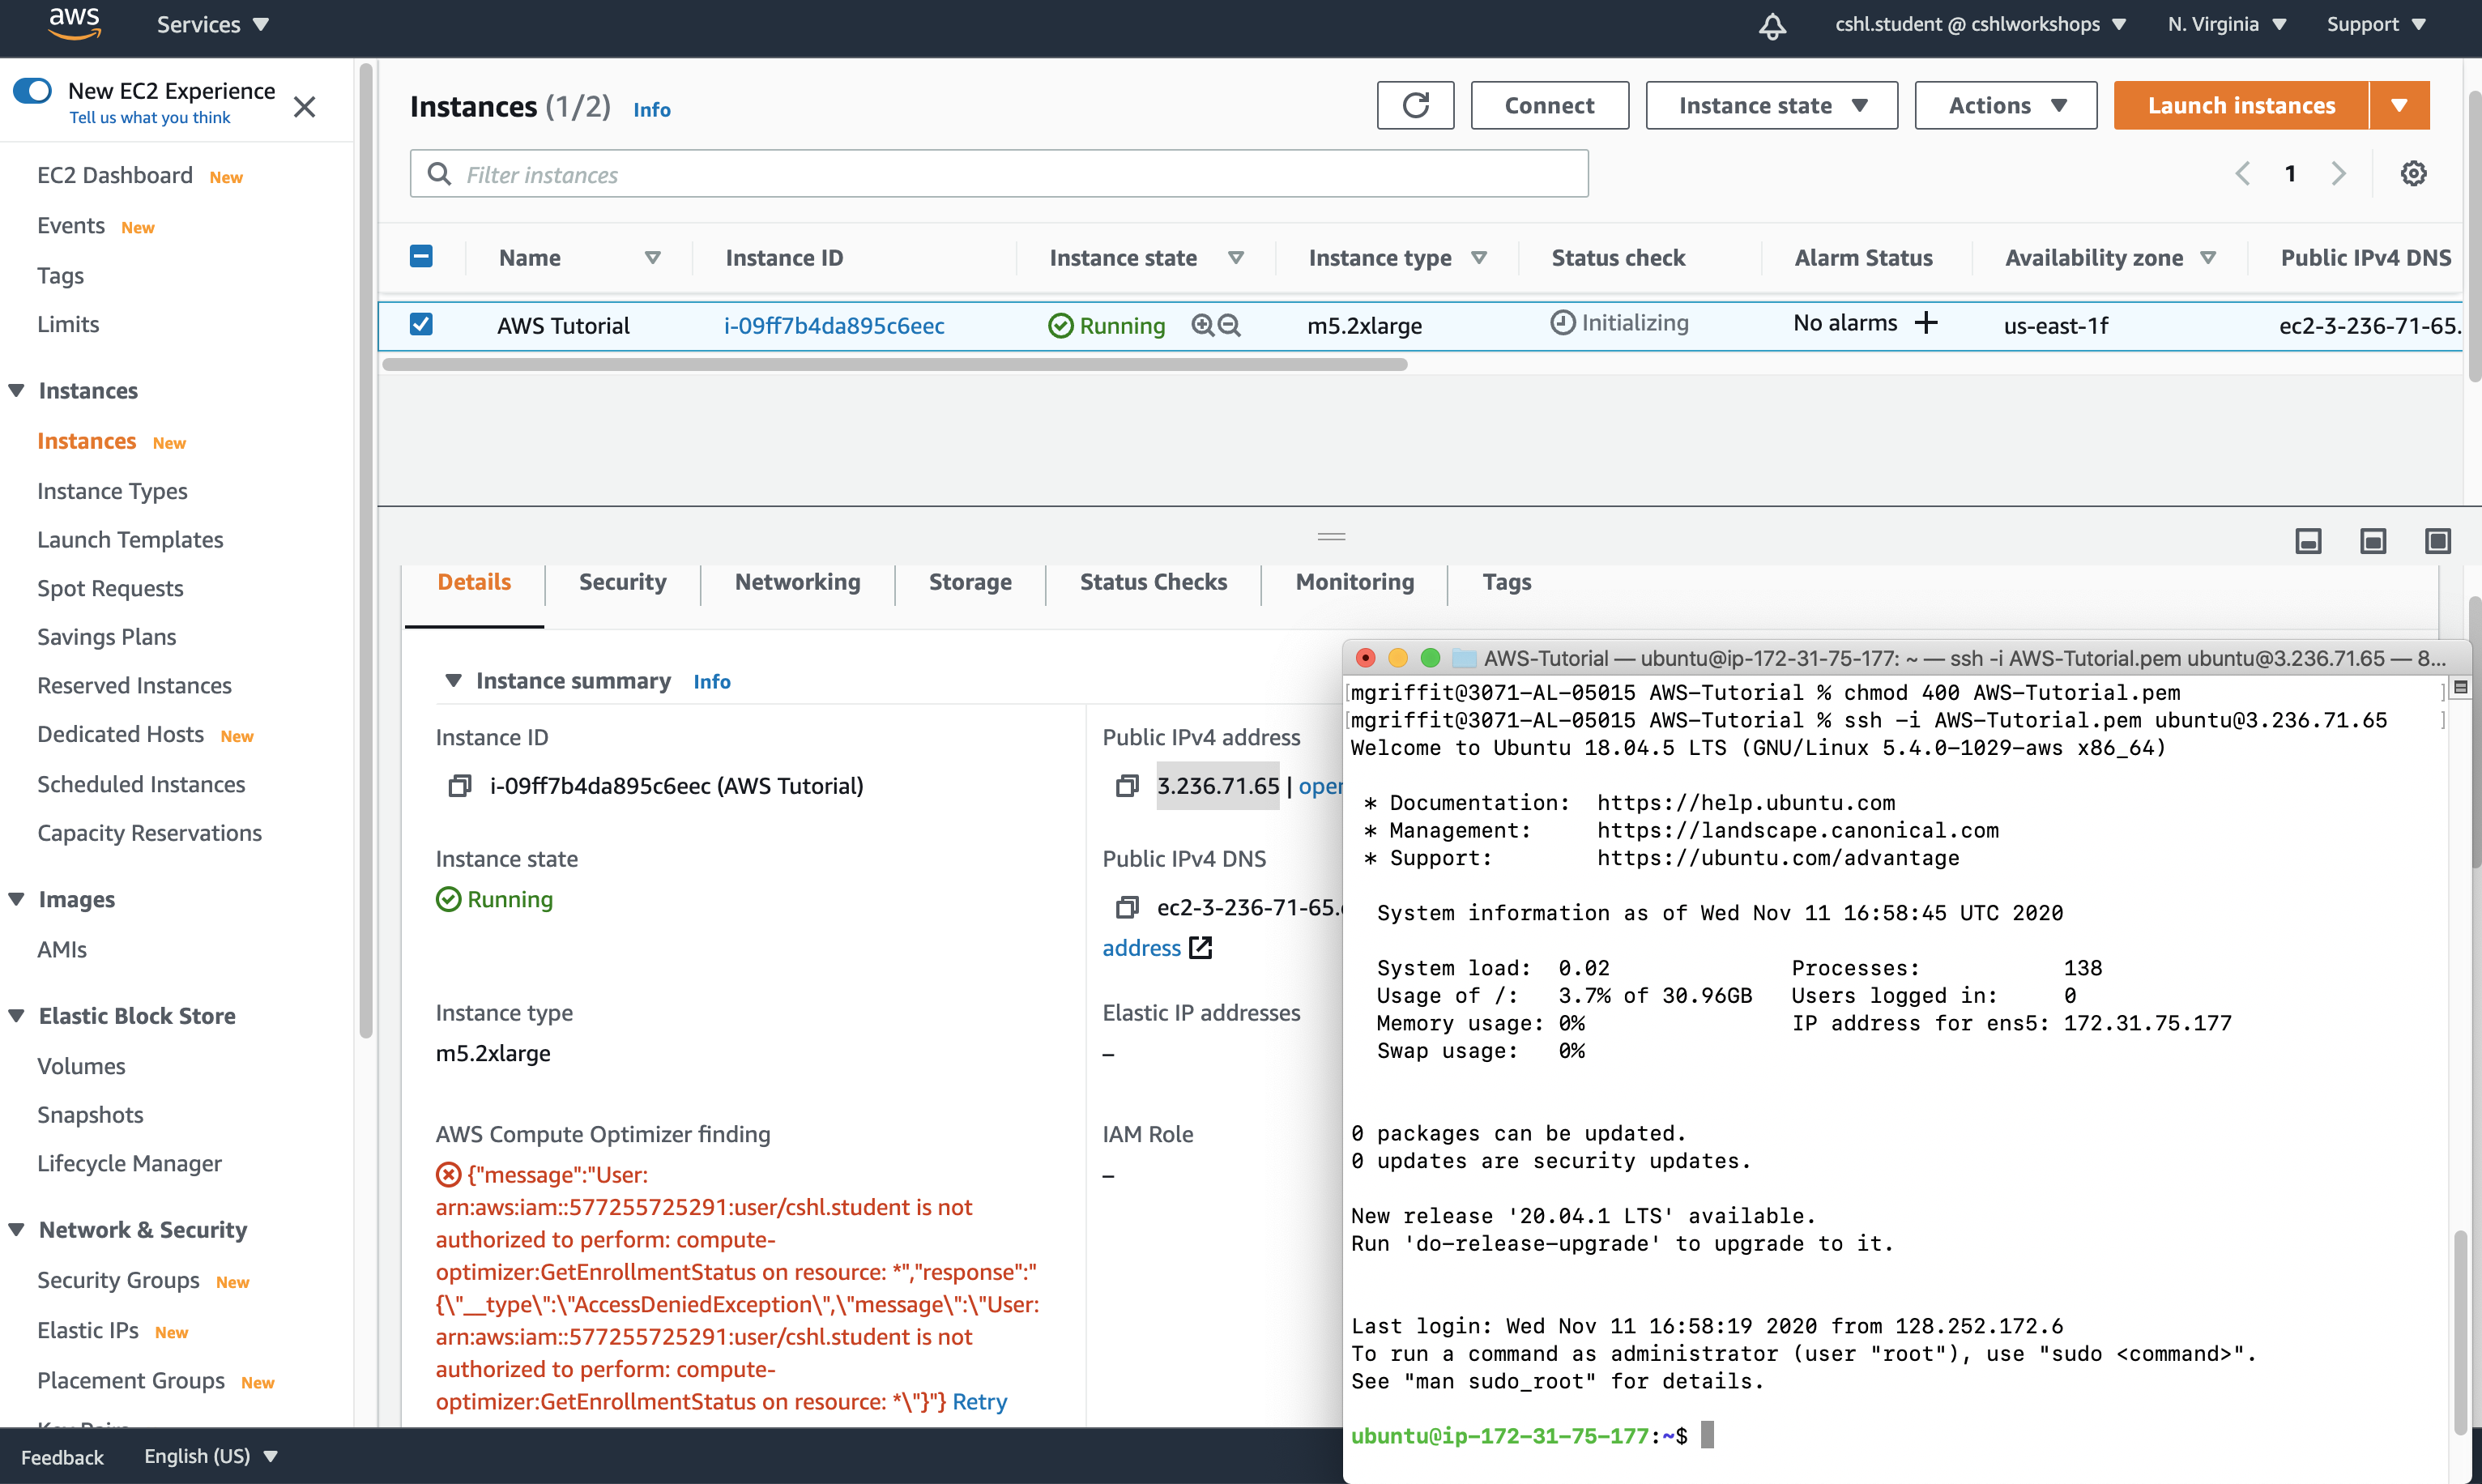
We are finally ready to log into our instance. To do this, open a terminal session on your local computer (e.g. using Mac Terminal or Windows Putty). Change directories to the location where you stored your key file AWS-Tutorial.pem. Now at the same time, view your instance in the EC2 console. Make sure that the Key pair name for this instance matches the .pem key file. Also, get the Public IP value from the console and use it instead of the example one below. Note that you could use the Public DNS value instead if you want. Finally log in as follows:
cd ~/AWS-Tutorial
chmod 400 AWS-Tutorial.pem
ssh -i AWS-Tutorial.pem ubuntu@52.5.92.87
In this example, we open a terminal command line session on our local computer. We moved to the location of my .pem key file. We then made sure the permissions of this file were set correctly using a chmod command. You only need to do this step once but there is no harm in doing it again. Then we executed an SSH command to remotely log into our AWS instance using the Public IP 52.5.92.87. Our SSH command included an option to use the .pem file to identify us as the owner of the instance. We logged into the instance as a user called ubuntu because that is a user that we know will be defined by default on all ubuntu systems. Once logged in you can create new users if you wish. If your login is successful, you should see something like that shown in the screenshot below.
Step 11. Log into Instance:
Trouble-shooting and advanced topics
I can not log into my EC2 instance, what might have gone wrong?
If you tried the above and it did not work there are several possible explanations.
- First, check the
Instance Stateof your instance in the EC2 console. Is itrunning? When you first start an instance it takes a few minutes to boot up. Similarly, if you reboot the instance for some reason, you will not be able to log into it until it comes back online. - Second, are you in a terminal session in the directory where you stored your
.pemkey file? - Third, is this the right key file? Each instance is associated with a single
Key Pairand you must have the key file that was created when thatKey Pairwas created. If you delete a key file and later generate a new one, it will not work with instances that used an olderKey Paireven if you name the file the same thing. - Fourth, have you set the permissions for your
.pemkey file correctly. Do not forget to runchmod 400 *.pemon your key file. - Fifth, did you remember to include the
-i key_file_name.pemin your SSH command? - Sixth, did you remember to specify what user you want to log into the system as? You must include the
ubuntu@(or other valid user name) before the IP address to log into an Ubuntu system by SSH. - Seventh, did you specify the correct IP address for the instance you want to log into. The value after
ubuntu@must match thePublic DNSorPublic IPvalue that is shown in the AWS EC2 Console. Note that there are alsoprivateversions of these two values. Only thePublicversion will work from your local computer. - Eighth, does the
Security Groupused for the instance allow Incoming SSH Access? Make sure yourSecurity Grouphas an entry for typeSSH, protocolTCP, port22, from sourceAnywhere. If you have to change theSecurity Groupsettings to allow access, you will have to reboot the instance before they take effect.
How do storage volumes appear within a Linux instance on Amazon EC2?
Now that you are logged in, you can investigate how the storage options you choose when creating the instance manifest inside an AWS Ubuntu instance. First try using the command df -h to view existing storage devices that are mounted. If you created a system exactly as described above, you should see one device (/dev/nvme0n1p1 of 32G mounted as /). This is the EBS root device volume that we configured for the m5.2xlarge instance type we chose. Remember that we added an EBS volume that was 250 GiB in size. Where is that device?
It is not currently mounted. To view all devices the system knows about you can do something like this command: ls /dev/ or ls -1 /dev/ | grep nvme. You should now see two devices: nvme0 and nvme1. Lets format and mount the device xvdb to a new directory data as follows:
lsblk
cd /
sudo mkdir data
sudo mkfs -t ext4 /dev/nvme1n1
sudo mount /dev/nvme1n1 /data
sudo chown -R ubuntu:ubuntu /data
df -h
lsblk
NOTE: Refer to AWS docs about using EBS Volumes for more details.
Now the same df -h command we performed above should show a new volume /dev/xvdc mounted at /data of size 493G. Note that in order to make this new mount persist when we reboot the machine we will have to add a mount line like this to the /etc/fstab file (e.g. by sudo vim /etc/fstab):
/dev/nvme1n1 /data auto defaults,nobootwait 0 2
Taking stock of compute resources within an Ubuntu Linux instance
To examine other resources within the Ubuntu instance you should familiarize yourself with the command top (press 1 to show CPUs and q to exit). You can also learn about the system by examining cat /proc/meminfo, cat /proc/cpuinfo, and lsb_release -a.
Basic setup and administration of an Ubuntu Linux instance
To update your Ubuntu OS to use the latest security patches etc. you can do the following:
sudo apt-get update
sudo apt-get upgrade
sudo reboot
Setting up an Apache web server
If you want to easily retrieve or share data created on your instance, one option is to start an Apache web service on the instance so that you can browse the contents of certain directories remotely in a web browser. Note that when launching the instance our security group was configured to allow http access via port 80 so that this would work.
- Edit config to allow files to be served from outside /usr/share and /var/www
sudo vim /etc/apache2/apache2.conf - Add the following content to apache2.conf
<Directory /home/ubuntu/>
       Options Indexes FollowSymLinks
       AllowOverride None
       Require all granted
</Directory>
- Edit vhost file
sudo vim /etc/apache2/sites-available/000-default.conf - Change document root in 000-default.conf
DocumentRoot /home/ubuntu - Restart apache
sudo service apache2 restart
You should now be able to enter the Public IP or Public DNS in a web browser on your local computer and browse the contents of the /home/ubuntu directory on your AWS instance.
What is difference between the ‘Start’, ‘Stop’, ‘Reboot’, and ‘Terminate’ (Instance States)?
From the AWS EC2 console, you can change the state of each of your instances. The Start command will boot a system that has been powered down. The Stop command will power down the instance and is similar to performing sudo shutdown from within the instance (if you have configured your instance that way during creation). Do not forget that if you stop an instance with ephemeral Instance Store volumes, the contents of these volumes will be lost. The Reboot command will simply reboot the machine. This is equivalent to using a sudo reboot command from within the instance. The Terminate command will destroy the instance and any ephemeral Instance Store volumes associated with it. If the root device is an EBS volume it may or may not be destroyed depending on how you configured the instance during creation. If there were additional EBS volumes associated with the instance and you Terminate the instance, these may also be destroyed if you selected that option when they were being created. Before terminating an instance you should think carefully about whether there is data you want to save and if so, how the volumes will behave on termination. Similarly, if you want to destroy all components of an instance, including all associated volumes, you may need to terminate the instance and then separately destroy certain volumes.
How do I create my own AMI? How do I publish my AMI to create a community AMI? What is a Snapshot?
If you have configured an existing AMI for your own purposes and you would like to save this work, one option is to create your own custom AMI. You can save an existing instance as a new AMI in the EC2 console by right clicking the instance and selecting Create Image. Enter an appropriate name and description and then save. You can monitor the creation of you AMI in the AMIs section of IMAGES in the EC2 console. Once complete, your new AMI will appear in the My AMIs section when you create new instances. If you would like your AMI to be listed in the Community AMIs where it can be shared with others you can change the permissions of the AMI to public. Remember that AMIs are region specific and you need to copy the AMI to any additional regions where you would like it to appear in Community AMI searches. Each AMI you create will be associated with a Snapshot stored on an EBS volume. You will be charged to store these. If the AMI was large and you make it available in multiple regions, these costs could add up.
Tidying up and shutting down AWS resources
Once you are done with this tutorial you should terminate or delete all resources that were created to ensure you are not charged. Specifically you should remove: Instances, Volumes and Snapshots. You may also decide to remove other entities that were created for demonstration purposes including: Tags, AMIs, Security Groups, and Key Pairs. All of this can be done in the AWS EC2 console. When you are done, the EC2 Dashboard should show 0 for all resource types except Security Groups where a single default security configuration will remain.
Further reading and preparing for more advanced AWS cloud computing concepts
This is a basic introduction to AWS cloud computing that assumes all configuration of the instance will occur within the AWS EC2 console of your web browser and all configuration of the Ubuntu Linux system will occur by the user manually executing commands and perhaps saving the outcome as a cusom AMI. For large scale computing and complex deployments of compute infrastructure on the cloud these methods will not be sustainable. Here is a list of more advanced topics for discussion on how to move beyond the console and automate configuration of your system:
- Use of the AWS command line interface (CLI)
- Use of the AWS EC2 API
- Use of AWS SDKs
- Use of S3 and glacier
- Use of vagrant to launch AWS instances
- Use of puppet to configure Linux systems